Zenith royal 710

This is the 2 pages manual for zenith royal 710.
Read or download the pdf for free. If you want to contribute, please mail your pdfs to info@audioservicemanuals.com.

Page: 1 / 2
left right
zenith royal 710

Extracted text from zenith royal 710 (Ocr-read)


Page 1

VOLUME R-ZO, MOST-OFTEN-NEEDED 1960 RADIO SERVICING INFORMATION

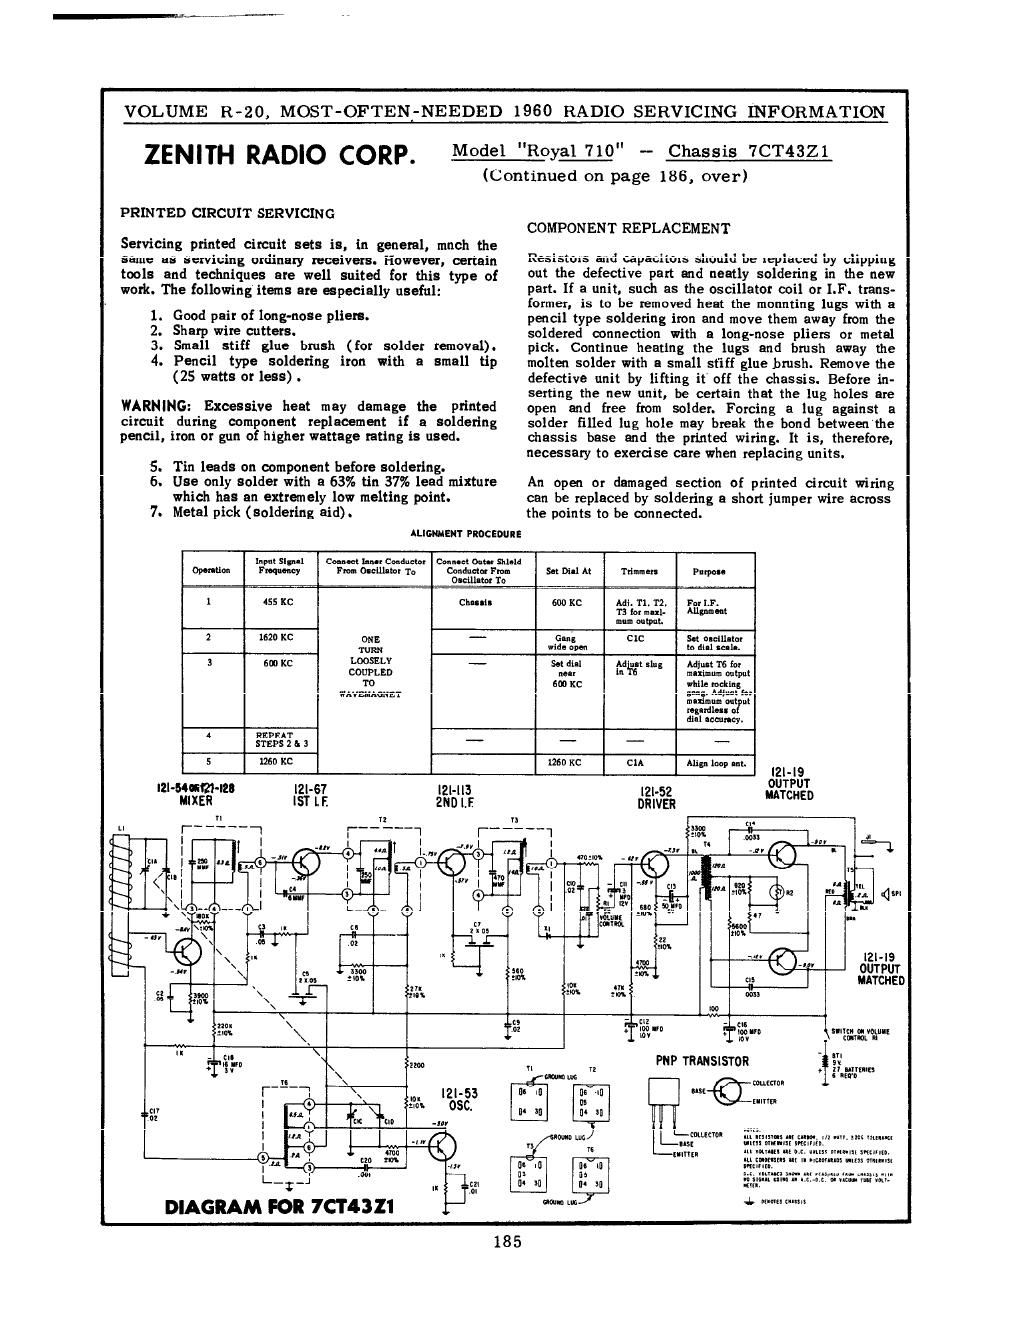
Model "Royal 710" - Chassis 7CT43Z1

ZENITH RADIO CORP.

(Continued on page 186, over)

PRINTED
Servicing printed circuit sets is, in general, mnch the
same as servicing ordinary receivers. However, certain
tools and techniques are well suited for this type of
work. The following items are especially useful:

1. Good pair of long-nose pliers.

2. Sharp wire cutters.

3. Small stiff glue brush (for

4. Pencil type soldering iron
(25 watts or less) .

WARNING: Excessive heat may damage the printed
circuit during component replacement if a soldering
pencil, iron or gun of higher wattage rating is used.

5. Tin leads on component before soldering.

6. Use only solder with a 63% tin 37% lead mixture
which has an extremely low melting point.

7. Metal pick (soldering aid).

COMPONENT REPLACEMENT

Resistors and capacitors should be replaced by clipping
out the defective part and neatly soldering in the new
part. If a unit. such as the oscillator coil or l.F. trans-
former, is to be removed heat the mounting lugs with a
pencil type soldering iron and move them away from the
soldered connection with a long-nose pliers or metal
pick. Continue hearing the lugs and brush away the
molten solder with a small st'iff glue brush. Remove the
defective unit by lifting it' off the chassis. Before in-
serting the new unit, be certain that the lug holes are
open and free from solder. Forcing 3 lug against a
solder filled lug hole may break the bond betweenthe
chassis base and the printed wiring. it is, therefore,
necessary to exercise care when replacing units.

An open or damaged section of printed circuit wiring
can be replaced by soldering a short jumper wire across
the points to be connected.

ALIGNMENT FIOCEDUI E

input Sip-l Connect [Incl Conductor Conn-er Ont- Shield
opsrstlou Frequency Fm cum-m 1-. Camflmor From 5.: on: At Tame.- anou
Oscillator To
1 455 KC Chilis 600 KC Adi. T1. T2. For 7.
1'3 rm mul- Allan-m
mm anhmt.
2 mo KC ONE - gun's crc 3.: emu-m
TURN with up." to dial lull.
a m KC W053 - 5.1 an: Ad on In. Adjust is (or
COUPLED near I! mum output
T0 Goo xc while rodrin
WAVEMAGNET g... . mm (or
III mam W l
regardless
dill lea-Icy.
A PEPEAT
STEP: 2 a a - - - '-
5 ml] KC 1250 KC CIA Aliyi lnnp ml.
63' #31
T
l2l-ll3 I2l-52 MATCHED

2ND LE

DRIVER

. 'aI
5..

mo

\ In!
W I r :m.
u
' a: g m m
I

IZI-53
08C.

4"

DIAGRAM FOR 7C'l'43ll

» m
0, lot} In " | m mm «mu-r
m . ,3, (m m
~ In
PNP TRANSIST R u
n u 0 . 11. VIII
man
I w: cerium ,
III in II! 'III 9
a, mum
II In n in
t-
I } carom was In run, .1. .m. not mun-rt
n ow: Um _...; "Ir-m msmsn.
rs _m" m Invuu u. M. mm ommsr mum,
to tuner» at u. mm..." mm atrium
flu In no Ill rnrmlu.
as us .4, mm m n. m... r... ...a.. m.
n. ,u In an :(ousmu um .. was. or m.- .u um.
mm m] 4, mm mm;

185

Page 2

VOLUME 11-20. MOST-OFTEN-NEEDED 1960 RADIO SERVICING INFORMATION

ZENITH RADIO CORP.
Mym
Chum 7CT432I

3; (Continued from page 185)


VIEWED FROM WIRING SIDE

CHASSB, WIRING AND COMPONENTS