Thule audio rc 250 owners manual

This is the 2 pages manual for thule audio rc 250 owners manual.
Read or download the pdf for free. If you want to contribute, please mail your pdfs to info@audioservicemanuals.com.

Page: 1 / 2
left right
thule audio rc 250 owners manual

Extracted text from thule audio rc 250 owners manual (Ocr-read)


Page 1

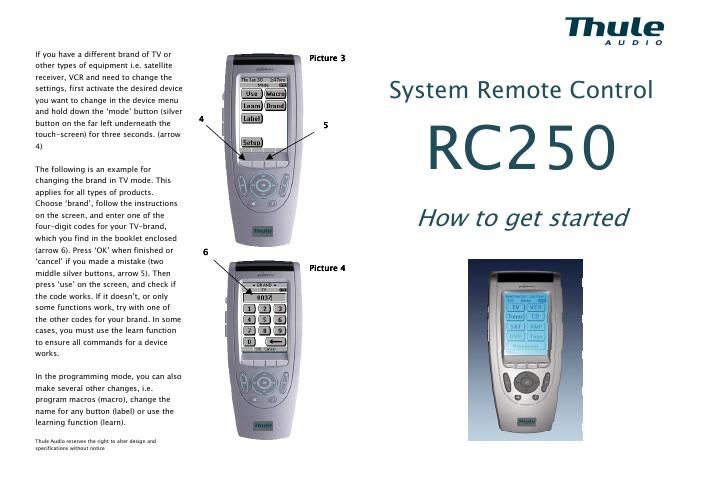
arrow 3 arrow 3arrow 3 arrow 3 First of all, congratulations with your new Thule Audio RC250 system remote control. The RC250 can replace all your existing remote units, and it is pre- programmed to control all types of Thule Audio products. IMPORTANT: IMPORTANT:IMPORTANT: IMPORTANT: If you wish to make sure that you can always recall the factory programming, you should install the NEO Edit 4 program on your computer, from the enclosed CD-ROM, and upload the configuration from your RC250, using the COM cable from the box. Please see the original manual from the manufacturer for further details. You can also learn more about the many other advanced functions in your remote from the Neo Edit 4 manual. It is a good idea to save your existing configuration on a computer before you make any changes in the remote. This way, you can always reload the original file if something goes wrong. In the NEO Edit program, you can also change all settings and programming in the remote, and you can insert downloads into your remote from various international internet sites, such as: remotecentral.com On this site, you can download hundreds of different set-ups for many types and brands of products. General advise on using the RC250 General advise on using the RC250General advise on using the RC250 General advise on using the RC250 The pre-programming on this remote is meant for controlling a full Thule Audio system. For example, when you are in Device mode, you can put both your Thule PR2/350B in standby as well as your Thule DVD player. In Device mode, the Volume controls the PR, and the channels are set to control your TV. Device pre Device preDevice pre Device pre- -- -programming: programming:programming: programming: TV: Sony, codeset 0037 VCR: Philips, codeset 9027 Tuner: Thule Audio, codeset 9027 CD: Thule Audio, codeset 9027 Sat: Philips, codeset 9027 Amp: Thule Audio, codeset 9027 DVD; Thule Audio, codeset 9027 Tape: Philips, codeset 9027 Processor: Thule Audio, codeset 9027 CDR: Philips, codeset 9027 Cable: Jerrold, codeset 0030 This box contains: This box contains:This box contains: This box contains: 1 Thule R 1 Thule R1 Thule R 1 Thule RC250 System remote C250 System remoteC250 System remote C250 System remote 1 Thule manual How to get started 1 Thule manual How to get started1 Thule manual How to get started 1 Thule manual How to get started 1 Com cable for PC uploads 1 Com cable for PC uploads1 Com cable for PC uploads 1 Com cable for PC uploads 1 CD 1 CD1 CD 1 CD- -- -ROM, Neo Edit 4 ROM, Neo Edit 4ROM, Neo Edit 4 ROM, Neo Edit 4 1 Philips manual for Neo Edit 4 1 Philips manual for Neo Edit 41 Philips manual for Neo Edit 4 1 Philips manual for Neo Edit 4 3 AA batteries 3 AA batteries3 AA batteries 3 AA batteries S SS Shortcut version for immediate use: hortcut version for immediate use:hortcut version for immediate use: hortcut version for immediate use: Insert batteries on the rear side. (Picture 1) After a one-second start-up period, the remote will always open in device mode. To get back to this mode, press far right silver button underneath touch-screen (arrow 1). On the touch-screen, now choose the device you wish to operate: - processor (if you have a PR250B/350B or AV100/120), - amp (for any other Thule amplifier) - CD-player, tuner etc. If you need light to see the touch- screen, press the small top button on the left side of the RC250 just under the connector cable hole. (arrow 2) After you have chosen the device, the various function choices will appear, like stand-by, play, stop. (Picture 2) For some complex units like processors, videos, TVs and DVDs, there are several screen pages with functions. These can be scrolled by the two larger buttons on the left side of the RC250. You can also scroll to the second page in the device page (arrow 3). 3 33 3 1 11 1 Picture Picture Picture Picture 1 11 1 Picture 4 Picture 4Picture 4 Picture 4 Picture 2 Picture 2Picture 2 Picture 2 2 22 2