Technics SUC 3000 Service Manual

This is the 30 pages manual for Technics SUC 3000 Service Manual.
Read or download the pdf for free. If you want to contribute, please mail your pdfs to info@audioservicemanuals.com.

Page: 1 / 30
left right
Technics SUC 3000 Service Manual

Extracted text from Technics SUC 3000 Service Manual (Ocr-read)


Page 1

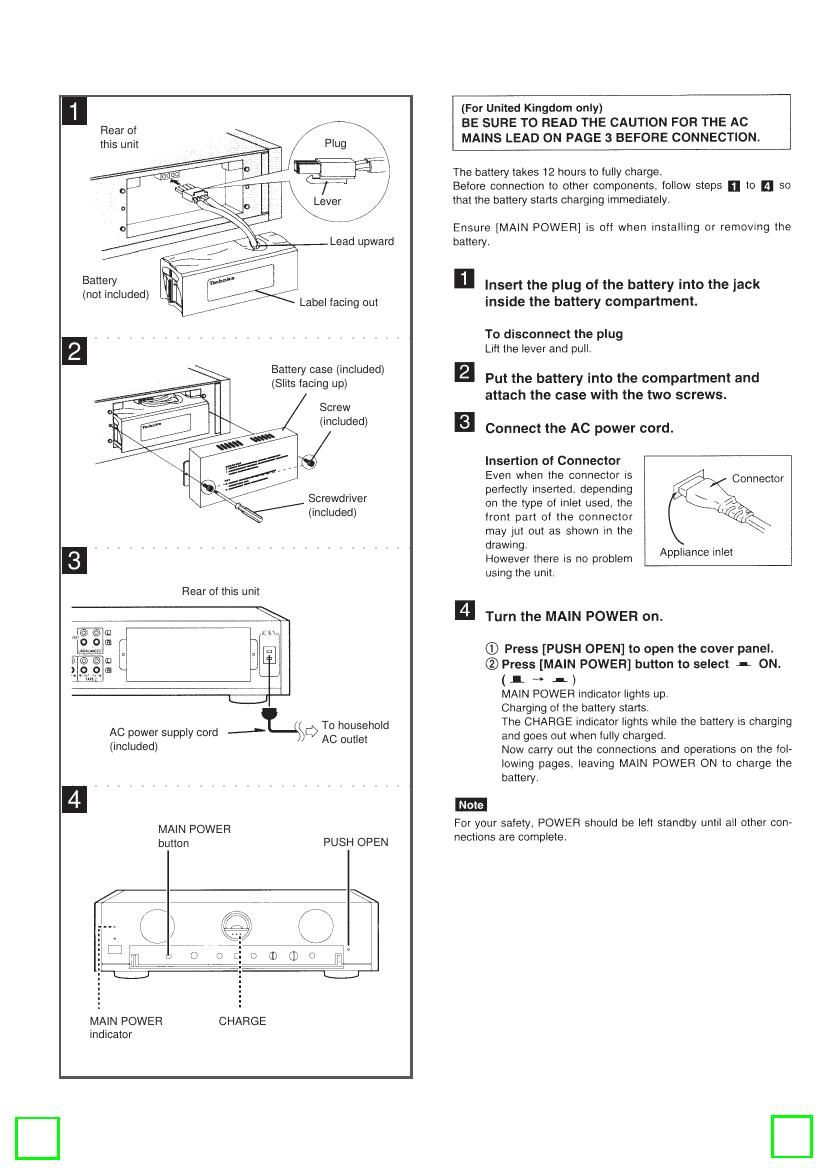
Rear of
this unit


/

, gl/
/ /,
not included '
( > / Label facing out

Rear of this unit

Lead upward

Battery case (included)
(Slits facing up)

Screw
(included)

Screwdriver
(included)

AC power supply cord 2L5$ To household

AC outlet

indicator

(included)
MAIN POWER
button PUSH OPEN
\
//A\ \
l... L ) f i
5 Jifig \/
ED rm v 0 <0 GD 0 n°
MAIN POWER CHARGE

(For United Kingdom only)
BE SURE TO READ THE CAUTION FOFI THE AC
MAINS LEAD ON PAGE 3 BEFORE CONNECTION.

The battery takes 12 hours to fully charge.
BeIore connection to other components, Iollow steps I] to n so
that the battery starts charging immediately.

Ensure [MAIN POWER] is off when installing or removing the
battery.

Insert the plug of the battery into the jack
inside the battery compartment.

To disconnect the plug
Lift the lever and pull.

Put the battery into the compartment and
attach the case with the two screws.

Connect the AC power cord.

Insertion of Connector
Even when the connector rs
perfectly Inserted, depending
on the type of inlet used, the
front part of the connector
may jut out as shown in the
drawing.

However there is no problem
using the unit.

Connector

Appliance inlet

Turn the MAIN POWER on.

® Press [PUSH OPEN] to open the cover panel.

® Press [MAIN POWER] button to select A ON.
(1 t 4* )
MAIN POWER indicator lights up.
Charging of the battery starts.
The CHARGE indicator lights while the battery is charging
and goes out when fully charged.
Now carry out the connections and operations on the fol-
lowing pages, leaving MAIN POWER ON to charge the
battery.

For your safety, POWER should be left standby until all other con»
nections are complete.

Page 2

POWER button
MAIN POWER button
OPERATION

Battery power and this units power system E

Recently, audio makers have been looking at the polarity of the
power cords used with systems in an eflort to reduce noise caused
by power sources as much as possible. Batteries are independent
from AC power sources and so noise caused by power transfer is
out, making them the ideal source for audio equipment,

This unit uses a 2X12 V 2.2 Ah sealed lead sound quality.

Features

The battery is charging whenever MAIN POWER Is on and DC is
not selected as the power source. This means recharging takes no
extra trouble.

Normal on/standby operation is done with the POWER button. and
switching between AC and DC operation is done with OPERATION.

Observe the following points for your safety and to keep the battery
performing well for as long as possible

oThe battery used is a lead acid battery. it differs from regular Ni-
Cd rechargeable batteries in that if it is fully discharged, recharg-
ing may be impossible. Ensure that the battery is recharging
whenever it is not being used, leave MAIN POWER ON and
switch to AC power after finishing with the battery. There is no
danger of overcharging the battery.

0 Avoid overheating.

If the unit is to be used in a rack, leave the rear of the rack open,
leave some space between the unit and the wall, and allow suffi»
cient ventilation.

o It you decide not to use the battery, iully recharge it, remove it
from the unit. and store it in a cool, dry place. The battery still natv
urally discharges in this condition, so every 6 months reconnect to
the unit and recharge it.

u If the unit itself is not to be used for a long period, fully recharge
the battery, switch MAIN POWER off, and unplug the power cord
from the outlet (recharging is unnecessary for a month it this is
done). Recharge the battery again before use.

I Replacing the battery I

lf effective life of the battery reduces to about 3~4 hours even after
being fully recharged. the battery is approaching the end of its ser-
viceable life.

Page 6

BATTERY
(3


AC DC ounce
o o:
i


\j
v 4:)

BATTERY
(3

/
Afr-N


To check the po source and charging condi on

The voltage meter and operation indicators allow you to check the
power source being used and the charging condition of the battery.

The following apply when MAIN POWER is ON.

Charging ®
POWER is standby and the battery is recharging.
The needle remains still.

AC source, charging

The unit is operating on AC power and the needle indicates the

charge in the battery,

This occurs in the following two situations.

I OPERATION is in the 1 AC/CHARGE position.

I OPERATlON is in the 1 DC position but the unit switched to
recharging because the battery charge fell below 10.5 V.

Operating on AC ©
The unit is operating on AC and the battery :5 fully charged.
(No volts are being used for charging so the needle remains still.)

The same condition occurs if the battery is not installed.

Operating on DC ©

The unit is operating by battery.

The needle is in the green zone, indicating the charge in the bat-
tery. ,

The unit switches to AC source, charging (B) when the voltage falls
below 10.5 V. See When battery voltage falls below 105 V below.

Not operating or charging ®
POWER is standby and the battery is fully charged.

[ When battery voltage falls below 10.5 V

oThere is some variation in the needle indication. For this reason,
the needle may not exactly indicate 10.5 V when the unit automat-
ically switches from DC to AC.

- It takes approximately 12 hours for the battew to fully charge. The
unit cannotrbe operated on DC during this time. The indicators
change to (Q or , when charging is complete.

For your reference

a The battery takes approximately 12 hours to charge irrespective of
the charge left in the battery when charging starts. If you begin
charging before the battery falls below 10.5 V, then you can use
DC power before the battery has completely charged.

a When the battery is approaching full charge, the needle fluctuates
in the area between 18.5 V and the upper limit (when POWER is
ON). This occurs because charging is nearly finished and does
not indicate a malfunction.