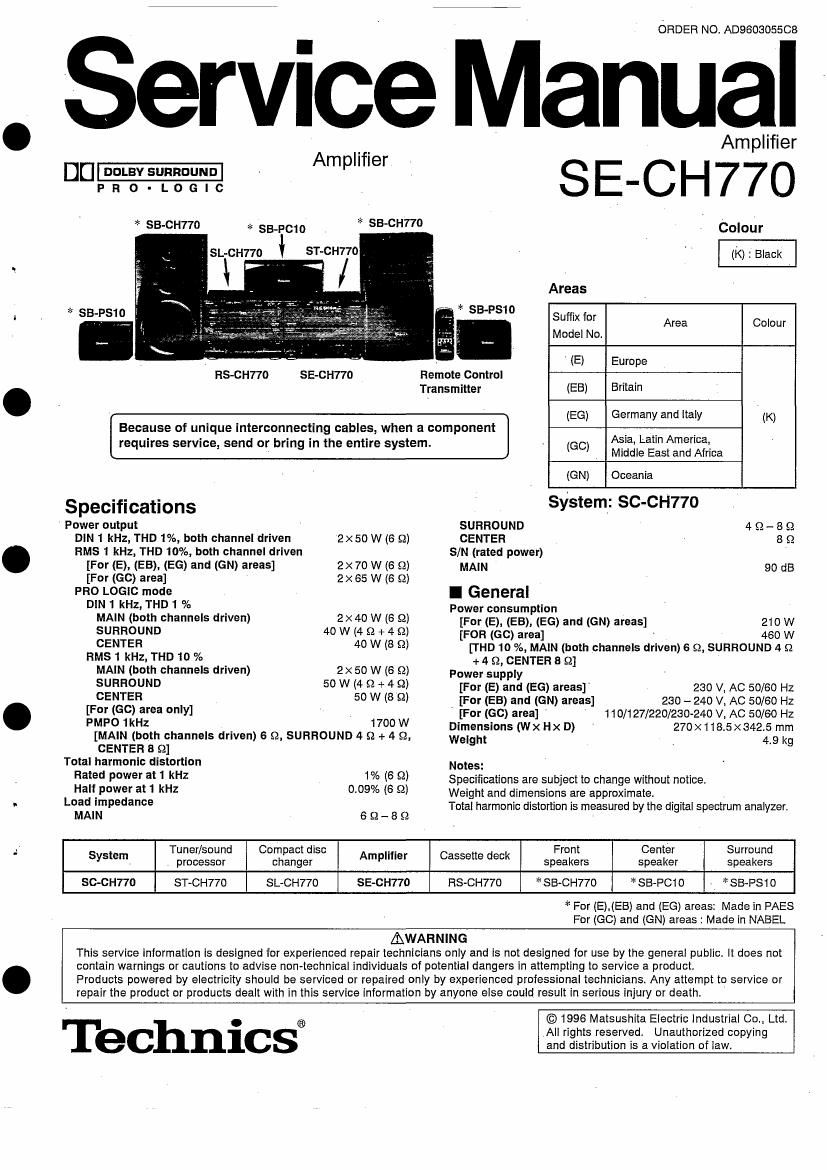
Technics SECH 770 Service Manual

This is the 33 pages manual for Technics SECH 770 Service Manual.
Read or download the pdf for free. If you want to contribute, please mail your pdfs to info@audioservicemanuals.com.

Page: 1 / 33
left right
Technics SECH 770 Service Manual

Extracted text from Technics SECH 770 Service Manual (Ocr-read)


Page 1

CRDER NO. A09603055CB

Service Manual


Amplifier
Amplifier
DU- :90st sunnouNn
o - L o G I c "'
* SB-CH770 * SEPCW * SB-CHTio Colour
SL-CH770 * ST-CH770 (k) : Black
Areas
SB- 510 SB-PS1O ,
Suffix for Area Colour
Model No.
. . ' (E) Europe
RS-CH770 SE-CH770 Remote Control
Transmitter (EB) Britain
(EG) Germany and Italy L (K)
Because of unique interconnecting cables, when a component _
requires service, send or bring in the entire system. (60) ASE Latin America.
Middle East and Africa
(GN) Oceania

system: SC-CH77D

Specifications
Power Output SURROUND 4 O. - 8 9
DIN 1 kHz, THD 1%, both channel driven 2x50 W (6 Q) CENTER 8 (2
RMS 1 kHz, THD 10%, both channel driven SIN (rated power) '
[For (E), (EB), (EG) and (GN) areas] 2x70 w (6 9) MAIN 90 dB
[For ((36) area] 2x 65 W (6 £2)
PRO LOGIC mode I General
DIN 1 kHz, THD 1 % _ Power consumption
MAIN (both channels driven) 2x 40 W (6 9) [For (E). (EB), (EG) and (GN) areas] 210 W
SURROUND 40 W (4 £3 + 4 9) [FOR (cc) area] 450 W
CENTER 40 W (8 9) frHD10 %, MAIN (both channels driven) a s2, SURROUND 4 o
RM31 kHz, THD1D % 4. 4 Q, CENTER 5 52]
MAIN (both channels driven) 2x 50 W (6 Q) Power supply
SURROUND 5° W (4 9 + 4 9) [For (E) and (EG) areas] 230 v, AC 50/60 Hz
CENTER 50 W (8 9) [For (EB) and (GN) areas] 230 - 240 v. AC 50/60 Hz
[For (GO) area only] [For (GC) area] 110/127/220/230 240 v, AC 50/60 Hz
PMP01kHz _ 170° W Dimensions (Wx Hx o) 270x 118 5x342. 5 mm
[MAIN (both channels driven) 6 $2, SURROUND 4 $2 + 4 $2, Weight 4 9 kg
CENTER 8 £2]
Total harmonic distortion Notes:
Hated P°W9I at 1 kHz 1?" (6 9) Specifications are subject to change without notice
H3"_P°W3" at 1 kHz 0-095 (6 9) Weight and dimensions are approximate
Load impedance Total harmonic distortion is measured by the digital spectrum analyzer.
MAIN 6 Q - 8 Q
Tuner/sound Compact disc . . Front Center Surround
System processor changer Arnplilier Cassette deck speakers speaker speakers
SC-CH770 ST~CH77O SL-CH770 SE-CHTIO RS-CH77O 3 SB-CH770 * SB»PCI O - * SB-PSi O
* For (E).(EB) and (EG) areas: Made in PAES
For (GC) and (GN) areas : Made in NABEL
AWARNING
This service information is designed for experienced repair technicians only and is not designed for use by the general public. It does not
contain warnings or cautions to advise non-technical individuals of potential dangers in attempting to service a product.
Products powered by electricity should be serviced or repaired only by experienced professional technicians. Any attempt to service or
repair the product or products dealt with in this service information by anyone else could result in serious injury or death.

Technics®

© 1996 Matsushita Electric Industrial Co, Ltd.
All rights reserved. Unauthorized copying
and distribution is a violation of law.

Page 2

SE-CH770 »

l Contents

Page
Before Repair ...................................................... ' ............................... 2 External Unit Connections ......................................
Protection Circuitry 2 Enjoy Sound with DOLEIY PRO LOGIC ...................
Accessories ....... 2 Operation Check and
- Caution of AC Mains Lead. .. 3 Main Component Replacement Procedures .......................... 10 ~ 12
Location of Controls . 3 Power Source ONIOFF of This Unit.
Installation ......... . 4 Schematic Diagram .............
Flat Cable Connections . 4 Printed Circuit Board Diagram
Antenna Connections ................................. . 5 Wiring Connection Diagram
Connection of Front and Surround Speakers 5 Block Diagram...
Connection of Center Speaker .................. .. 6 Replacement Parts List
Connection of AC Power Supply Cord . 6 _ Cabinet Parts Location.
Optional Antenna Connections ........ .. 6 Packaging .................

l Before Repair

(1) Turn off the power supply. Using a 10 52. 10 W resistor, connect both ends of power supply capacitors (C701, 0702) in order to discharge the voltage.
(2) Before turning the power supply on, after completion of repair, slowly apply the primary voltage by using a power supply voltage controller to make
sure that the consumed current at 50/60 Hz In NO SIGNAL mode should be shown below with respect to supply voltage 230 V/24o V.

Area (E) (EG) (EB) (Go)
Power supply voltage AC 230 V AC 240 V 7 AC 110 V AC 240 V
' Consumed current 50 Hz 69 ~ 240 mA 60 ~ 240 mA 120 ~ 480 mA 60 ~ 240 mA

I Protection Circuitry

The protection circuitry may have operated ifeither ot the following conditions is noticed:
>I< No sound is heard when the power is switched ON.
>I< Sound stops during a performance
The functions of this circuitry is to prevent circuitry damage if, for example, the positive and negative speaker connection wires are shorted", or it
speaker systems with an impedance less than the indicated rated impedance of this unit are used.
If this occurs, follow the procedure outlined below:
1. Switch OFF the power,
2. Determine the cause of the problem and correct it.
3. Switch ON the power once again.
Note:
When the protection circuitry functions. the unit will not operate unless the power is first switched OFF and then ON again

I Accessories V
0 AC power supply cord 0 Flat cable 0 Remote control transmitter
. (E), (EG) and (60) areas : (RJAOOiQ-ZK). . 1 Long (REX0661) (RAK-CH202WH) .....
(EB) area : (VJA0733) .......................... . 1 Medium (REXOSBO) . '
Short (REXOGOB) . ...................................... i

(E). (EG) and (GC)

0 Batteries ' AM (LW/MW) loop antenna ' Antenna holder
(UM-4, AAA, R03) ..................... , ............. 2 - (RSA0012) ............ . ................................... 1 (RMN0244) ............................
Note: These are available on sales route.

)6 Q;

0 Mounting screw 9 FM indoor antenna 0 Speaker cords
(XTN3+12AFZ) ......................................... 1 (E), (EB) and (EG) areas: (RSA0007) ...... 1 (REE0393) ........ . ........................................ 2
(GO) area: (RSAOOOS) .....

9

(E). (EB) and (EG)

OAttachment plug > U Power plug adapter
for (EB) area only (SJPQDOQ). 1 for ((30) area only (SJP5213-2)..

Page 6

, sE-CH770 .
I Connection of AC Power Supply Cord

0 Plug the cord into an outlet only alter all other connections have been made.

I Connection of Center Speaker

Center speaker (included)


AC power supply

cord (included) Household AC outlet

Insertion of Connector:

Even when the connector ispertectly .

inserted, depending on the type of . \
inlet used. the front part of the con- Approx. ll
nector mayjut out as shown in the 5 mm .

drawing. -

Connector

FM outdoor antenna (not included)

\ .

75 £2 coaxial cable (not included)

FM outdoor antenna (not included)

__-i=.

|<-5-12m-->[

\finyl-sheathed wire

FM outdoor antenna (not included) El

The outdoor antenna should be used when using this unit in moun-
tainous areas or in spaces enclosed by reinforced concrete where
the FM indoor antenna. (included) does not provide satisfactory re-
ception.

An outdoor antenna should be installed by a qualified technician only.

AM (M W/LW) outdoor antenna (not included) [a

The outdoor antenna should be used when using this unit in moun-
tainous areas or in spaces enclosed by reinforced concrete where
the AM loop antenna (included) does not provide satisfactory re
ception.

Use 5-12 m of vinyl-sheathed wire horizontally at the window, or a
convenient location. A '

When the unit is not in use, disconnect the outdoor antenna to
prevent possible damage from lightning. Never use an outdoor an-
tenna during an electrical storm.

Be sure to connect the AM loop antenna even when an outdoor
antenna is used.

0

Page 9

SE-CH77O

I DDPRO LOGIC

DOWN \
VOLUME

Adjusting speaker output level 3 Turn VOLUME to set the volume level normally used
for enjoying the source.
_ In order to reproduce the movement of the sound and its clear 4 Press CENTER (_) or (+) or SURROUND (_) or H")

orientation, it is important to adjust the output level of each speaker.
Adjust output to the correct levels while listening to the test signal.
Before starting, check your front speakers are correctly balanced

on the remote control to adjust the output level bal-
ance.

(see page 74) Adjust the output level of each speaker from the listening posi-
tion until they are all identical.
1 Press PRO LOGlC to select SURROUND" 01' Output levels can be varied within a range of 1-12 dB with front
. 3 STEREO". speaker output level sewing as the zero point

2 Press TEST to output a test signal.

The test signal is emitted in the following order: . . . . >
For SURROUND mode > 0The test sIgnal is output only by the speaker you are now adjusting

and does not repeat the sequence until adjustments are complete.
URemember you cannot adjust output level of the surround speakers
if you selected the 3 STEREO mode in step 1.

Front speaker (Ieft)->Center speaker

Surround speakers (left, right) e-Front speaker (right)

The test signal is not emitted from the center speaker when the , _
center mode is on PHANTOM. To 50? the 195 Signal-

Press TEST.
. For 3 STEREO mode
Front speaker (lett)->Center speaker

T
Front speaker (right)

Enjoying with SURROUND or 3 S TEREO

Before trying anything. have you set the center mode and adjusted
5P5 LOGIC' speaker output level?
When viewing a video, turn on the power supply for the TV and set
the TV to video mode

° . 1 Press PRO LOGIC to select SURROUND or
Cl © 3 STEREO. .
2 Press SELECTOR to select the desired external
DDPRU LOGIC source, .
Each time you press this button, sound sources will be switched
astollows,
TUNER->CD->TAPE->EXT

i l
PHONOe-VDPe-VCR

SELECTOR These indications correspond to terminals on the tuner/sound
processors rear panel. Switch the displayed indication to the
source you want to use.

You can not enjoy SURROUND or 3 STEREO in the tuner
mode.

3 Start the desired source.
To operate external sources, see the instruction manual pro-
vided with the specific unit.

To turn off the DOLBY PRO LOGIC systems:
Press PRO LOGIC to select OFF".

m _ , , When employing SURROUND, use software recorded In Dolby Sur-
You cannot record aCOUstIcal effects produced In the SURROUND round.

and 3 STEREO modes.