Technics SADV 280 Schematics

This is the 24 pages manual for Technics SADV 280 Schematics.
Read or download the pdf for free. If you want to contribute, please mail your pdfs to info@audioservicemanuals.com.

Page: 1 / 24
left right
Technics SADV 280 Schematics

Extracted text from Technics SADV 280 Schematics (Ocr-read)


Page 1

(For United Kingdom)

(EB" area code model only)

For your safety, please read the following text careful-
ly.

This appliance is supplied with a moulded three pin
mains plug for your safety and convenience.

A 5-ampere fuse is fitted in this plug.

Should the fuse need to be replaced please ensure
that the replacement fuse has a rating of 5-ampere
and that it is approved by ASTA or BSI to 381362.
Check for the ASTA mark ® or the BSI mark @ on
the body of the fuse.

If the plug contains a removable fuse cover you must
ensure that it is refitted when the fuse is replaced.

If you lose the fuse cover the plug must not be used
until a replacement cover is obtained.

A replacement fuse cover can be purchased from
your local dealer.

CAUTION!

IF THE FITTED MOULDED PLUG IS UNSUIT-
ABLE FOR THE SOCKET OUTLET IN YOUR
HOME THEN THE FUSE SHOULD BE RE-
MOVED AND THE PLUG CUT OFF AND DIS-
POSED OF SAFELY.

THERE IS A DANGER OF SEVERE ELECTRI-
CAL SHOCK IF THE CUT OFF PLUG IS IN-
SERTED INTO ANY 13-AMPERE SOCKET.

If a new plug is to be fitted please observe the wiring
code as shown below.
If in any doubt please consult a qualified electrician.

IMPORTANT

The wires in this mains lead are coloured in accor-
dance with the following code:

Blue: Neutral, Brown: Live.

As these colours may not correspond with the coloured
markings identifying the terminals in your plug, proceed
as follows:

The wire which is coloured Blue must be connected to
the terminal which is marked with the letter N or col-
oured Black or Blue.

The wire which is coloured Brown must be connected
to the terminal which is marked with the letter L or co-
loured Brown or Red.

WARNING: DO NOT CONNECT EITHER WIRE TO
THE EARTH TERMINAL WHICH IS MARKED WITH
THE LETI'ER E, BY THE EARTH SYMBOL J7- OR CO-
LOUREDGREEN ORGREENIYELLOW.

THIS PLUG IS NOT WATERPROOF- KEEP DRY.

Before use
Remove the connector cover.

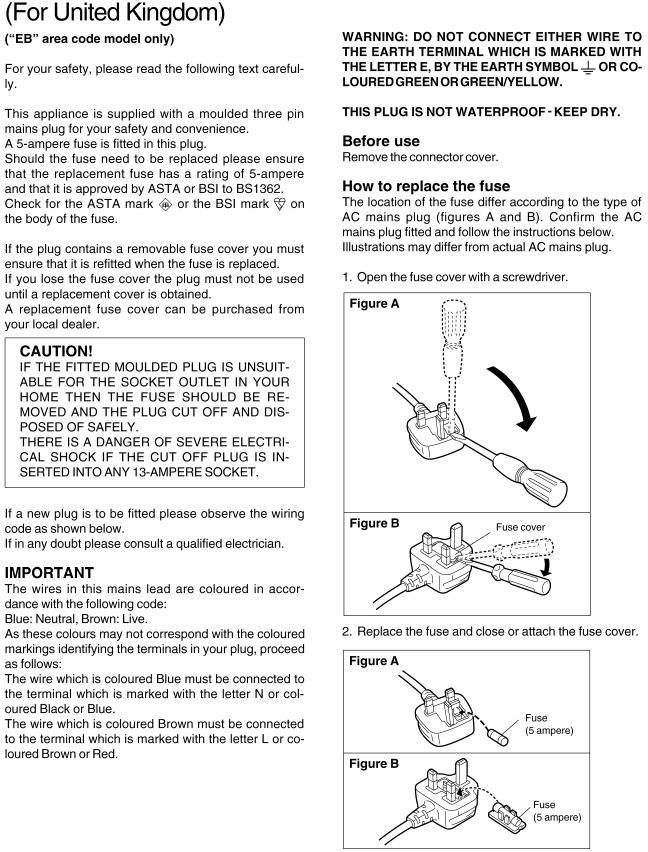
How to replace the fuse

The location of the fuse differ according to the type of
AC mains plug (figures A and B). Confirm the AC
mains plug fitted and follow the instructions below.
Illustrations may differ from actual AC mains plug.

1. Open the fuse coverwith a screwdriver.

Figure A

Figure B

2. Replace the fuse and close or attach the fuse cover.

Figure A

Fuse

\
ix (5 ampere)

. Fuse
(5 ampere)

Figure B

Page 2

(56>

at 014--

<50

CBC")

on mtouic CH SELECT

SWER SKID KARAOKE

DVD

TUNER]
[AND
I F

tr TAPE
- . Ha)


®

@ an «N
[:J
@ {ml ,Wfi, «SLOW/SEARCII>>
®-(:) C) D
e MUTING I« SKIP »I
(:i (3
® - mm +
:1 [:1 -®

®

©©©6 @0®@@© @

Standby/on switch ((D/l)

Press to sWitch the unit irom on to standby mode or vice versa. In
standby mode, the unit is still consuming a small amount ol power.
Standby indicator (LU)

When the unit is connected to the AC mains supply, this indicator lights
up in standby mode and goes out when the unit is turned on.

Play timer/record timer button and indicator

(©PLAV/6REC)

Clock/timer button (CLOCK/TIMER)

Demo button (-DEMO)

FM mode button (FM AUTO/MONO)

Source input button (INPUT SELECTOR)

Tuner/band button (TUNER/BAND)

Digital super woofer button and indicator

(DIGITAL S.WOOFER)

Volume control (VOLUME)

Headphone iack (PHONES)

Tuning mode button (TUNING MODE)

Set button (SET)

For the United Kingdom, Continental Europe and Russia

@

Tuning buttons (V, A TUNING)
nos display mode button (nos, PS-DISP MODE-PTY)

For areas except the United Kingdom, Continental Europe and Russia

66©6

®®©

Key control button (KEY CON)

MIC eflect buttons (MIC EFFECT, LOUNGE, CHORUS)
Echo button (ECHO)

Tuning, Key upldown buttons

(v, A TUNING, b, ti)

KARAOKE, Voice mute buttons (KARAOKE, V.MUTE)
Microphone iacks (1-MlC-2)

Microphone volume control (MIC VOL)

Buttons 0. 0, 9, (D. 0 and @ Iunction in the same way as the controls on
the main unit.

® @®®@®®®@®®@

@@®®®

®®®®®®6 @

Sleep timer button (SLEEP)

Numbered buttons (1-9, 0, 210/-/--)

Channel select, Test signal button (CH SELECT, TEST)
Menu, E0 button (MENU, E0)

Cursor buttons (4, V, A, V)

Marker, Super 3D Al EC button (MARKER, S.3D Al EQ)
Input select button [VCR (EXTWDP (AUX)]

Tape select, deck 1/deck 2 select button (TAPE/DECK 1/2)
Play mode, Cancel button (PLAV MODE, CANCEL)
Disc pause, Tape reverse play button (

Audio select, 2 channel down mixing button

(AUDIO, MIX ZCH)

Shift button (SHIFT)

To operate functions labeled in orange, press [SHIFT] and then the cor
responding button at the same time.

Muting button (MUTING)

Top menu, Subtitle select button

(TOP MENU, SUBTITLE)

GUI display, Initial setting button

(DISPLAY, SETUP)

Disc button (DISC)

Karaoke, Karaoke effect button

(KARAOKE, KARAOKE EFFECT)

Return, Super sound E0 button

(RETURN, SUPER SOUND EQ)

Enter button (ENTER)

Angle select. AV effect button (ANGLE, AV EFFECT)
DVD button (DVD)

Disc play, Tape torward play button (V)

Disc stop, Tape stop button (I)

Disc slow/search buttons (<4, >> SLOW/SEARCH)
Disc skip buttons (H4, >>l SKIP)