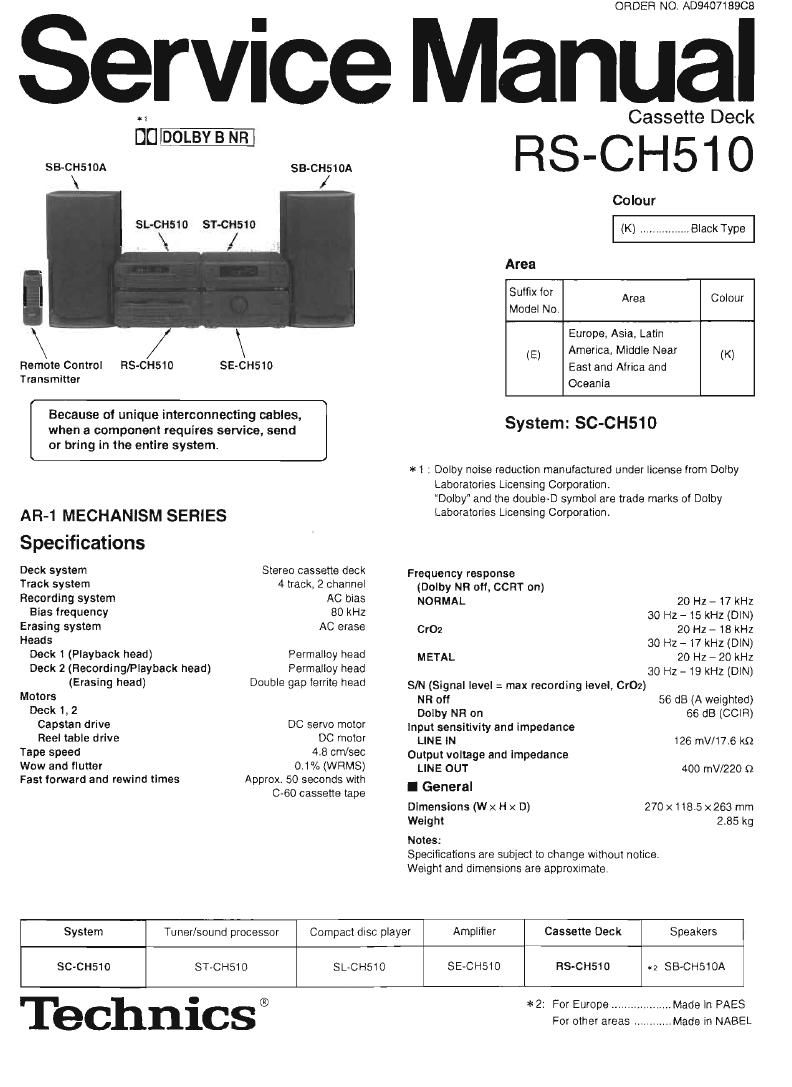
Technics RSCH 510 Service Manual

This is the 22 pages manual for Technics RSCH 510 Service Manual.
Read or download the pdf for free. If you want to contribute, please mail your pdfs to info@audioservicemanuals.com.

Page: 1 / 22
left right
Technics RSCH 510 Service Manual

Extracted text from Technics RSCH 510 Service Manual (Ocr-read)


Page 1

ORDER NO. AD9407189CE

Service Manual

DC] DOLBY B NR l

SB-CHSIDA

\

SB-CH51DA
/

SL-CH510 ST-CHS 1 0

\ /

RS-CHSl 0

Remote Control
Transmitter

SE-CHSiO

Because at unique interconnecting cables,
when a component requires service, send

or bring in the entire system.

AR-1 MECHANISM SERIES
Specifications

Deck system
Track system
Recording system
Bias frequency
Erasing system
Heads
Deck 1 (Playback head)
Deck 2 (Recording/Playback head)
(Erasing head)

Stereo cassette deck
4 track, 2 channel
AC bias

80 kHz

AC erase

Permalloy head
Permalloy head
Double gap ferrite head

Cassette Deck

RS-CH510

Colour
(K) ................ Black Type

Area
Suffix {0' Area Colour
Model No,

Europe, Asia, Lann

(E) America, Middle Near (K)
East and Africa and
Oceania

System: SC-CH51 0

*t : Dolby noise reduction manufactured under license from Dolby
Laboratories Licensmg Corporation.
"Doiby and the double-D symbol are trade marks of Dolby
Laboratories Licenslng Corporation.

Frequency response
(Dolby NR oii, ccm' on)

NORMAL 20 Hz 717 kHz
30 Hz- is kHz (DIN)
cm: 20 Hz - 18 kHz
30 Hz - 17 kHz (DIN)
METAL 20 H2 - 20 kHz

30 Hz - 19 kHz (DiN)
SIN (Signal level : max recording level, Cr02)

Motors NR off 56 dB (A weighted)
DECK 1, 2 _ Dolby NR on 66 dB (CClR)
Capstan dHVB DC SGTVD motor Input sensitivity and impedance
Reel table drive DC motor LINE W 126 mvme kQ
Tape speed 43 CHI/595 Outputvoltage and impedance
Wow and flutter 0.1% (WRMS) LINE OUT 400 mV/220 9
Fast iorward and rewind times Approx. 50 seconds with I General
0-60 cassette tape
Dimensions (WxHx D) 270xiiB.5x263 mm
Weight 2.85 kg
Notes:
SpeClficatlons are subject to change Without notice.
Weight and dimensions are approxmate
System Tuner/sound processor Compact disc player Amplifier Cassette Deck Speakers
SC-CHSiO ST-CH51O SL-CHSiO SE-CHSlO RS-CHSiO v2 SB-CHSiOA

Technics®

Made In PAES
Made in NABEL

*2: ForEurooe...
For other areas ..

Page 2

RS-CH51O i

I Contents
Page
0 Location of Controls ....................................................................... 2

0 Operation Check and
Main Component Replacement Procedure .. , 3~8
0 Measurements and Adjustments... .. ,V 9~13
0 Schematic Diagram ,. . 14~20
0 Printed Circuit Board Diagram 21 ~24
. 25

0 Wiring Connection Diagram. .

NOTE:

Page
. Block Diagram ................................................................. .26, 27
DSeltCheck Function ......... 28~30
OFunction of IC Terminals 30 31
0 Replacement Parts List ...... , 32 ~37
0 Cabinet Pans Location 33

0 Mechanism Parts Location V 39.42

Refer to the service manual for Model No. SE-CHStO (ORDER No. AD9407197CE) for Information on Accessories. Stack-

Ing the Components, Connections" and Packaging.

I Location of Controls

(D Deck 1 holder open button

® Deck 1 cassette holder

© Deck 1 holder close button

(4) Stop button

(5) Deck 2 holder close button

© Deck 2 cassette holder

(7) Deck 2 holder open button

Dolby noise reduction button and
indicators

(9 Reverse mode button and indi-
cators

Deck 1ldeck 2 select button and
indicators

® Playback buttons and indicators

® Fast forwardlrewind/tape pro~
gram sensor buttons

® One-touch tape edit buttons

Record pause button and indi-
cator

(5) CORT button and indicator

Page 6

RS-CH510

_ @m 0

Remove the cassette holder

assy from the boss of [XTW2+5L]
drive rack.
GEE
/ REED
Bass 01 Conneclok
drive rack l [I \

Mn

Claw \

V ,l \ E033 /
g (D (D
(El/ED \4- ll -v//

Pull out the pin. Push the drive rack, \ - /

Mechanism unlt

Head Block [DECK 1: RX00317-l]
[DECK 2: RXOO316-l]

Plnch roller (F) unlt [RXPDOSZ]

Pinch roller (Fl) unit
[RXPoosal

Installation of the cassette holder assy after replacement

m, Locate the cassette holder ass'y and mechanism unit at
a 90 degree angle. and then install the cassette holder ass'y. m

Close the cassette holder assy.

Cassette holder
ass'y

Force this point of drlve rack.
Mechanism unll

Page 9

[13-an IU

110'an I U

oPreparation for making automatic adjustments

1. Find the beginning of the 315 Hz, 0 (15 test signal recorded on the test tape (QZZCFM)
2. Switch off the power to the unit and then make the following connections,
a) Connect an AF oscillator between- (LINE iN, left channel) and -, and between -(LlNE lN, right channel)
and -. (Referto Fig.1 and Fig.7.)
b) Connect an EVM (AC range) between- (LINE OUT, left channel) and -, and between -(LINE OUT right
channel) and -. (Refer to Fig.1 and Fig.7.)
c) Connect WOW, and- to the A. GND . (Refer to Fig. 1 and Fig, 8.)
-When EROM is connected to the AEQND and the power is switched on, the memory of the EEPROM
(lC702) will be erased.
-When TEST lis connected to the and the power is switched on, the unit Will be in the adjustment
mode.
3. Switch on the power to the unit. (Refer to page 9 for information on how to connect the power supply.)
-The Deck 1/2 indicators and the CCRT indicator will begin flashing. (Refer to Fig. 9.)
. Use the AF oscillator to apply a 315 Hz. -20 dB (100 mV) signal to the unit.
5. Without a tape inserted in either Deck 1 or Deck 2, hold the REC PAUSE button down and confirm that the signal is
being output from and -.
- The signal is output from- and only while the REC PAUSE button is held down. When the button is
released, the output will stop.
6. Adjust the output ofthe AF oscillator so that the output from and -becomes 400 mV, and then hold the REC
PAUSE button down again for at least 5 seconds
-The reference signal will be stored in the memory of the EEPROM (lC702).

p


7. Release the REC PAUSE button. .
8. Disconnect EROM from thelA. GNQ. "DECKl/Z" REC PAUSE"bUnQn
-Leave TEST lconnected to thelA. GND . indicator and indicator
(The Deck 1/2 indicators are flashing at this time.)
AF EVM
Oscfllator MEI PCE' E7
(39 [mm m-rdro
§¢+c i2 EVM Short
- -91 7 7
fl WE LIX-f Short <1 " button "CCRT" button
°tO and indicator and indicator
L> button
Fig.7 Fig 8 and indicator
Fig. 9

.PLAYBACK GAIN ADJUSTMENT

Perform the procedures 3 to 8
in Preparation for making
\y automatic adjustments" and

return to m once again.

Insert the test tape (QZZCFM) into DECK 1.

Press the CCRT button:
-The "<1 " and "[> indicators will begin flashing.
-The REC PAUSE indicator will begin flashing.
-Tne CCRT indicator will be on.

Pressthe i> button. Connect EROM tothe A. GND
-The automatic adjustment of DECK 1 will begin. Egan
-) REV PLAY ~> STOP

(Automatic operation for apprOleately 5 seconds.)

ll

Step 4 Press the CORT button.


No (continuesflashing)

Does the "<1 " indicator go out?


(The DOLBY IN/OUT indicator Wltl
begin flashing.)

Go back to
eon

insert the test tape (QZZCFM) into DECK 2.

Press the " |>" button.

'The automatic adjustment of DECK 2 will begin.
Step 7
FWD PLAY) -> REV PLAY s. STOP
(Automatic operation for approximately 5 seconds.)

ll

Step 8 Press the ccnr button.


/ No (continues flashing)
w the " |> Indicator go out" /
\\// (The DOLBY lN/OUT

Yes indicator will begin
i flashing.)

Playback gain adjustment completed.

(Proceed to Step 11 )

DOVERALL GAIN ADJUSTMENT AND OVERALL FREQUENCY ADJUSTMENT

From Step 10 Go back to

Step 11 insert the test tape (ozzan) into DECK 2.
(Any normal commercially available tape can also be used.)

Press the REC PAUSE button.
Step 12 -The automatic adjustment of DECK 2 will begin.

(REC) -» (new) _, -» (STOP)

(Automatic operation for apprommateiy 25 seconds.)


No (continues flashing)


Does the CCRT indicator go out?
(The DOLBY lN/OUT
indicator wtll begin

flashing.)

Automatic adjustments com pieted.

Disconnect TEST from the chassrs (GND).
(The DECK 1/2 indicator stays Lit.)

l-

.Perform the following recording/playback frequency response and gain adjustment
checks

1. Playback gain check
1-1.Findthe start of the 315 Hz/O dB section of the test tape (QZZCFM), insert the tape into Deck1 and 2, and play it back
(FWD).
1-2. Confirm that the output between--/ and -agrees With the following rated value:
400 mV 1' 0.5 dB
2. Playback frequency response check (Decks 1 and 2)
Playback the 315 Hzl-20 dB and 12.5 kHz to 63 Hzl-ZO dB sections of the test tape (QZZCFM) and then, using the 315 Hz/
-20 dB playback output as a reference (0 dB), confirm that the playback frequency response is within the range shown in
Fig. 10.
Output points: between- /- and -.


+6218
+469 *5
+3.13 , . was
was +2dE
out one
~2ua -2aa
L3 , -3ua

aqua
- -5aa

-saa

. l _
63th look: 20on some ikHl 2km mu 125lH1 FIB-10

31 Hz 8H

3. Recording/playback frequency response and gain check

34. Insert a Normat-type blank tape (QZZCRA) into Deck 2,

32. input at kHz signat between--/and -, and use the attenuatorto setthe output between--/ and
-to 400 mV.

33, Record the 1 kHz signal.

3-4. Playback the recorded signal and confirm that the output between--/ and -agrees with the following
rated value:
400 mV 2 1 dB

8-5. Without adjusting the output setting from step 3-2, use the attenuator to further attenuate the input signal by 20 dB and
record signals of 50 Hz, 100 Hz, 300 Hz, 500 Hz, 3 kHz, 10 kHz and 12.5 kHz.

36. Playback the recorded signals and. using the 1kHz playback output as a reference (0 dB), confirm that the output
between "/ and -confirms to the overall frequency response shown in Fig. 11.

34?. Insert first a biank Chrome-type tape (QZZCRX) and then a blank Metattype tape (QZZCRZ) into Deck 2.

38. Repeat steps 3-5 and 3-6 for each tape and confirm that the output for each conforms to the overall frequency
response shown in Fig. 12.

Normal Overall frequency response chart (NR OUT)

+6dfl
+4d3
+268

065
-2dB
-4d9
*6

+468

0113

-C|dB

Fig.11
50H! IOOHI 200M! 500m lkHz 2tz 10km

0102 Metal Overall frequency response chart (NR OUT)

+663
+163
Hits

068
-2dE
7468
-5dB

+5118

068

-ldB

50m :0on zoom 500": mu 2m IZSXHI Fig-2

_13_

Page 22

RS-CH510 RS-CH51O

l Mechanism Parts Location . DECKZ (RECORD/PLAYBACK)

1 | 2 | 3 | 4 | 5 | 6 | 7 | 8 l 9 I
249-1
Note:
When changing mechanism parts, apply the
specified grease to areas marked XX" as
A shown in the drawing
Rel. Pan Name Pan No
No.
0 FLOIL AK-152 szzoL 18
G) FLOIL 947F- RZZOL 02
B
C
D
E
F

Printed in Japan

_ 41 .. _ 42 _ F940712000 TW/HH/TN