Tapco dibox owners manual

This is the 4 pages manual for tapco dibox owners manual.
Read or download the pdf for free. If you want to contribute, please mail your pdfs to info@audioservicemanuals.com.

Page: 1 / 4
left right
tapco dibox owners manual

Extracted text from tapco dibox owners manual (Ocr-read)


Page 1

DB-1AIDB-1P

ACTIVE & PASSIVE DIRECT-IN BOXES

instruction sheet

FEATURES

Converts unbalanced line- level signals to balanced mic- -Ievel output
Provides signal and impedance matching for the direct connection
of instruments to amplifiers and mixers

1/4" Inputjacks for connecting instrument or speaker-level signals
(switch selectable)

1/4" Thru jack allows the unbalanced signal to be sent to an
onstage amplifier while the balanced signal is sent to a mixer
Ground Lift switch helps eliminate hum and buzz problems in
musical instrument hookups

Allows use of long cables without high-frequency loss

The DB-I A can be powered either internally by two 9-volt batteries
or externally by phantom power from a mixer

The DB-I I3 passive model has a noise filter for reducing buzz and
hiss (switch selectable)

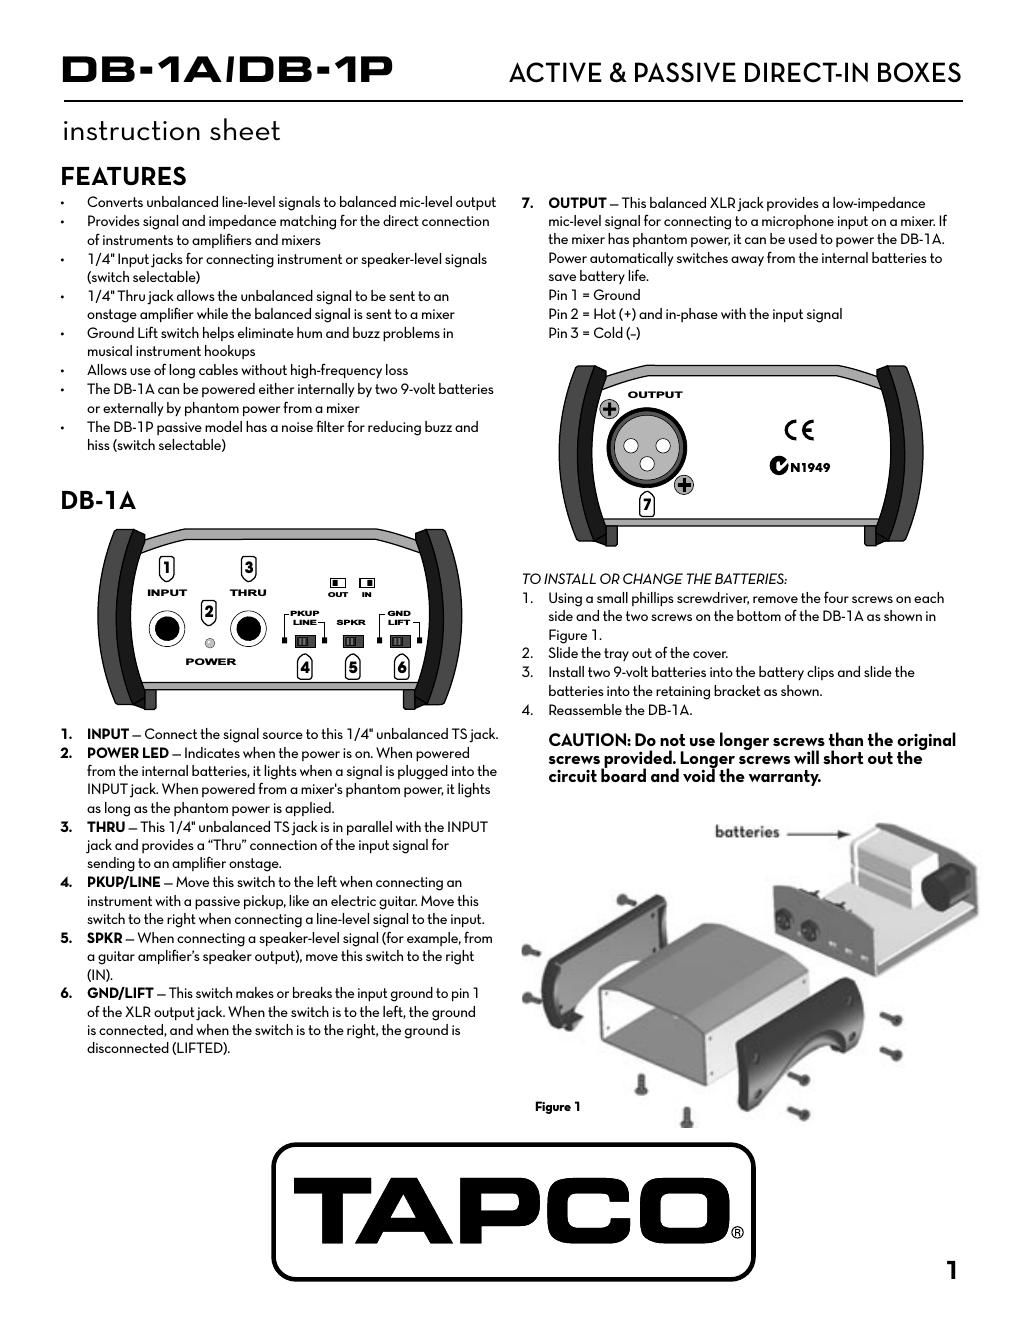
DB-'IA

Q

INPUT

Q

THRU

IEIIEI

am IN

PKuP
Hun: SPKR -l'I_I"I=T

-I.

QIQQ

©-©I.

POWER

INPUT - Connect the signal source to this 1/4" unbalanced TSjack.

POWER LED - Indicates when the power is on. When powered
from the internal batteries, it lights when a signal is plugged into the
INPUTjack. When powered from a mixer's phantom power, it lights
as long as the phantom power is applied.

THRU -This 1/4" unbalanced TSjack is in parallel with the INPUT
jack and provides a Thru" connection of the input signal for
sending to an amplifier onstage.

PKUP/LINE - Move this switch to the left when connecting an
instrument with a passive pickup, like an electric guitar. Move this
switch to the right when connecting a line-level signal to the input.
SPKR - When connecting a speaker-level signal (for example, from
a guitar amplifier's speaker output), move this switch to the right
(IN).

GND/LIFT - This switch makes or breaks the input ground to pin I
of the XLR outputjack. When the switch is to the left, the ground

is connected, and when the switch is to the right, the ground is
disconnected (LIFTED).

OUTPUT - This balanced XLR jack provides a low-impedance
mic-level signal for connecting to a microphone input on a mixer. It
the mixer has phantom power, it can be used to powerthe DB-I A.
Power automatically switches away from the internal batteries to
save battery life.

Pin I = Ground
Pin 2 = Hot (+) and in»phase with the input signal
Pin 3 = Cold (-)

OUTPUT

TO INSTALL OP CHANGE THE BATTERIES:

1.

Using a small phillips screwdriver, remove the tour screws on each
side and the two screws on the bottom of the DB-I A as shown in
Figure I .

Slide the tray out of the cover.

Install two 9-volt batteries into the battery clips and slide the
batteries into the retaining bracket as shown.

Reassemble the DB-I A.

CAUTION: Do not use Ionger screws than the original
screws provided. Longer screws wiII short out the
circuit board and void the warranty.

batteries ->

Figure I

TAPCD.

Page 2

DB-'IP

M-I

2

INPUT - Connect the signal source to this 1/4" unbalanced TS jack.
INST/AMP - Leave this switch out when connecting an instrument
or line-level signal to the INPUTjack. Push this switch in when
connecting a speaker-level signal (for example, from a guitar
amplifiers speaker output).

FLAT/FILTER - Push this switch in to engage a high-cut filter to
reduce hiss and noise when using the AMP input setting. The filter
has no effect when the input is set to INST (2).

THRU -This 1/4" unbalanced TSjack is in parallel with the INPUT
jack and provides a Thru connection of the input signal for
sending to an amplifier onstage.

OUTPUT - This balanced XLRjack provides a low-impedance mic-
level signal for connecting to a microphone input on a mixer.

Pin 1 = Ground

Pin 2 = Hot (+) and in-phase with the input signal

Pin 3 = Cold (-)

GND/LIFT- This switch makes or breaks the input ground to pin 1

of the XLR outputjack. When the switch is in the OUT position, the

ground is connected, and when the switch is pushed IN, the ground
is disconnected (LIFTED).

it is important to keep your receipt in a safe place, and not a bad idea to write your product information
here for future reference (i.e., insurance claims, tech support, return authorization, etc.).

PRODUCT SERIAL #: [

PURCHASED AT: [

DATE OF PURCHASE: [

Parr No. 0015052 Rev. A 02/05
©2005 LOUD Technologies Inc. All Rights Reserved.