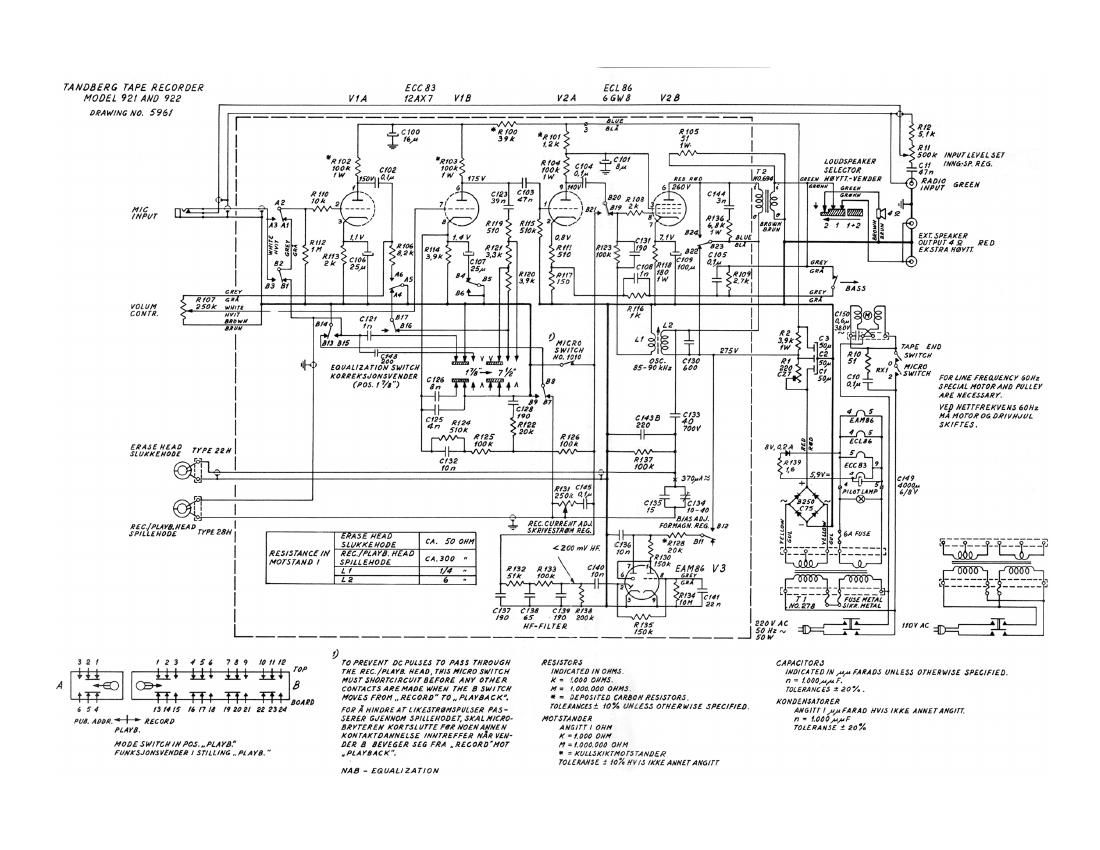
Tandberg 921 Schematic

This is the 2 pages manual for Tandberg 921 Schematic.
Read or download the pdf for free. If you want to contribute, please mail your pdfs to info@audioservicemanuals.com.

Page: 1 / 2
left right
Tandberg 921 Schematic

Extracted text from Tandberg 921 Schematic (Ocr-read)


Page 2

ADJUSTMENT OF TB 921 AND YB 922.

. e on]
J I

i, ADJUSTMENT or OSCILLAion

L1.

Puah fie:urd»Pllybuck Switch to .Re.
cord- poaitlon and Tape Motion Lever
to poaltlon (Normal Forward Drive).
Maaeure voltage acroae arm head
With a low lnpu| capacity VTVM (Var
cuum Tube Voltmeter)

(Ute a probe with input capacity lees
than to pF in order not to detune the
creed heed circuit.) Adiuat the core
in the oeetllaior coil to max reading on
VTVM. check that the reading is the
reme (as close HI poeeihic) in past»
tiena -Normai. and -Ex|ra- The ire.
ouancv ahouid than he its-ea RH: and
voltage tic-220 volta. The biaa cur-
rent ahould be about :75 art, it can be
varied e 25% by marine oitha var-cola
capacrtor Cm [see point 53),

:, ADJUSTMENT 0F HEADS

2,
22

23
ZSI

2.32.

2,33.

Dam-gnadring. Demagnatiea the
heads and adlaoent parts.

Set Tape Motion Lever to Normal For-
ward Drive (aunt) and check that
the rape rune equidistant tram the lie
gee oi the edruttaltle taoe guide.

Vhe playback head.

The height oi head to adiuaied by the
height adruatment acrewa The upper
edge oi the tape anould run even with
the upper edge at head Ba sun that
the mounting plate tor the haad and
the upper mounting plate are parallel
Adruat the playback head With the III-
irruth alignment ecrew tor max reading
on the output meter by playing back a
etandard azimuth alignment tape

Lin the preuure pad away irorn the
tape lf the meter readinga decreeee
more than udehurn the playbockhaed
by turning the hand mounting plate,
The direction ie determined byincreae
ing the contact angle to the right or
ieit aide oi the head by means oi a
nonmagnetic pio. (Rex ii the meter
reading inmllu with Incmulng Carla

tact angle on the right ride or the gap.
ium the hand clockwiae.
Racheok ihe arimuth alignment 2 3 2

1h. :raaa H d
.0!" (2 mm the lace or the erate
hndd ehould be vieibie above the tape,
The ioorplate tor the head muet be
parallel with the upper mounting plate.

s. RECoRDiNG CURRENr. DISIOKNON

a.i.

32.

iii.

42.

Recording current In the recording
head ehauld be lunch that dunno rec
cording at max. recording ievei one
will get 44% diatortion en die re-
corded program. Ir = so uA.
Record a 400 Mr aignal with the re-
cording ievei indicator light beam iuei
touching each other Play brick and
marauie diatorrion at output terriri.
naia with a dieterrion meter. ll dietar-
tion ia too high or too low. the record-
ing current ia adiueted by rneane oi the
potentiometer Rial iincraaairig coun-
oerclockwrae) on the amplifier board.
eaauramanta ara reneaiad until
tiaiactory reeuita are obtained.

AMPLIFIER

With the Record-Playback Snitch in
-t=ua. ADDR. position the tape ra-
corder iuncuonr an an amplifier tor
microphone or radio input.

input impedance ior mleanhone: i M
chin. and ior radio lnpnl: .SM ohm.
The voltage diviaian horn radio input
to variable irom I:1 . do try
means at a ,5 M ohm potentiometer,
From the Emmy eat to about its».

5. Full BACK

5!.

With Record-Playback Switch in
.piaypack- posiiien and Tape Modori
Lever in Normal Forward Drive (a
position) the playback iunctton can be
checked, preferably with a atriridard
frequency tape

52

iolerarioea t 25 dB for nldybnck lie-
ouancy raeponae curve

a. RECORDING AND munch

EL

62.

6.;

With Record-Playback Switch in dis-
cord. puma" and Tape Molan Lever
in Nonnai Forward Drive recording
can he made from microphone or re-
dta input

A mm H: input elgnal la connected
to radio input. Spead 7%". Volume
control ls edruated to that the record
level indicator light beanie touch aeeh
other. Reduce volume mold and u»
cord ihe deaired ireoiienctaa. Bypluy»
ing back the recording and meaaunng
output voirage oi the whole iragriancv
range the iraouency reaponre Curves
can be checked. Same procedure ior
35/." and 77/." speed. iolarancar at
all space 2 :i tie,

it the tape recorder-e treble responee
i. too high or too low. the pier current
can be adiusbed wiih the variable ce-
pacitor clad Rachack point 32.

1. SPEED CHECK

7i

Make lum that the flywheel Ind ihe
tranatar wheel move ireetv. Ure a tape
with a marked aeetian or 450 lnchea
(tiu cm) (start and and markera).
Meuuu the time it takaii ior tha lepe-
aactton to pass by the recording head.
Correct time: i min. ior We, 2 min,
tor 3% and 4 mint ior iv/g". Speed
lolemnnea: e 2% at all apeede.

a. MICROPHONE AND ERAsE CHECK

El

52

in .Normal- poeitiorr. reoord irom mi-
crephone at mar record rig level. he-
wind. play baCk end iiaten to check
racarding.

Sat volume control to zero and areea
the program Rewrnd ih- tape and play
back with the volume control on mu.
check ihar the program ia Maud Dom»
vietoly