Sony xm 7557 owners manual

This is the 2 pages manual for sony xm 7557 owners manual.
Read or download the pdf for free. If you want to contribute, please mail your pdfs to info@audioservicemanuals.com.

Page: 1 / 2
left right
sony xm 7557 owners manual

Extracted text from sony xm 7557 owners manual (Ocr-read)


Page 1

Features

I Maximum power output of 150 watts x 4 + 500
watts (at 4 ohms).

I Features a 2 channel-input / 5 channel-output
function that makes it possible to carry a 2-way
multi system even with a single line output from
the car stereo.

I Built-in variable filter corresponds to a wide range,
from 50 Hz to 400 biz/500 Hz to 4 kHz.

(x 1/ x 10 switch)

I Built-in variable LPF (Low-pass filter), HPF (High-
pass filter) and low boost circuit.

I The DIRECT switch can be used to bypass the low-
pass filter, high-pass filter for more enjoyable high
quality sound.

I Possible to switch between Hl-CURRENT mode
(1 - 2 Q) and l-II-VOLTAGE mode (2 - 4 Q) for
subwoofer.

I Negative Feed Back (ON/OFF) switchable.

I Independent voltage amplifier power supply.

I Protection circuit and indicator are provided.
I Pulse power supply" for stable, regulated output
power.

* Pulse power supply
This unit hasa built-in power regulator which
converts the power supplied by the DC 12 V car
battery into high speed pulses using a
semiconductor sivitdi. These pulses are stepped up
by the built-in pulse transformer and separated into
both positive and negative power sipplies before
being converted into direct current again. This Isto
regulate fluctuating voltage from the car battely
This light weight power supply system provides a
highly effluent power supplywith a low impedance
output.

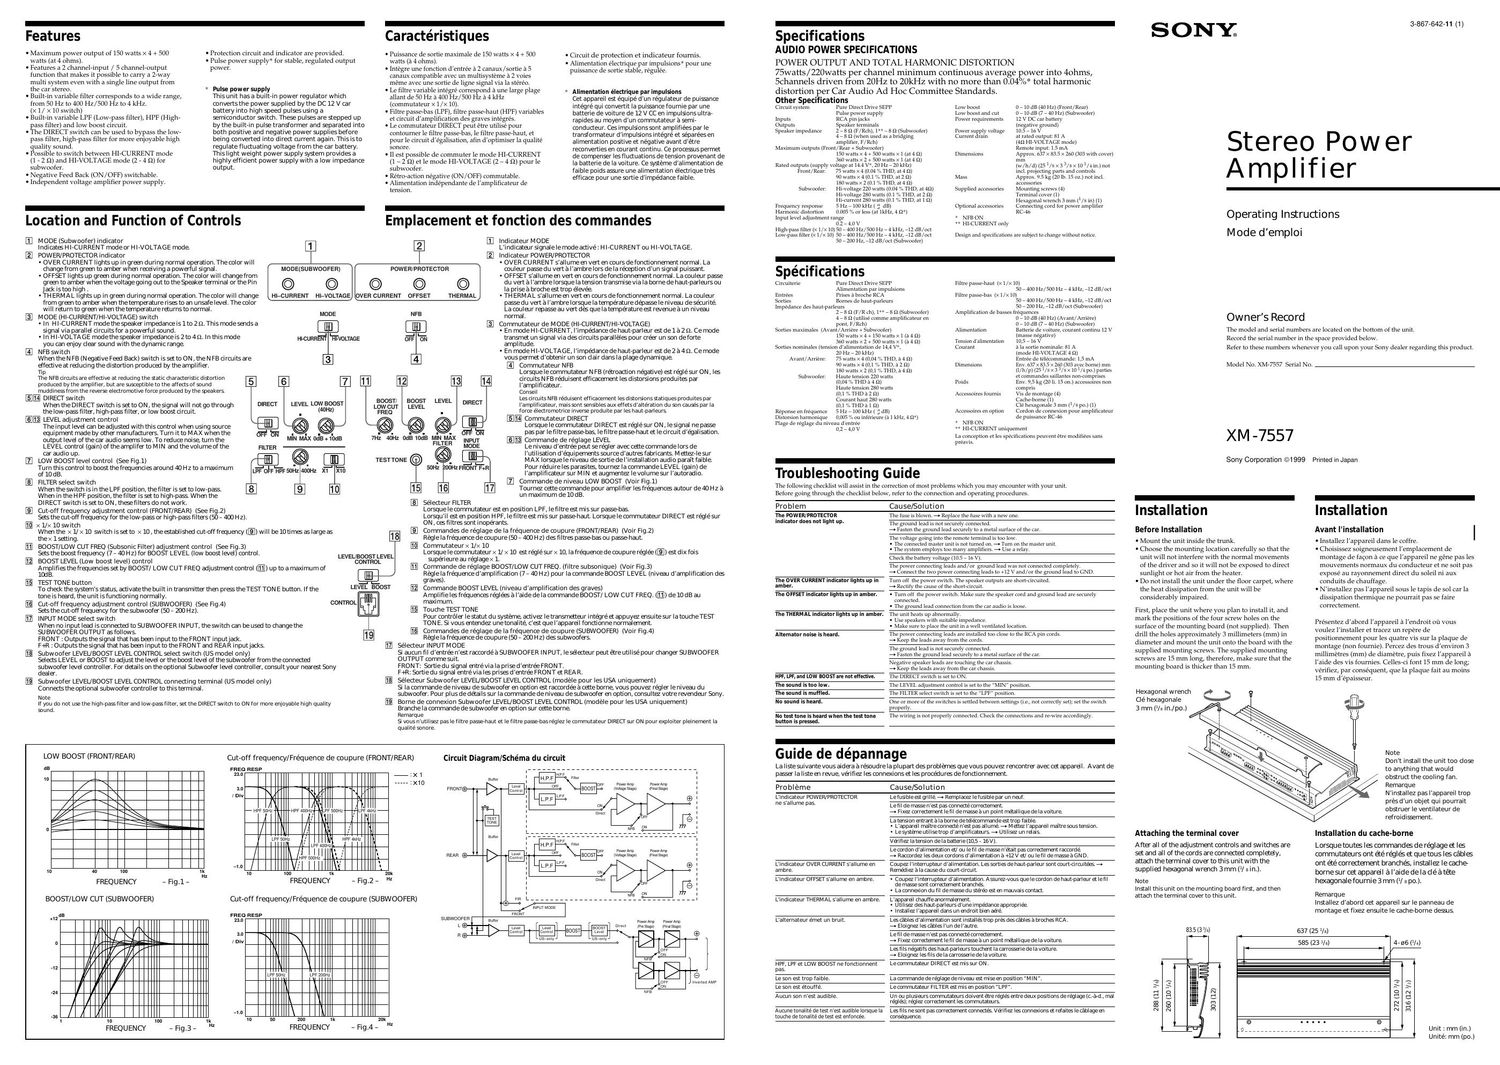
Location and Function of Controls

m MODE (Subwoofer)indicator
Indicats H I-CURRENT modeor H I-VOLTAGE mode.

E POWER/PROTECTORindicator

- OVER CURRENT lightsup In green during normal operationThecolor will

Caractéristiques

I luissance de sortie maximale de 150 watts x 4 + 500
watts (a 4 ohms).

I Integre une fonction dentree a 2 canaux/ sortie a 5
canaux compatible avec un multisysteme a 2 voies
meme avec une sortie de ligne signal via la stereo.

I Le filtre variable intégré correspond a line large plage
allant de 50 Hz a 400 Hz/SUO Hz a 4 kHz
(commutateur x l/x 10).

I Filtre passe-bas (LPF), filtre passe-haut (HPF) variables
et circuit damplification des graves intégres.

I Le commutateur DIRECT peut étre utilise pour
contourner le filtre passe-bas, le filtre par e-haut, et
pour le circuit dégalisatinn, af-in doptimiser la qualité
sonore.

I 11 est possible de commuter le mode til-CURRENT
(1 - 2 52) et le mode Hl-VOLTAGE (2 - 4 Q) pour le
subwoofer.

I Retro-action negative (ON / OFF) commutable.

I Alimentation indépendante de lamplificateur de
tension.

I Circuit de protection et indicateur fournis.
I Alimentation électrique par impulsions* pour une
puissance de sortie stable, régulée.

* Alimentation électrique par impulsions
Cet appareil est équipé d'un régulateur de plii$ance
intégre qui convertit Ia puifince fournie par une
batterie de voiture de 12 V CC en impulsions ultra-
rapldes ali moyen d'un commutateur a semi-
conducteur. Ces impulsions sont amplifiées par le
transformatelir d'impulsions integré et separées en
alimentation positive at negative avant d'etre
reconverties en courant continu. Ce proceSus permet
de compenser les fluctuations de tension provenant de
la batterie de la voiture. Oe systeme d'aIimentation de
faible poids assure une alimentation electrique tres
efficace pour line sortie d'impédance faible.

Emplacement et fonction des commandes

m Indicateur MODE
L'indicateursignalelemodeactivé : H I-CURRENT ou H I-VOLTAGE.

E IndicateurPOWER/PROTECTOR

- OVER CU RRENT s'allume en vert en cours de fonctionnement normal. La
couleur passedu vert a l'ambrelors de la reception d'un signal pui$ant.

- OFFSET s'allume en vert en cours de fonctionnement normal. La couleur passe

du vert a l'ambre lorsque la tension transmisevia la bornede haut-parleurs ou
la prise a broche st trop elei/ée.

- TH ERMAL s'allumeen vet en cours defonctionnement normal. La couleur
passe du vert a l'ambre lorsque la températuredepasse Ie niveau de sécurité.

La couleur repasse au vert d8 que la temperatures: revenue a un niveau

change from green to amber when receiving a powerful signal. MODE(SUBWOOFER) POWER/PROTECTOR

- OFFSET lighB up green during normal operation. The color will change from
green to amber when the voltage going out to the Speaker terminal or the Pin © © © © ©
jack istoo high.

- TH ERMAL llghls up in green during normal operat: on. The color Will change HI-CURRENT Hl-VOLTAGE VEH CURRENT OFFSET THERMAL
from green to amber when the temperature riss to an unsafelevel. The color
will return to green when thetemperature returns to normal.

E MODE (HI-CURRENT/HIvVOLTAGE) switch 0'95 F5 normal-

- In H I-CURRENT mode the speaker impedance is no 2 9. This mode sends a

signal Via parallel clrcuitsfor a powerful sound.

- In H I-VOLTAGE modelhespeeker impedanceis 2to49. In thismode

you an enjoy clear sound with the dynamic range
E NFB switch

When the N FB (Negative Feed Back) switch is setto ON, the N FB circuits are
effective at reducing the distortion produced by the amplifier.

Tip

The NFB circuits are effective at reducing the static characteristic diiortion

produced bythe amplifier, but are susceptible to the affects of sound

muddinessrrom the reverse electromcitive force produced bythe speakers.

EB) DIRECT switch

When the DIRECT switch is setto ON, the signal will not go through
the low~pass filter, high-pam filter, or low boost Cl rcuit.

@[Sj LEVEL adjustment control

The input level can beadiusted with this control when using source
equipment made by other manufacturers. Turn it to MAX when the
output level of the car audio seems low. To reduce noise, turn the

LEVEL control (gain) of the amplifer to M I N and the volume of the

car audio up.
LOW BOOSTlevel control (See Fig.1)

Turn this control to boost thefrequencis around 40 Hz to a maximum

of 10dB.
FILTER select switch

When theswitch Is in the LPF position, thefilter lS set to low~pass.
When in the H PF position, the filter Is sate highrpass. When the

DIRECT switch issetto ON , thgefilte's do not work.

BE

x 1/>< 10 sWItch

DIRECT

Cut-off frequency adjustment control (FRONT/REAR) (See Figi2)
Sesthe cut-off frequency for the low-pass or highrpass filters (507 400 HZ).

When the x 1. x 10 switch issetto x 10,the atablished cutoff frequency (El) will be 10tim5aslargeas

the x 1 seal ng.

HE

BOOST LEVEL (Low boost level) control

Amplifisthe frequencis set by BOOST/ LOW CUT FREQ adjustment control (I) up to a maximum of

10dB.
TEST TONE button

tone is heard, the unit is functioning normally.

:EE

INPUT M ODE select switch

To check the system's status, activate the built in transmitter then pras theTEST TON E button. If the

Cut-off frequency adjustment control (SUBWOOFER) (See Fig.4)
Se: the cutoff frequency for the subwoofer (50 a 200 Hz).

BOOST/LOW CUT FREQ (Subsonic Filter) adjustment control (See Fig.3)
Sesthe boost frequency (7, 40 Hz) for BOOST LEVEL (low boost level) control.

CONTROL _ H _

When no input lead is connected to SU BWOOFER IN PUT, the Switch an be used to change the

SUBWOOFER OUTPUT asfollows.

FRONT : Outpuls the signal that has been input to the FRON T input jack. [E
F-IR : Outputs the signal that has been input to the FRONT and REAR inputjacks.

Subw oofer LEVEL/BOOST LEVEL CONTROL select switch (US model only)

Selects LEVEL or BOOST to adjust the level or the boost level of the subwoofer from the connected
subwoofer level controller. For details on the optional Subwoofer level controller, consult your narst Sony

dealer.

Subw oofer LEVEL/BOOST LEVEL CONTROL connecting terminal (US model only)
Connects the optional subwoofer controller to this terminal.

Note

If you do not usethe highrpa$fi|ter and IOerafi filter, set the DIREG switch to ON for more enjoyable high quality

sound.

@

o o a . 0
7H: 40H1 MB 10113 MIN M

k
TESTTONE @ .K. _' _
5on com FRONT F+R

LEVEL/BOOST LEVEL
CONTROL

-l t-
LEVEL BOOST

amplitude.

Consell

OFF ON

INPUT

FILTER MODE

Sélecteur FILTER

E Commutateur de MODE (HIvCU RRENT/HI~VOLTAGE)
- En mode H I-CU RRENT, l'impedance de haut-parleur & de 1 a 25L Ce mode
transmet un signal Via d5 circuits paralléla pour creer un son de forte

- En mode H IrVOLTAGE, l'impédance de haut-parleur 5t de2 a 49 Ce mode
vous permet d'obtenir un son clair dans la plage dynamique.
E Commutateur NFB
Lorsque lecommutateur N FB (réIoacti on negative) at regle stir ON, l5
drcuits N FB reduisent efflcacement l5 distorsions produltfi par
I'amplificateurr

Les orcuits NFB réduisent etficacement les distorsions statiques produites par
lampliflcateur, malssont sensibles aux effets d'altération du son Causes par la
force e'lectromotnre inverse produite par les hautrparleurs
@Ej Commutateur DIRECT
Lorsque lecommutateur DIRECT 5t réglé sur ON, lesignal ne passe
pas par leflltre passebas, leflltre passehaut et lecircuit d'égalisation.
@[fij Commande de réglage LEVEL
Le niveau d'entrée peut se regler avec cette commande lors de
l'uti I isation d 'equipements source d'autrs fabrl cents. M etta-le sur
MAX lorsque le niveau desortie de l'installation audio paraitfaible
Pour réduireiS parasita, tourna la commande LEVEL (gain) de
l'amplificateur sur M I N et augmenta levolume sur l'autoradio.
Commande de niveau LOW BOOST (Voir Fig.1)
Tourna cette commande pour amplifia lafréquencs autour de40 Hz a
un maximum de 10 dB.

Lorsque lecommutateur 5t en position LPF, lefiltre St mis sur pamebas.
Lorsqu'il st en position H PF, lefiltrest mis sur passehaut. Lorsque lecommutateur DIRECT 5t réglesur

ON, c5 fi ltrs sont lnoperants.

Oommutateurx 1/x 10

supe'ieureau réglagex 1.

gravs).

@ Commandes de réglage de la fréquence de coupure (FRONT/REAR) (Voir Fig.2)
Regleia fréxmence decoupure (50 a 400 Hz) dsfiltrs passebas ou pamehaut.

Lorsquelecommutateurx 1. x 10 streglesurx 10, lafréquencedecoupure regleedil) stdixfois

fl Commande de reglage BOOST/LOW CUT FREQr (filtre subsonique) (Voir Fig.3)
Regleia fréxmence d'amplifiation (7 a 40 Hz) pour la commande BOOST LEVEL (niveau d'amplifiation d5

Commande BOOST LEVEL (niveau d'amplification des graves)

Amplifie l5frequenc5 regleS a l'aide de la commande BOOST/ LOW CUT FREQ. (I) de 10dB au

maxi mu m.
Touche TEST TON E

Pour contréie lestatut du systéme active letransmetteur intégré et appuya ensuitestir la toucheTEST
TON E. SI vous entendez une tonal ité, c'st que l'appareil fonctionne normalement.

Commandes de réglage de la fréquence de coupure (SU BWOOFER) (Voir Fig.4)
Reglela fréquencedecoupure (50 a 200 Hz) (16 subwoofers.

Sélecteur INPUT M ODE

Si aucun fil d'eitrée n'st raccordea SU BWOOFER I N PUT, lesélecteur peut étre utilisé pour changer SU BWOOFER

OUTPUT comme suit.

FRONT: Sortiedu signal entrevia la prised'entreeFRONT.

F-IR: Sortiedu signal entrevia l5 prism d'entrée FRONT et REAR.
Sélecteur Subw oofer LEVEL/BOOST LEVEL CONTROL (modele pour les USA uniquement)
Si la commande de niveau de subwoofer an option 5t raccordee a cette borne vous pouva regler leniveau du
subwoofer. Pour plus de details sur la commande de niveau de subwoofer en option, consults: votre revendeur Sony.
Borne de connexion Subwoofer LEVEL/BOOST LEVEL CONTROL (modele pour les USA uniquement)
Branche la commande de subwoofer en option sur cette borne.

Remarque

s vous nutilisez pasie filtre paeehaut et lefiltre passehas réglez le rommutateur DIRECT siir on pour exploiter pleinement ia

dualite sonore.

LOW BOOST (FRONT/REAR)
at;

TD

10 to ion

FREQUENCY - Fig.1 -

BOOST/ LOW CUT (SUBWOOFER)

M2

too

To
FREQUENCY

- Fig.3-

1
Hz

1k

"1 FREQUENCY

Cut-off frequency/ Fréquence de coupure (FRONT/ REAR)

FREQ RESP
2111

3.0
I Div

HPF 5on

LPF Squ ,l HPF 4)in

LPF
III

-1.0 i
in inn Ik

FREQUENCY - Fig.2 -

Cut-off frequency/Fréquence de coupure (SUBWOOFER)

FREQ RESP
23.0

11)
/ Div

LPF SDHz

LPF 2mm

Butter

FFIONTO

Circuit Diagram/Schema du circuit

>4:

é

rcsr
TONE

Butter

I


F r
- Filter

HEAR (C) {>_

PowerNW
Wm span

Polermp
IFlnal saga)

Direct

Pmriimv

(visage spas.

vaermn

O
-0
20k
Hz Direct
6
are a 7i;
sssssssssssssssssssssssssssssssssss i
INFUIMODE
room
SUEWOOFER ME, My Amp
LO We, Lem Ems, Direci (preseoel lFImlSVJge)
PI Control Conlrul BOOST Level 6)
@* us "ii a
i a
jo
inseam

in 51: zuu 1k 20k

- Fig.4-

Hz

Specifications
AUDIO POWER SPECIFICATIONS

POWER OUTPUT AND TOTAL HARMONIC DISTORTION

75watts/ 220watts per channel minimum continuous average power into 4ohms,
5channels driven from 20Hz to 20kHz with no more than 0.04%* total harmonic
distortion per Car Audio Ad Hoc Committee Standards.

Other Specrflcatlo ns

Circuit system Pure Direct Drive SEI'P
Pulse powcr supply

inputs RCA pin jacks

Outputs Speaker terminals

Speaker impedance 2 a 8 t2 (F/Rch), 1w 7 ti o (siibwooter)
.i 7 ti it (when used as a bridging
amplifier, F/Rch)

Maximum outputs (Front/Rear e Subwoofcr)
150 watts x .i 4 Suit watts x 1 (at 4 n)
361) watts x 2 + Sui) watts x 1 (at 4 n)

Rated outputs (supply voltage at 14 4 w. 2i) Hz a 211 kHz)

Front/Rear. 75 watts x 4 (i).ii4 o lHD, at 4 n)

all watts x 4 (ti 1 "a THD, at 2 i2)

lxii watts x 2 ((1.1 % THD, at 4 $2)
Subwoofer, Iii-voltage 2le watts (0.0-1 o THD, at 451)

Hirvoltage 2in watts (0.1 /o THD, at z o)
Hi~cl|rrcnt 280 watts (II.1 THD, at 1 :2)
Frequency rcsponsc 5 Hz a 1110 kHz ( :1 dB)
Harmonic distortion (1.005 "o or less (at 1l input level adjustment rangc
I) Z s 4.0 V
Highpass filtcr (x 1/x 10) Eli a 4110 Hz /3lItI Hz a 4 kHz, 712 dB /oct
Loerziss filler (x l/X Ill) Sll r 400 HZ/Sllll Hz 7 4 kHz, 712 dB/oct
Bit a 2110 Hz, 712 dB/oct (Subwoofer)

Low boost
Low boost and cut
Power requiremcnts

ii a in dB (40 Hz) (Front/Rear)
ii a in dB (7 ,40 Hz) (Subwoofer)
12 v Dc car battery

(ncgauvc ground)

10.5 s 16 V

at rated output. iii A

(4;; HI~VOLTAGE mode)
Rcmotc input, 1 5 mA

Power supply voltage
Current drain

Dimcnsions Approx o37 x 2535 x zot)(3i13 with covcr)
mm
(w/h/rl)(251/x x 3 3/ii x 10 1/i in.) not
incl. projecting parts and controls

Mass Approx 9 5 kg (20 lb. 15 oz.) not incl,

aecessorics
Mounting screws (4)

Terminal cover (1)

Hexagonal wrench 3 mm (Vs in) (1)
Connecting cord tor powcr ampliticr
R046

Supplied accessories

Optional accessories

NFB ON
V" HIrCURRENT only

Dcsign and spcciiicaiions arc subjcct to change Without noticc.

Specifications

circuitcric Pure Direct Drive SEPP
Alimentation par impulsions

Entrccs Priscs a broche RCA

Sortics Borncs dc haiilvparlcurs

Impedance des haul-parleiirs
2 a ti o (F/R ch), 1 a s o (Subwoofer)
4 a ti o (utilisc' comme ampliiicateur cn
pont, F/Rch)

Sorties moximalcs (Avant/Arricre + siihwootcr)
15ii watts x 4 + 130 watts x 1 (a 4 t2)
3oii watts x 2 + 500 watts x 1 (a 4 n)

Sorties nominalcs (tension d'alimcntation do 14,4 VT,

20 Hz a 21) kHz)

75 watts x 4 (0,114 % THD, a 4 n)

so watts x 4 (0,1 THD, a z 9)

list) watts x 2 (ii,l THD, a 4 o)

lldule tension 220 watts

Avant/Amere

Subwoofer.

Filtrc passe~haiil (x l/x1li)
30 7 Jill) HZ/Slll) Hz a 4 kHz, 712 dB/oct
Filtre passc-bas (x l/x lo)
5 r Alli) HZ/Slltl Hz ,4 kHz, 712 dB/oct
s a 2011 {12,712 dB/oct (Subwootcr)
Amplitication dc basscs fréquences
ii a 10 dB (40 Hz) (Avant/Arriere)
0 a in dB (7 a 40 Hz) (siibwooter)
Battery: dc \mturc, Coumnt continu 12 V
(massc négritive)
10,5 7 16 V
a la sortie nominale 81 A
(mode HI~VOLTAGE 4 £2)
Entrcc de tclecommandc. 1,5 mA
Env. 637 x 83.5 x 261) (303 avcc borne) mm
(l/h/p) (25 1/i x 3 /a x til '/i po.) panics
ct commandes saillantcs nonvcomprises

Alimentation

Tension dalimentalion
Cotirant

Dimcnsions

3-867-642-11 (1)

SONXC,

Stereo Power
Amplifier

Operating Instructions
Mode d'emploi

Owner's Record

The model and serial numbers are located on the bottom of the unit.
Record the serial number in the space provided below.
Refer to these numbers whenever you call upon your Sony dealer regarding this product.

Model No. XM-7557 Serial No.

(Ibo-'1 % THD a 4 £2)

Ha iitc tension 2x0 watts

(0,1 to THD a 2 t2)

Courant haut 225i) watts

(i),1 THD a 1 t2)
Rc'ponse en trc'quencc
Distorsion harmoniqiic
Plagc dc rc'glage du nivcau dcntréc

11,2 7 4,11 v

s Hz a lit) kHz ( 3 ([13)
0,005 "/o oli infc'rieurc (a 1 kHz, -l 9')

Poids Env 9,3 kg (20 ii. 13 on) accessoires non
compris

vis dc montage (4)

Criehe~borne (1)

Clé hcxagonale 3 mm (/a po,) (1)

Cordon dc connexion pour ampliticatcur

de puissancc ROM»

Acccssoircs foiirnis

Accessoires cri option
r NFB ON
W ill-CURRENT uniquemcnt

La conception ct les specifications pcuvcnt ctrc modificcs sans
prcavts

Troubleshooting Guide

The tollowing checklist will assist in the correction of most problems which you may encounter with your unit
Before going through the checklist below, refer to the connection and operating procedures.

Problem

Cause/Solution

The POWER] PROTECTOR
indicaturdoes not light up.

The fuse is blown, 4» Replace the fuse with a new one,

The ground lead is not scciirely connected.
a rasicn thc ground lcad securely to a metal surface of thc car.

Thc voltage going into the rcmotc terminal is too low.

I The conncclcd master unit is not turned on. 4v Turn on the master unit.

- The system employs too many amplitiers. a Use a relay.

Check the battery voltage (10.5 a 16 V)

Thc power connecting leads and/or ground lead was not conncctcd completely

4» Connect the two power connecting leads to +12 V and/or the ground lead to GND.

The OVER CURRENT indicator lights up in
amber.

Turn off the power switch Thc speaker outputs are shortcirciiitcd.
a Rcctiiy the cause of thc Shortfircuit.

The OFFSET indicator lights up in amber.

- Turn off the power switch Makc surc thc speakcr cord and ground lcarl arc scciirely
connected
- The ground lead connection from the car audio is loose

The THERMAL indicator lights up in amber.

1hc unit heats up abnormally.
- Use spcakcrs with siiitablc impcdancc.
- Make sure to place the unit in a well vcntilaicd location.

Alternator noise is heard.

The powcr connecting leads are installed too closc to the RCA pin cords.
a Keep the loads away trom the cords

Thc ground lcad is not scciircly connected.
a rasicn the ground lcad securely to a mctal surface of thc car.

Ncgativc speaker leads arc touching the car chassis.
a Keep the loads away trom the car chassis.

HPF, LPF, and LOW BOOST are not effective.

The DIRECT switch is set to ON.

The sound is too low.

The LEVEL adjustment control is set to the MIN position.

The sound is muffled.

The FILTER select switch is set to this LPF position

No sound is heard.

Onc or more of thc swttchcs is scttlcd between settings (i,e., not correctly set); sct the swttch
propcrly

No CUR tone is heard when the test tune
button is pressed.

Thc Wiring is not properly connected Check the connections and rewirc accordingly.

-
Guide de dépannage

La liste suivante vous aidera a rsoudre la plupart d6 problémS que vous pouva rencontrer avec cet appareil. Avant de
passer la liste en revue, verifia l5 conne

Probléme

Cause/Solution

L'indicateur POWEWPROTECTOR
ne s'allume pas.

Lefusibleatgrille 4» Remplaca lefusible par un neuf.

LefiI de niasse nst pas connecte' correctenent.
4v Fixez (orrectemmt lefll de massea un point meallioue deiavoiture

La teasion entrant a la borne det erommande at trop faible
- Lappareil maitreconnecten pas allume. 4v Metta Iappareil maitresous tension.
- Lesysteme utiliseirop d'amplificatairs. 4v Utilisa un reais.

Vérlfiez lateision dela batterlellofir 15v).

Le cordon d'aI lmEnEtion Gt/ ou la fil de mm n'était pm correctenent raccordé.
4t Ra(cordez ladeux cordon: d'alimentatlon a +12V et/ ou lefll de Toma GND.

L'lndlrateur OVER CURRENT S'allume en
ambre.

Coupez Iinterruptair d'alimentatlon. L5 somrs de hautrparleur sont courtdrcuitea. »
Renediez a la cause du courtrcircuit

L'lndlrateur OFFSET S'allume en ambre.

- Coupa llnterruptairdalimentation. Assure-erousquelemrdon de hautparleir et lefll
de masse sontcorrectenentbraidirs
- La connerion du fll de masse du stereoetim mauvais contact.

L'lndlrateurTI-IERMAL S'allume en ambre.

Lappare'l chauffe anorrnalenent.
- Utillsa des hautrparlairs d'une impedance appropriee.
- lnstallez Iappareil dans un endroit pien aé'é.

L'alternateur émet un bruit.

L55 cables d'alimentation sont installétrop pré d5 CébiS a broche RCA.
4t Eloigna Iacébla I'un delautre

LefiI de niasse nst pas connecte' correctenent.
4v Fixez (orrectemmt lefll de massea un point meallioue deiavoiture

Lssfils negatlfs d5 hautrparlairstoudwent la (BTTUSETIE de la vulture.
4t Eloignez I5 fils de la Grrosserie de la volture.

HPF, LPF et LOW BOOST ne fonctionnent
pas.

Le (ommutatair DIRECT a mis Sur ON.

Le sori est trop faible.

Lacummandedereglagede niveau 5t miseen position "MIN

Le son est étouffe.

Le (ommutatair FILTER 5t mism position LPF".

Aucun Son n'est audible.

u n ou plusieurs communteurs doivmt etre réglé entre deux positions de re'glage (cad, mal
regle); regiez correctement les commutateurs

Aucune tonallté detest n'est audible lorsque Ia
tuudle de tonalite detest est enfoncée

Lesrils nesont pas (orrectement mnnectés. vertiez I5 connexions it rdaita le cablage a1
consequence.

XM -7557

Sony Corporation @1999

Installation

Before Installation

I Mount the unit inside the trunk.

I Choose the mounting location carefully so that the
unit will not interfere with the normal movements
of the driver and so it will not be exposed to direct
sunlight or hot air from the heater.

I Do not install the unit under the floor carpet, where
the heat dissipation from the unit will be
considerably impaired.

First, place the unit where you plan to install it, and
mark the positions of the four screw holes on the
surface of the mounting board (not supplied). Then
drill the holes approximately 3 millimeters (mm) in
diameter and mount the unit onto the board with the
supplied mounting screws. The supplied mounting
screws are 15 mm long, therefore, make sure that the
mounting board is thicker than 15 mm.

Hexagonal wrendn » \
Oé hexagonale v ?
3 mm (Ila in./por)

Attaching the terminal cover

After all of the adjustment controls and switchs are
set and all of the cords are connected completely,
attach the terminal cover to this unit with the
supplied hexagonal wrench 3 mm W 5 in).

Note
Install this unit on the mounting board first, and then
attach the terminal cover to this unit.

83.5 (3 3/il

288 (11 3/a)
260 (10 Vt)
303 (12)

Printed in Japan

Installation

Avant l'installation

I lnstallez lappareil dans le coffre.

I Choisissez soigneusement l'emplacement de
montage de facon a ce que lappareil ne gene pas les
mouvements normaux du conducteur et ne soit pas
expose au rayonnement direct du soleil ni aux
conduits de chauffage.

I N'installez pas lappareil sous le tapis de sol car la
dissipation thermique ne pourrait pas se faire
correctement.

Iresentez dabord lappareil a lendroit ou vous
voulez l'installer et tracez un repere de
positionnement pour les quatre vis sur la plaque de
montage (non foumie). Iercez des trous denviron 3
millimetres (mm) de diametre, puis fixez lappareil a
laide des vis fournies. Celles-ci font 15 mm de long;
vérifiez, par consequent, que la plaque fait au moins
15 mm dépaisseur.

Note

Don't install the unit too close
to anything that would
obstruct the cooling fan.
Remarque

N'installez pas l'appareil trop
presd'un objet qui pourrait
obstruer le ventilateur de
refroidisement.

Installation du cache-borne

Lorsque touts I5 commands de régl age at I5
commutateurs ont tté réglfs et quetous I5 cabla
ont été correctement branché, installa Ie came
borne sur cet appareil a l'aide de la clé a téte
hmagonalefournie 3 mm (1/ a po.).

Remarque
Installez d'abord cet appareil sur Ie panneau de
montage et fixez ensuite le cache-borne deals

637 (25 Va)
585 (23 Va)

3:
50
En

Unit : mm (in.)
Unite: mm (po.)

Page 2

Connections

Precautions

I This unit is designed for negative ground 12 V DC
operation only.

I Use front/rear speakers with an impedance of 2 to 8
ohms (4 to 8 ohms when used as a bridging
amplifier).

I Use a subwoofer with suitable impedance.

7 Hl-CURRENT mode: 1 to 2 Q.
7 Hl-VOLTAGE mode: 2 to 8 52.

I Do not connect any active speakers (with built»in
amplifiers) to the speaker terminals of the unit.
Doing so may damage the active speakers.

I Avoid installing the unit in areas subject to:

7 high temperatures such as from direct sunlight or
hot air from the heater

7 rain or moisture

7 dust or dirt.

I If your car is parked in direct sunlight and there is a
considerable rise in temperature inside the car,
allow the unit to cool down before use.

I Be sure to install the unit horizontally so that the air
duct of the cooling fan or its fin will not be covered
with carpet etc.

I The cooling fan operates when the temperature
inside the unit rises to a certain level. It is not a
malfunction if the cooling fan does not operate
when you turn on the power.

I If this unit is placed too close to the car radio or
antenna, interference may occur. in this case,
relocate the amplifier away from the car radio or
antenna.

I If no power is being supplied to the master unit,
check the connections.

I This power amplifier employs a protection circuit*
to protect the transistors and speakers if the
amplifier malfunctions. Do not attempt to test the
protection circuit by covering the heat sink or
connecting improper loads.

I Do not use the unit on a weak battery as its
optimum performance depends on a good power
supply.

I For safety reasons, keep your car audio volume
moderate so that you can still hear sounds outside
your car.

Fuse Replacement

If the fuse blows, check the power connection and
replace the fuse. if the fuse blows again after
replacement, there may be an internal malfunction. In
such a case, consult your nearest Sony dealer.

Warning

I When replacing the fuse, be sure to
use one matching the amperage
stated above the fuse holder. Never
use a fuse with an amperage rating
exceeding the one supplied with the
unit as this could damage the unit.

I If all four fuses are not used, the
performance is limited, and the
power may not be activated.

* Protection circuit
Thisamplifier is provided with a protection circuit
that activates in the following cases:
7 when the unit isoverheated
7 when a DC current isgenerated
7 when the speaker terminals are short circuited.
The color of the POWER/PROTECTOR indicator will
changefrom green to amber, and the unit will shut
down.
If thishappens, turn off the connected equipment.
take out the casette tape or disc, and determine the
cause of the malfunction. If the amplifier has
overheated, wait until the unit coolsdown before
use.

If you have any questions or problems concerning
your unit that are not covered in this manual, please
consult your nearest Sony dealer.

Caution

I Before making any connections, disconnect the
ground terminal of the car battery to avoid short
circuits.

I Be sure to use speakers with an adequate power
rating. If you use small capacity speakers, they
may be damaged.

I Do not connect the (9 terminal of the speaker
system to the car chassis, and do not connect the
9 terminal of the right speaker with that of the
left speaker.

I Install the input and output cords away from the
power supply lead as running them close
together can generate some interference noise.

I This unit is a high7power amplifier. Therefore, it
may not perform to its full potential if used with
the speaker cords supplied with the car.

I If your car is equipped with a computer system
for navigation or some other purpose, do not
remove the ground wire from the car battery. If
you disconnect the wire, the computer memory
may be erased. To avoid short circuits when
making connections, disconnect the +12 V power
supply lead until all the other leads have been
connected.

k
\

Connexions

Préca utio ns

I Cet appareil est concu pour fonctionner uniquement
sur courant continu de 12 volts avec masse negative.

I Utilisez des haut-parleurs dune impedance de 2 a
8 ohms (4 a 8 ohms lors de lutilisation comme
amplificateur en pont).

I Utilisez un subwoofer d'une impedance appropriée.
7 Mode Hl-CURRENT' a 2 Q
7 Mode til-VOLTAGE. 2 a 8 Q

I Ne raccordez pas de haut-parleurs actifs (avec
amplificateur integre) aux bornes de haut-parleurs
de cet appareil; ils pourraient ét-re endommages.

I Ninstallez pas lappareil a un endroit exposé a:

7 de hautes temperatures comme sous le
rayonnement direct du soleil ou pres dun
conduit de chauffage

7 la pluie ou a lhumidite

7 de la poussiere on a des saletés.

I 51 votre voiture était garée en plein soleil et que la
température a considérablement augmenté a lintérieur,
laissez refroidir l'appareil avant de lutiliser.

I Veillez a installer lappareil horizontalement de
facon a ce que le conduit dair du ventilateur de
refroidissement ou ses ailettes ne soit par recouvert
par le tapis de sol, etc.

I Le ventilateur fonctionne lorsque la temperature
interne de lappareil atteint un certain niveau. Ce
nest pas anormal que le ventilateur ne fonctionne
pas a la mise sous tension.

I Si cet appareil est placé trop pres de lautoradio et
de lantenne, il se peut que des interferences se
produisent. Dans ce cas, éloignez lamplificateur de
lautoradio ou de lantenne.

I Si lappareil principal nest pas alimenté, verifiez les
connexions.

I Cet amplificateur de puissance integre un circuit de
protection* destine a proteger les transistors et les
haut-parleurs en cas de dysfonctionnement de
lamplificateur. Nessayez pas de tester le circuit de
protection en recouvrant le di. pateur de chaleur
ou en connectant des charges inappropriees.

I Nutilisez pas lappareil sur une batterie faible, car
sa performance maximale dépend d/une bonne
alimentation en electricité.

I Pour des raisons de sécurité, écoutez lautoradio a
un volume modére afin d'entendre les bruits
extérieurs.

Remplacement du fusuble

Si le fusible saute, vérifiez les connexions du {11
dalimentation et remplacez le fusible. Sil saute de
nouveau, un mauvais circuit interne peut en etre la
cause. Dans ce cas, consultez votre concessionnaire Sony.

Avertissement

I En cas de remplacement du fusible,
Veillez a utiliser un fusible dont
l'intensité correspond a celle inscrite
sur le porte-fusible. Nutilisez jamais de
fusible dont lintensité dépasse celle du
fusible fourni avec lappareil, car vous
risqueriez dendommager lappareil.

Si les quatre fusibles ne sont pas
utilises, les performances s/en
trouvent limitées et il se peut que le
systeme ne puisse étre mis sous
tension.

6 Circuit de protection
Cet amplifimteur est équipe d'un ciroiit de
protection qul s'active dans les cas suivants:
7 Surchauffe de l'appareil
7 Production d'un courant continu
7 Court-circuit aux bornes des haut-parleurs
La couleur du temoin POWER/PROTECTOR page du
vert a l'ambre et l'appareil séteint.
Si Ie passe présente, coupez l'allmentation de
l'appareil raccordé et éjectez la ca§ette ou ledisque
compact avant d'examiner la cause de la défaillance.
Si I'amplificateur es: trop chaud, attendez qu'il
refroidise.

Pour toute question ou probleme qui ne serait pas
traite dans ce manuel, consultez votre concessionaire
Sony.

Attention

I Avant d'effectuer les connexions, débranchez le
fil de masse de la borne de la batterie pour éviter
un court7circuit.

I Utilisez des haut7parleurs d'une capacité
adequate. Si Vous utilisez des haut7parleurs de
faible capacité, ils risquent d'etre endommagés.

I Ne raccordez pas la borne @ des haut7parleurs a
la carrosserie de la voiture ni la borne @ du
haut7parleur droit a celle du haut7parleur
gauche.

I Eloignez les cordons d/entree et de sortie du fil
dalimentation électrique pour eviter que des
interferences ne se produisent.

I Cet appareil est un amplificateur de haute
puissance et il peut ne pas atteindre sa puissance
maximale si les cordons de haut7parleurs
originaux de la voiture lui sont raccordés.

I Si votre voiture est équipée dun ordinateur de
bord pour la navigation ou a toute autre fin, ne
débranchez pas le fil de masse de la batterie de la
voiture. Si vous débranchez ce fil, toute la
mémoire de lordinateur sera efiacée. Pour éviter
un court7circuit lorsque vous effectuez les
branchements, branchez le fil dalimentation de
+12 V uniquement apres avoir branché tous les
autres fils.

Power Connection Leads
Cébles dallmentation

Remote output*
Sortie de télécommandet

(REM OUT)
Car audio l Fuse (50 A x 2)
Autoradio 1 Fusible (50 A x 2)

+12 V car battery
Batterie de voiture +12 V

to a metal
surface of the car
vers une partie
metallique de la
carrosserie

+12 V car battery
Batterie de voiture +12 V

06

Distributeur

l Distributor

acce$o i res

* If you have the factoiy original or some other car audio without a remote output on the amplifier, connect
the remote input terminal (REM OTE) to the acceSory power supply.

* Si vousdisposez du modele d'origine ou d'un autre autoradio dont l'amplificateur ne comporte pasde sortie
de telecommande, raccordez la borne d'entrée de télécommande (REMOTE) a la prise d'alimentation

Fusible (100 A)

m 2
(100 A) l

Notes on the power supply

I Connect the +12 V power supply lead only after all
the other leads have been connected.

I Be sure to connect the ground lead of the unit
securely to a metal surface of the car. A loose
connection may cause the amplifier to malfunction.

I Be sure to connect the remote control lead of the car
audio to the remote terminal.

. When using a Gr audio without a remote output on
the amplifier, connect the remote input terminal
(REM OTE) to the acce$ory power supply.

I Use the power supply lead With a fuse attadwed
(100 A).

I Place the fuse in the power supply lead asdose as
posible to the car battery.

I Make sure that the leadsto be connected to the +12
V and GND terminalsof this unit are larger than 6'
Gauge (AWG-6) or have a sectional area of more
than 13 mmz.

. When using the optional RG46 power amplifier
connecting cord, consult that manual for proper use.

Make the terminal
connections as illustrated below.

Flat-head screwdriver l
Toumevis a lame plate


11mm

(7/iain./po.) Cord diameter 0.3 - 1.25 mm
(AWG 22 - 16)
Section du cordon

0,3 - 1,25 mm (AWG 22 - 16)

Remarques sur lalimentation électrique

I Raccordez le cable d'allmentation +12 V uniquement
apres avoir realisé toutes les autres connexions.

I Raccordez oorrectement le fil de masse de l'appareil a une
sunace métallique de la voiture. Une connexion lache peut
provoquer un dysfonctionnement de l'amplificateur.

I Veillez a raccorder le fil detélécommande de
l'autoradio a la borne de télécommande.

I Si vous utilisez un autoradio dont l'amplificateur ne
comporte pas de sortie de telecommande, raccordez
la borne d'entrée de la telecommande (REMOTE) a la
prise d'allmentation acce$oires

I Utilisez un cable d'allmentation muni d'un fusible
(100 A).

I Fixez Ie cable d'allmentation le plus pres poslble de
la batterie de voiture.

I Vous devez raccorder des cables de calibre supérieurs
a 6Jauge (AWG-6) ou d'une section supérieure a 13
mm2 aux bornes +12 V et GND.

I Lorsque vous utilisez le cordon de raccordement
pour amplificateur RG46 en option, consultez le
manuel pour une utlliEtlon correcte.

Effectuez les connexions de la maniére
indiquée ci-dessous.

Note

Tighten the screws firmly, but be careful
not to apply too much force* asdoing so
may damage the screws

* The torque value should be le$ than 1
NIm.

Remarque
Ne serrez* pas trop fort la vis Gr vous
pourriez I'endommager.

* Le couple de serrage devrait étre
inferieur a 1 Nom.

Input Connections/Connexions d'entrée

Connexion d'entrée de ligne

(avec connexion de haut-parleur I

Line Input Connection (with Speaker Connection I)

Car audio
Autoradio

LINE OUT

Fro nt
Avant

SUB OUT

Line Input Connection (with Speaker Connection I

Connexion d'entrée de ligne

(avec connexion de haut-parleur I

Car audio
Autoradio

LINE OUT

Front
Avant

Rear
Arriere

Note

M ake sure to set the INPUT M ODE select switch to
either "FRONT" or "HR" (refer to "Loation and
Function of Controls")

Remarque

Réglez le selecteur INPUT M ODE sur " FRONT ou
"HR" (voir "Emplacement et fonction des
commandes).

Connexion d'entrée de ligne

Car audio
Autoradio

LINE OUT

(avec connexion de haut-parleur I

Line Input Connection (with Speaker Connection I)

Note

Make sure that the line output from the car audio
is connected to the jack marked "FRONT INPUT
on the unit. In thissystem, the signalsfrom FRONT
INPUTare filtered through each circuit and output
to the subwoofer and rear speaker.

Remarque

Asurez-vous que la sortie de ligne de l'autoradio

est raccordée a la prise "FRONT INPUT" de

l'apparei l.

Dans ce systeme, les signaux de FRONT INPUT sont
filtrés par chaque orcuit et sortie vers le subwoofer

et le hautvparleur arriere.

Line Input Connection (with Speaker Connection I)

Connexion dentrée de ligne

(avec connexion de haut-parleur I)

Car audio
Autoradio

LINE OUT

Left channel
Canal gauche

Right channel
Canal droit

Note

The INPUT MODE select switch must be set to
n F +R

(refer to " Location and Function of Controls")

Remarque
Le selecteur INPUT MODE doit étre réglé sur "HR"
(voir Emplacement et fonction des commandes" ).

Speaker Connections/Raccordement de haut-parleurs

5-Speaker System

Systéme a 5 haut-parleurs

For details on the settings of sthches and
controls, refer to Location and Function of
Controls"

(with Input Connection I, E] or I)
(avec connexion dentrée I, E] ou I)

1

Pour plus de details sir les réglages des
commutateurs et commandes, reportez-vous a
"Emplacement et fonction des commandes.

Left
Gauche
Front speakers
(min. 2 Q)
Haut-parleurs
avant
(min. 2 9.)

Right
Droit


* Hl-CURRENT/Hl-VOLTAGE mode
* mode Hl-CURRENT/Hl-VOLTAGE

Subwoofer
(min. 1 9/2 (2*)
Subwoofer
(min. 1 9/2 (2*)

Rear speakers
(min. 2 Q)
Haut-parleurs
arriere

(min. 2 Q)

3-Speaker System (with Input Connection IE) 2

Systéme a 3 haut-parleurs
(avec connexion d'entrée E)

For details on the settings of switches and
controls refer to Location and Function of
Controls

Pour plus de details sur les réglages des
commutateurs et commandes reportez~vous a
" Emplacement et fonction des commandes.

Full range speakers
(min. 4 D.)
Haut-parleurs pleine
gamme (min. 4 Q)

Subwoofer
(min. 1 (2/2 9*)
Subwoofer
(min. 1 (2/2 9*)

* Hl-CURRENT/Hl-VOLTAGE mode
* mode Hl-CURRENT/Hl-VOLTAGE