Sony wm fx 290 owners manual

This is the 2 pages manual for sony wm fx 290 owners manual.
Read or download the pdf for free. If you want to contribute, please mail your pdfs to info@audioservicemanuals.com.

Page: 1 / 2
left right
sony wm fx 290 owners manual

Extracted text from sony wm fx 290 owners manual (Ocr-read)


Page 2

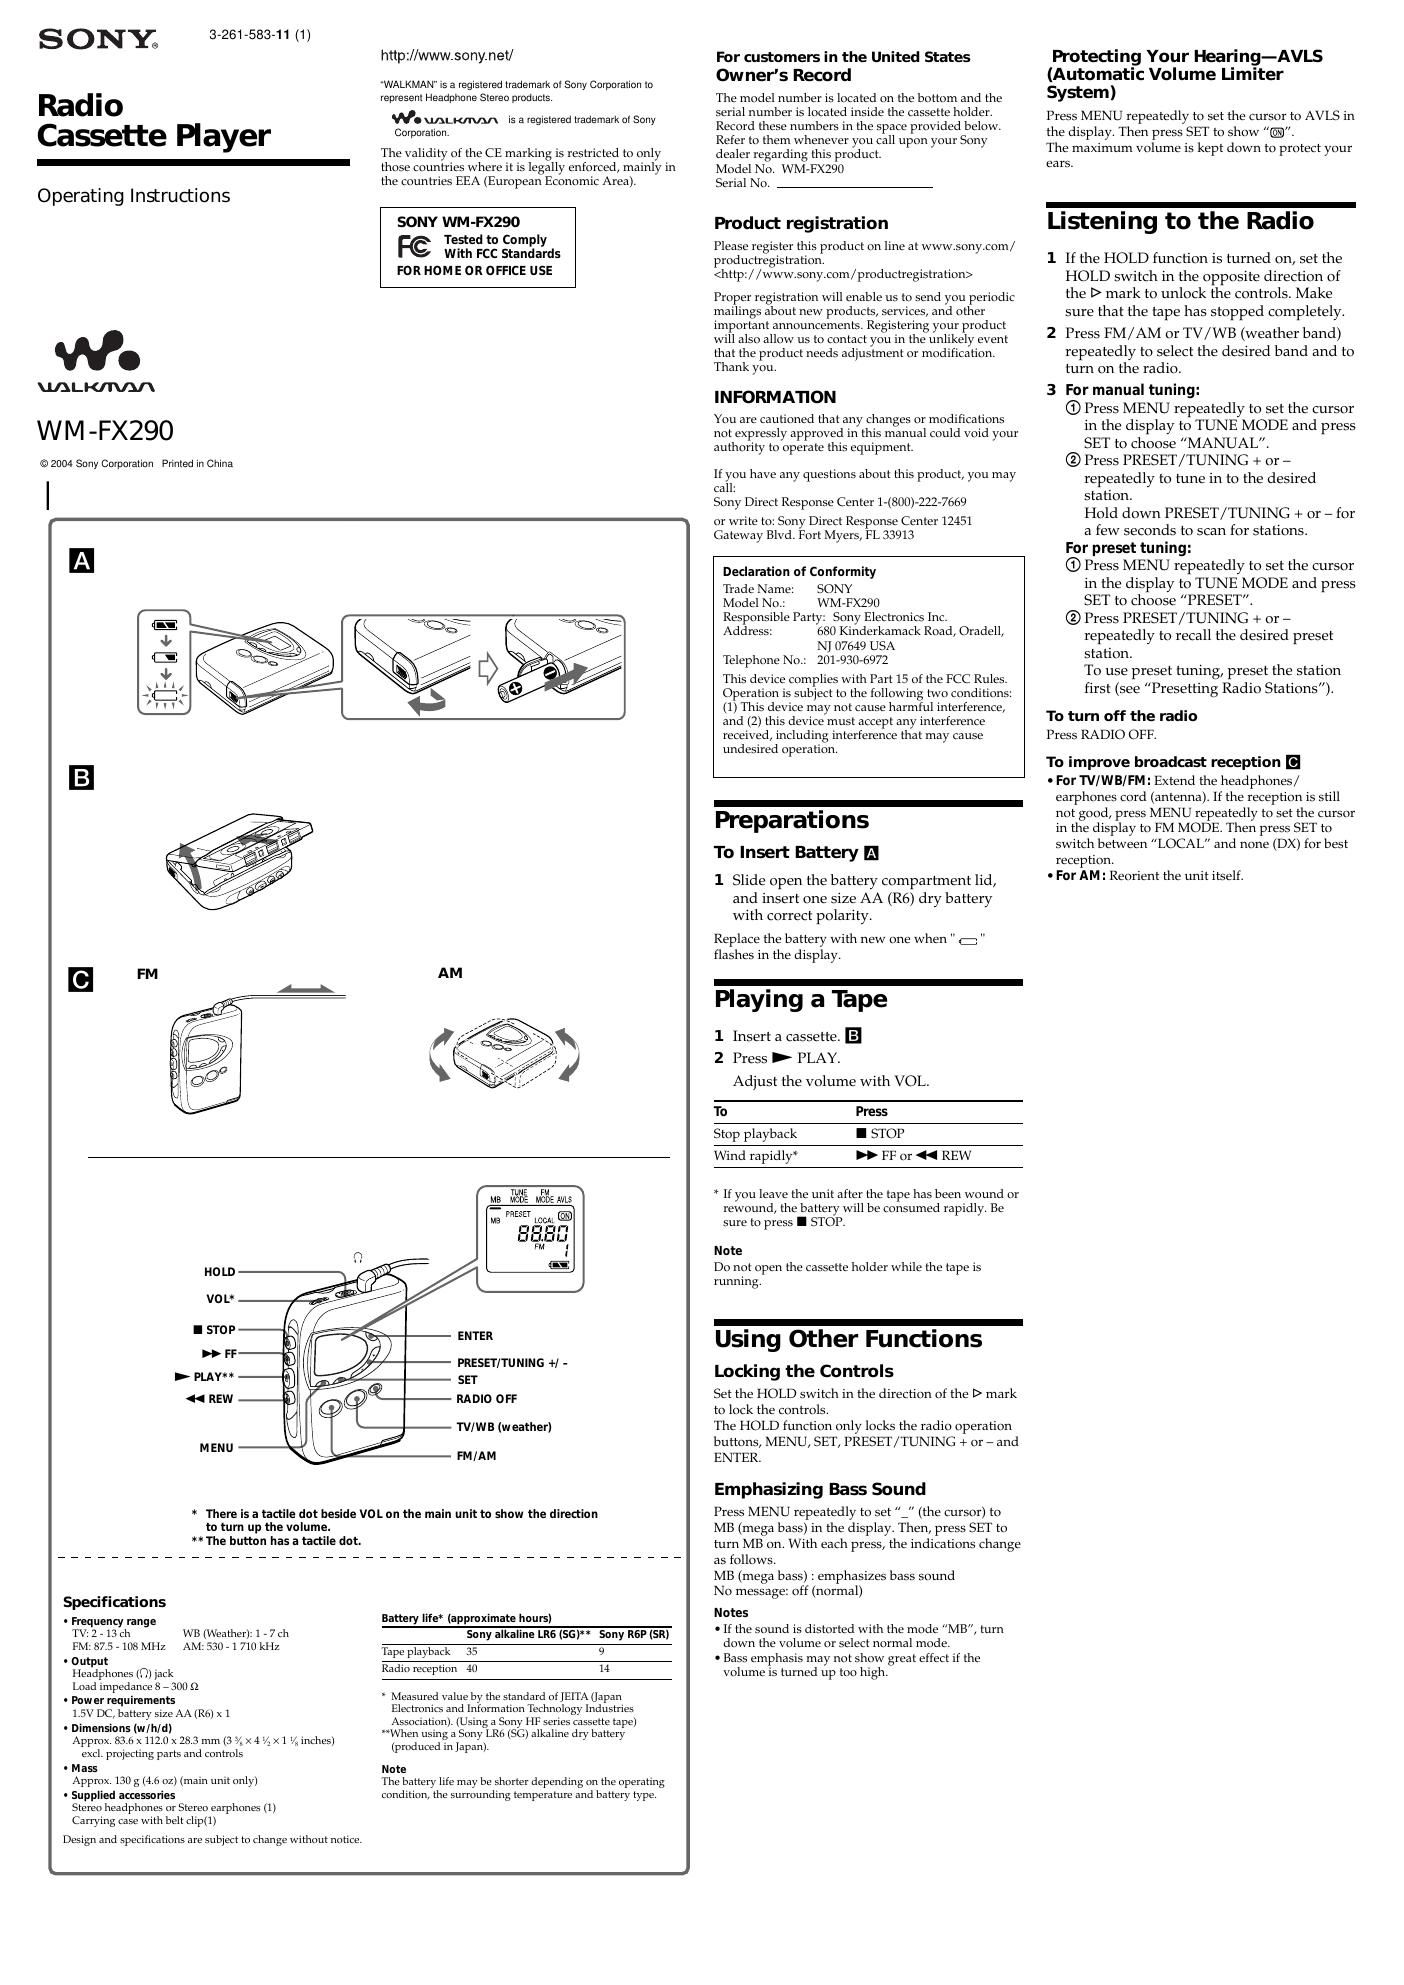
TLNE FM
MB MODE MODEM/LS
ME PRESET LOCAL.

l'l 'll-ll-l
abut:
rii :

@

ENTER

- PRESET/TUNING +l -
- SET
RADIO OFF

TV/WB (weather)

MENU
FM/AM

* There is a tactile dot beside VOL on the main unit to show the direction
to turn up the volume.
,The button has a tactile dot.


This warranty is valid only in the United States.


. .ii HAM . . i . ..
9

mega, ,

Tape Cassette PIayer/Recorder/CD Player/Mini Disc
SONY® DAT/Radio/Head Phone/Speaker/MlC/Personals

LIMITED WARRANTY

Sony Electronics Inc. lIISony'u warrants this Product tincluding any accessories) against detects in material or
workmanship as rollows:

I. LABOR: For a period oi 90 days from the date of purchase, it this Product is determined to be defective,
Sony will repair or replace the Product, at its option, at no charge, or pay the labor charges to any Sony author
rized service lacility. Aher the Warranty Period, you must pay ior all labor charges.

2. PARTS In addition, Sony will supply, at no charge, new or rebuilt replacements in exchange tor detective
pans tor a period oi one Ill year. Anerso days from the date oipurchase, laborior removal and installation is
available lrprn Sony authorized service racilities or a Sony Service Center at your expense.

To ohtaln warranty service, you musttake the Product, ordeliverthe Productireight prepaid, in either its original
packaging or packaging aitording an equal degree oi protection, to any authorized Sony service tacility.

This warranty does not cover customer instruction, installation, set up adjustments or signal reception prob
lems.

This warranty does not cover cosmetic damage or damage due to acts oi God, accident, misuse, abuse, negll'r
gence, commercial use, or modiiication at, or to any pan olthe Product, including the antenna. This warranty
does not cover damage due to improper operation or maintenance, connection to improper voltage supply, or
attempted repair by anyone other than a raciliiy authorized by Sony to service the Product. This warranty does
not cover Products sold AS Is or WITH ALL FAULTS, or consumables (such as (uses or batteries). This warranty
is valid only in the United States

Prool or purchase In the Iorm aIa bill or sale or receipted invoice which is evidence that the unit is Within the
Warranty period must be presented to obtain warranty service.

This warranty is invalid if the factory applied serial number has been altered or removed from the Product

REPAIR OR REPLACEMENT AS PROVlDED UNDER THIS WARRANTV is THE EXCLUSIVE REMEDV OF THE
CONSUMER. SONY SHALL NOT BE LlABLE FOR ANY INCIDENTAL OR CONSEQUENTIAL DAMAGES FOR
BREACH OF ANY EXPRESS OR IMPLIED WARRANTV ON THIS PRODUCT EXCEPT TO THE EXTENT PROHlBr
lTED BY APPLICABLE LAW, ANV lMPLlED WARRANTV 0E MERCHANTABILITV 0R ElTNEss FOR A PARTICUr
LAR PURPOSE ON THlS PRODUCT lS LIMITED lN DURATlON TO THE DURATION OF THIS WARRANTV

Some states do not allowthe exclusion or limitation of incidental orconseouential damages, orallow limitations
on how long an implied warranty lasts. so the above limi ns or exclusions may not apply to you In addition.
ilyou enter into a service contract with the Sony Partnership within so days olthe date oi sale, the limitation on
how long an implied warranty lasts does not applyto you. This warranty gives you speciiic legal rights, and you
may have other rights which varylrom state to state

For your convenience, Surly Electronics Inc. has established telephone numbers Iorfrequently asked questions:

To locate the serVicer or dealer nearest you, prior service assistance or resolution ota service problem, orior
product information or operation, call:

Sony Customer Inlormation Services center
143002224559
or visit the Sony Web site:
www.sony.com
For an accessory or part not available lrorn your authorized dealer, call

irsoorAEErSONV (7669)

c
D 5714702

Presetting Radlo Stations

You can preset up to 40 stations (7 for TV, 4 for WB,
24 for FM and 5 for AM).

Presetting Automatically Scanned
Stations

1 Press FM/AM or TV/WB repeatedly to
select the desired band and to turn on the
radio,

2 Press and hold ENTER for more than 3
seconds,

Preset number 1 will flash in the display
and the Walkman starts scanning the
stations from the lower frequencies and
stops for about 5 seconds when a station is
received.

3 If you wish to preset the currently received
station, press ENTER while the preset
number is flashing,

The received station is preset on preset
number 1 and the unit starts scanning for
the next receivable station,

4 Repeat Step 3 until all receivable stations
are preset

To stop scanning

Press RADIO OFF. The radio is turned off at the

same time.

NOTES

0 If Stations are already stored, the newly preset
stations replace the old ones when the above
procedure is completed.

0 If Stations cannot be preset automatically, preset them
manually.

Preset-ting Stations Manually

1 Press FM / AM or TV / WB repeatedly to
select the desired band and to turn on the
radio,

2 Press ENTER,

The frequency digits will flash in the
display.

3 While the frequency digits are flashing,
tune in to a station you wish to store using
PRESET/ TUNING + or - and press
ENTER.

The preset number will flash in the display.

4 While the preset number is flashing, select
the preset number you want using
PRESET/ TUNING + or - and press
ENTER.

Notes

0 If you cannot complete Step 3 or 4 while the indicators
are flashing, repeat from step 2.

0 If a station iS already stored, the new Station replaces
the old one.

Playing the Preset Radio Stations

1 Press FM/AM or TV/WB repeatedly to
select the desired band and to turn on the
radio,

2 Press MENU repeatedly to set the cursor in
the display to TUNE MODE. Then press
SET to display PRESET/K

3 Press PRESET / TUNING + or -i

To cancel a stored station

1Follow the procedure above and in step 3, select
the preset number you want to cancel and then
press ENTER. The frequency digits will flash in
the display.

2 Press and hold PRESET/ TUNING + or ,_ The
frequency digit starts running up or down. Keep
holding down the button until a - - -" is
displayed.

3Press ENTER while a s r a is flashing. A preset
number will flash in the display.

4Press ENTER to cancel the stored station.

Scanning the Preset Radio Stations
- DAPS (Digital Auto Preset Scanning)

1 Press FM / AM or TV/WB repeatedly to
select the desired band and to turn on the
radio.

2 Press and hold FM/ AM or TV/WB pressed
in step 1 for 2 seconds or more

The preset stations of the selected band will
be played for about 5 seconds each
(During DAPS the indicators in the display
flash.)

3 Press FM / AM or TV/WB again to select
the station while the desired preset station
is being played.

N ates

' If there are no Stations stored, the DAPS function does

not work.

' Until a Station is selected in Step 3, the DAPS function

turned on in step 2 will continue.

0 In step 2 or 3, if you select a band which you did not

select in step 1 by pressing FM/AM or TV/WB, the
newly selected band will be played normally.

Precautlons
On batteries

- Do not carry dry batteries with coins or other metallic objects.
lt can generate heat it the posnive and negative terminals of
the batteries are accidentally contacted by a metallic obyect

- When you are not going to use your Walkman tor a long time,
remove the battery to prevent damage from battery leakage
and corrosion.

On handling

- Do not leave the unit in a location near heat sources, or in a
place subiect to direct sunlight, excessive dust or sand,
moisture, rain, mechanical shock, or in a car with its windows
closed

- We do not recommend the use of tape longer than 90 minutes.
They are very thin and tend to be stretched easily. This may
cause malfunction of the unit or sound deterioration.

- The LCD display may become hard to see or slow down when
using the unit at high temperatures (above 40"C/104°F) or at
lUW temperatures (below (PC/32°F). At room temperature, the
display will return to its normal operating condition.

- If the unit has not been used for a long time, set it in the
playback mode to warm it up for a tew minutes before you
start using it again.

On headphones/earphones
Road safety

Do not use headphones/earphones while driving, cycling, or
operating any motorized vehicle. It may create a traffic hazard
and is illegal in some areas. lt can also be potentially dangerous
to play your headphones /earphunes at high volume while
walking, especially at pedestrian cross \

You Should exercise extreme caution or
potentially hazardous situations


scontinue use in

Preventing hearing damage

Do not use headphones/earphones at high volume Hearing
experts advise against continuous, loud and extended play. If
you experience a ringing in your ears, reduce the volume or
discontinue use

Caring for others

Keep the volume at a moderate level This will allow you to
hear outside sounds and to be considerate to the people around
you.

On maintenance

- Clean the tape head and tape path using a cotton swab and
commercially available cleaning solvent after every 101wurs
of use

- To clean the exterior, use a soft cloth slightly moistened in
water Do not use alcohol, benzine rir thinner.

- Clean the headphones/earphones plugs periodically