Sony srs zp 1000 owners manual

This is the 2 pages manual for sony srs zp 1000 owners manual.
Read or download the pdf for free. If you want to contribute, please mail your pdfs to info@audioservicemanuals.com.

Page: 1 / 2
left right
sony srs zp 1000 owners manual

Extracted text from sony srs zp 1000 owners manual (Ocr-read)


Page 1

SONXC

2-318-426-12(1)

Active Speaker System

Operating Instructions
Manual de instrucciones

SRS-ZP1000

http://www.sony.nel/
@2005 Sony Corporation Printed inMalaysia

.
Owner 5 Record

The model number and the serial number are located on the rear of the left speaker.

Record the model number and the serial number in the space provided below. Refer to them whenever you call upon
your Sony dealer regarding this product.

Model N o. SRS-ZPlOOU
Serial No.

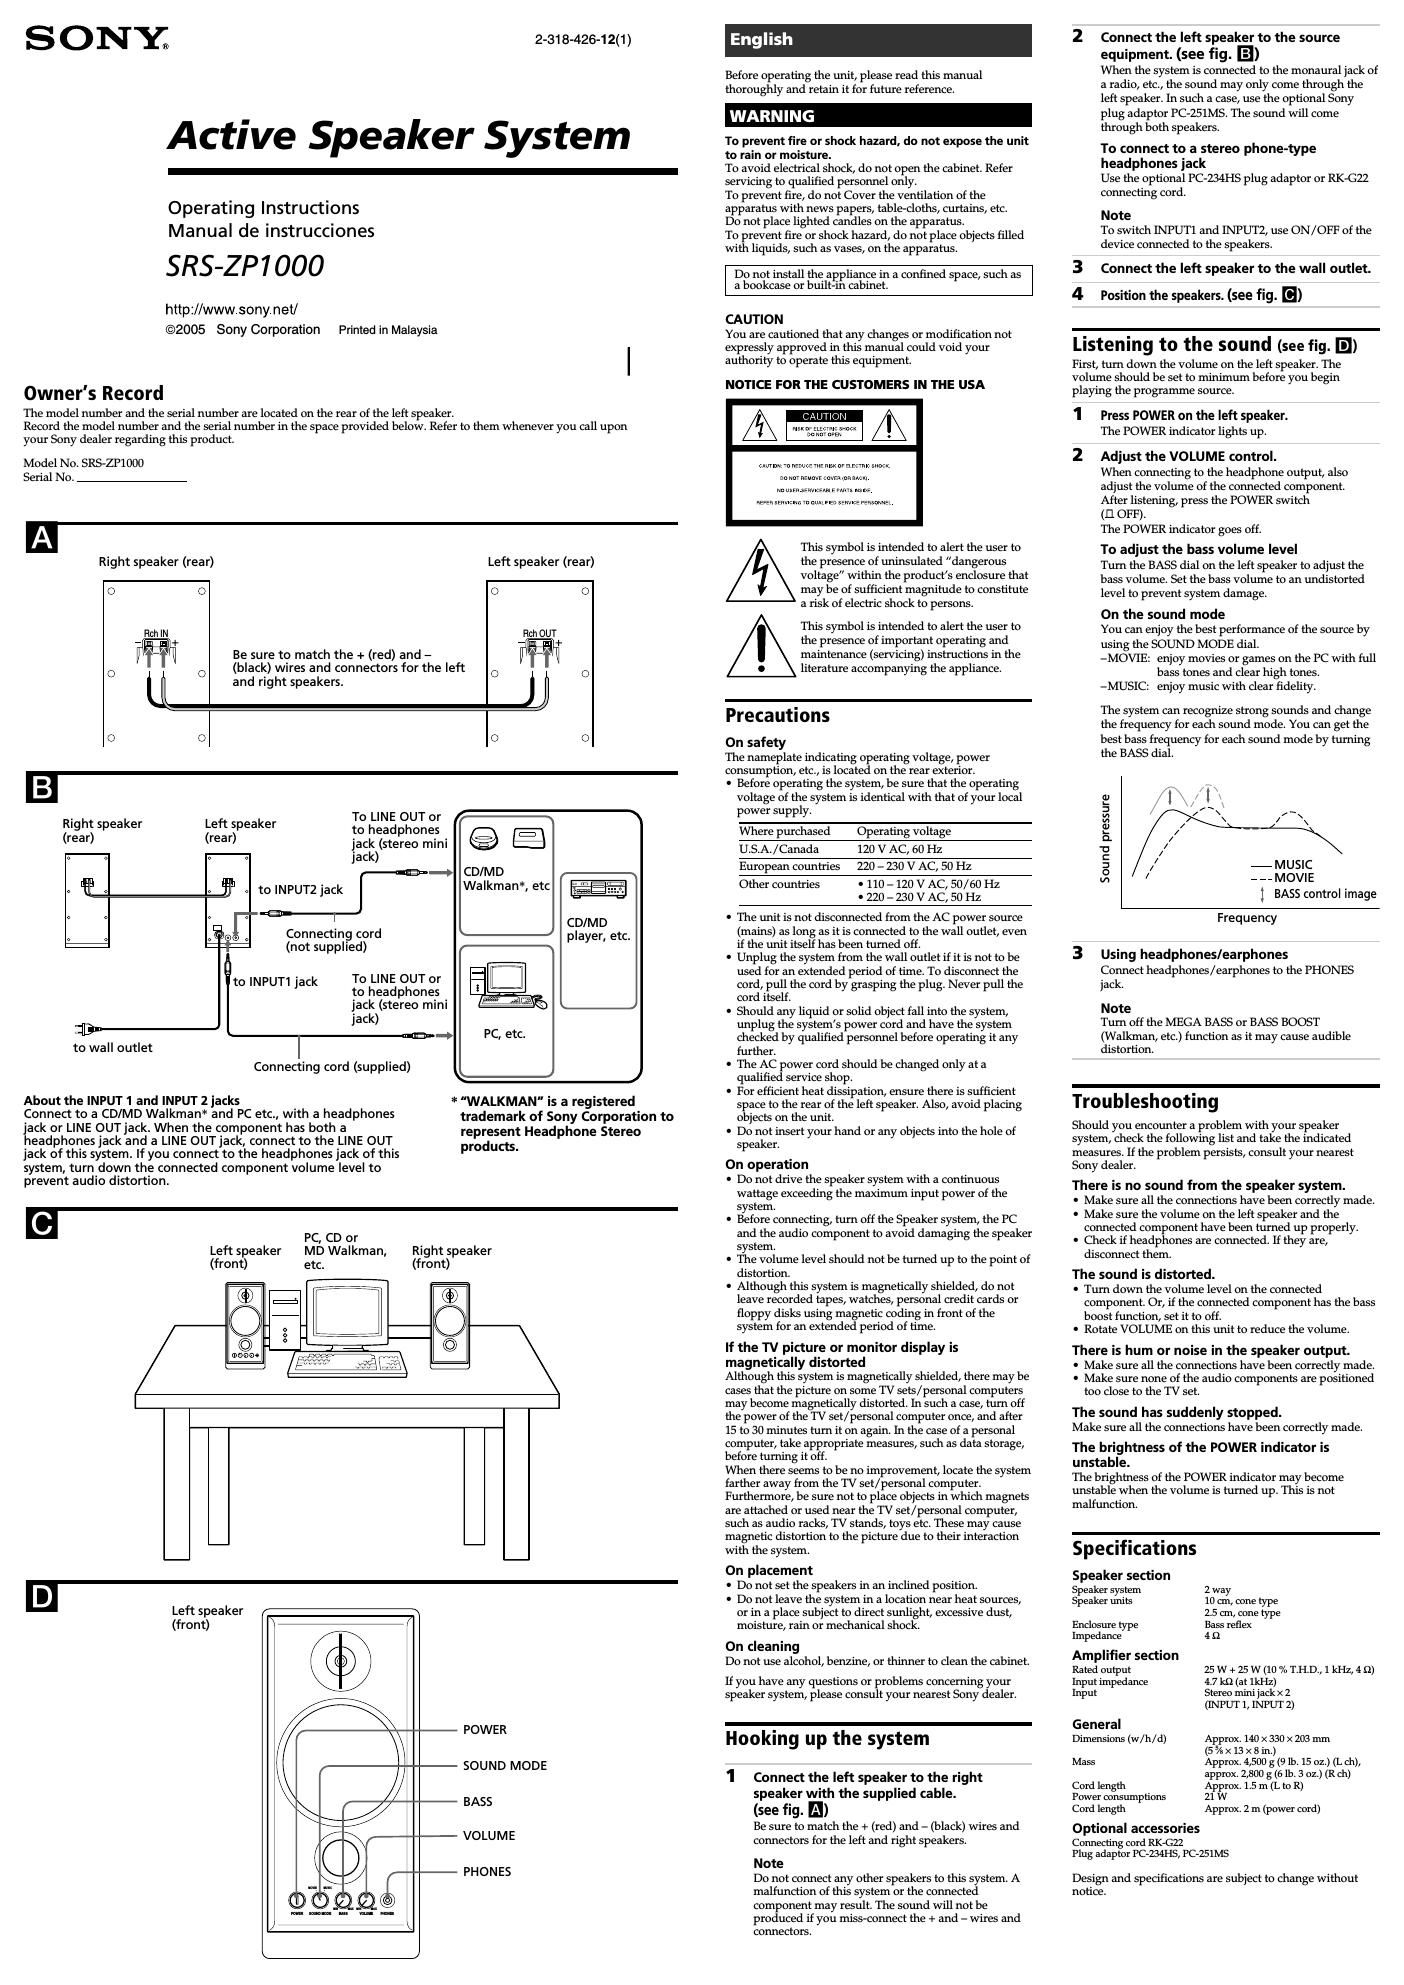
Right speaker (rear)

Left speaker (rear)

Be sure to match the + (red) and 7
(black) wires and connectors for the left a
and right speakers. V

O
-> a
. -
g....
.
(}

To LINE OUT or

Right speaker Left speaker to head
phones
(rear) (rear) jack (stereo mini E
a u jack)
-uuQ=--> CD/MD
a lllll a s W . to INPUTZjack Walkman". etc
u a a film-'-
a a 5% Connecting cord
. (not supplied)

To LINE OUT or
to headphones
jack (stereo mini
jack)

to INPUT1 jack

to wall outlet

Connecting cord (supplied)

About the INPUT 1 and INPUT 2 jacks

Connect to a CD/MD Walkman and PC etc., with a headphones
jack or LINE OUTjack. When the component has both a
headphones jack and a LINE OUTjack, connect to the LINE OUT

* "WALKMAN" is a registered
trademark of Sony Corporation to
represent Headphone Stereo

jack of this system. If you connect to the headphones jack of this products.
system, turn down the connected component volume level to
prevent audio distortion.
PC, CD or
Left speaker MD Walkman, Right speaker
(front) etc. (front)

7: @

doom

Left speaker
(front)

POWER

SOUND MODE

BASS

VOLUME

PHONES

Before operating the unit, please read this manual
thoroughly and retain it for future reference.

To prevent fire or shock hazard. do not expose the unit
to rain or moisture.

To avoid electrical shock, do not open the cabinet. Refer
servicing to qualified personnel only.

To prevent fire, do not Cover the ventilation of the
apparatus with news papers, table-cloths, curtains, etc.

Do not place lighted candles on the apparatus.

To prevent fire or shock hazard, do not place objects filled
with liquids, such as vases, on the apparatus.

Do not install the appliance in a confined space, such as
a bookcase or built-in cabinet.

CAUTIO N

You are cautioned that any changes or modification not
expressly approved in this manual could void your
authority to operate this equipment.

NOTICE FOR THE CUSTOMERS IN THE USA

cuivm mono snootwpaesame

no Mot nwmr cover an we

This symbol is intended to alert the user to
the presence of uninsulated dangerous
voltage" within the products enclosure that
may be of sufficient magnitude to constitute
a risk of electric shock to persons.

This symbol is intended to alert the user to
the presence of important operating and
maintenance (servicing) instructions in the
literature accompanying the appliance.

Precautions

On safety

The nameplate indicating operating voltage, power

consumption, etc., is located on the rear exterior.

. Before operating the system, be sure that the operating
voltage of the system is identical with that of your local
power supply.

Where purchased Operating voltage
U.S.A./Canada 120 V AC, 6|] Hz
European countries 220 - 230 V AC, 50 Hz

I llll - 120 V AC, 50/60 Hz
D 220 -23() V AC, 50 Hz

Other countries

The unit is not disconnected from the AC power source
(mains) as long as it is connected to the wall outlet, even
if the unit itself has been turned off.

Unplug the system from the wall outlet if it is not to be
used for an extended period of time. To disconnect the
cord, pull the cord by grasping the plug. Never pull the
cord itself.

Should any liquid or solid object fall into the system,
unplug the systems power cord and have the system
checked by qualified personnel before operating it any
further.

The AC power cord should be changed only at a
qualified service shop.

For efficient heat dissipation, ensure there is sufficient
space to the rear of the left speaker. Also, avoid placing
objects on the unit.

Do not insert your hand or any objects into the hole of
speaker.

On ope ration

. Do not drive the speaker system with a continuous
wattage exceeding the maximum input power of the
system.

Before connecting, turn off the Speaker system, the PC
and the audio component to avoid damaging the speaker
system.

The volume level should not be turned up to the point of
distortion.

Although this system is magnetically shielded, do not
leave recorded tapes, watches, personal credit cards or
floppy disks using magnetic coding in front of the
system for an extended period of time.

If the TV picture or monitor display is
magnetically distorted

Although this system is magnetically shielded, there may be
cases that the picture on some TV sets/ personal computers
may become magnetically distorted. in such a case, turn off
the power of the TV set/personal computer once, and after
15 to 30 minutes turn it on again. In the case of a personal
computer, take appropriate measures, such as data storage,
before turning it off.

When there seems to be no improvement, locate the system
farther away from the TV set/personal computer.
Furthermore, be sure not to place objects in which magnets
are attached or used near the TV set/personal computer,
such as audio racks, TV stands, toys etc. These may cause
magnetic distortion to the picture due to their interaction
with the system.

On placement

. Do not set the speakers in an inclined position.

. Do not leave the system in a location near heat sources,
or in a place subject to direct sunlight, excessive dust,
moisture, rain or mechanical shock.

0n cleaning
Do not use alcohol, benzine, or thinner to clean the cabinet.

If you have any questions or problems concerning your
speaker system, please consult your nearest Sony dealer.

Hooking up the system

1 Connect the left speaker to the right
speaker with the supplied cable.
(see fig. I)
Be sure to match the + (red) and - (black) wires and
connectors for the left and right speakers.

Note

Do not connect any other speakers to this system. A
malfunction of this system or the connected
component may result. The sound will not be
produced if you miss-connect the + and - wires and
connectors.

2 Connect the left speaker to the source
equipment. (see fig. El)
When the system is connected to the monaural jack of
a radio, etc, the sound may only come through the
left speaker. in such a case, use the optional Sony
plug adaptor PC-251MS. The sound will come
through both speakers.

To connect to a stereo phone-type
headphones jack

Use the optional PC-234HS plug adaptor or RK-GZZ
connecting cord.

Note
To switch INPUT1 and INPUTZ, use ON / OFF of the
device connected to the speakers.

3 Connect the left speaker to the wall outlet.
4 Position the speakers. (see fig. I)

Listening to the sound (see fig. 5])
First, turn down the volume on the left speaker. The
volume should be set to minimum before you begin
playing the programme source.

1 Press POWER on the left speaker.
The POWER indicator lights up.

2 Adjust the VOLUME control.
When connecting to the headphone output, also
adjust the volume of the connected component.
After listening, press the POWER switch
(11 OFF).
The POWER indicator goes off.

To adjust the bass volume level

Turn the BASS dial on the left speaker to adjust the
bass volume. Set the bass volume to an undistorted
level to prevent system damage.

On the sound mode

You can enjoy the best performance of the source by

using the SOUND MODE dial.

-MOVIE: enjoy movies or games on the PC with full
bass tones and clear high tones.

-MUSIC: enjoy music with clear fidelity.

The system can recognize strong sounds and change
the frequency for each sound mode. You can get the
best bass frequency for each sound mode by turning
the BASS dial.


7MUS|C
eeeMOVIE

I BASS control image

Sound pressure

Frequency

3 Using headphones/earphones
Connect headphones /earphones to the PHONES
jack.

Note

Turn off the MEGA BASS or BASS BOOST
(Walkman, etc.) function as it may cause audible
distortion.

Troubleshooting

Should you encounter a problem with your speaker
system, check the following list and take the indicated
measures. if the problem persists, consult your nearest
Sony dealer.

There is no sound from the speaker system.

D Make sure all the connections have been correctly made.

D Make sure the volume on the left speaker and the
connected component have been turned up properly.

D Check if headphones are connected. If they are,
disconnect them.

The sound is distorted.

D Turn down the volume level on the connected
component. Or, if the connected component has the bass
boost function, set it to off.

D Rotate VOLUME on this unit to reduce the volume.

There is hum or noise in the speaker output.

D Make sure all the connections have been correctly made.

- Make sure none of the audio components are positioned
too close to the TV set.

The sound has suddenly stopped.

Make sure all the connections have been correctly made.

The brightness of the POWER indicator is
unsta ble.

The brighmess of the POWER indicator may become
unstable when the volume is turned up. This is not
malfunction.

Specuflcations
Speaker section
Speaker system 2way
Speaker units 10 cm, cone type
2.5 cm, cone type
Enclosure type Bass reflex
impedance 4 o
Amplifier section
Rated output 25 w + 25 w (10 to T.H.D., 1 kHz, 4 52)
Input impedance 4.7 kn (at 1kl-lz)
Input Stereo mini jack x 2
(INPUT 1, lNPUT 2)
General
Dimensions (w/h/d) Approx. 140 x 330 x 203 rum

(5 5/5 x 13 x s in.)
Mass Approx. 4,500 g (9 lb. 15 oz.) (L ch),
approx 2,800 g (6 lb. 3 oz.) (R ch)

Cord length Approx. 1.5 m (L to R)
Power consurnptions 21 W
Cord length Approx. 2 m (power cord)

Optional accessories
Connecting cord RK~G22
Plug adaptor YC~234HS, PC251MS

Design and specifications are subject to change without
notice.

Page 2

Altavoz derecho
(posterior)

/
i)

O
'1'
go
()

Aseglfilrese de hacer coincidir los cables +
(rojo) y r (negro) con los conectores de
los altavoces izquierdo y derecho.

Altavoz izquierdo
(posterior)

O

(7
O

Acerca de las tomas INPUT 1 e INPUT 2

Conéctelas a un CD/MD Walkman*, PC 0 dispositivo similar
equipado con una toma de auriculares o una toma LINE OUT. Si e|
componente dispone de toma para auriculares y de una toma LINE

Altavoz derecho

a la toma LINE
OUT 0 a la toma

Altavoz izquierdo de auriculares

(posterior) (posterior) (minitoma
" 7 « estéreo)
116p " 0 HF alatomalNPUTZ
EIQQL- Cable de nonexion
D a o . D (no suministrado)

a la toma de corriente

a la toma LINE
OUT 0 a la toma
de auriculares
(minitoma
estéreo)

a la toma INPUT1

Cable de nonexion
(suministrado)

OUT, conéctelas a la toma LINE OUT de este sistema. Si las conecta
a la toma de auriculares del sistema, baje el nivel de volumen del
componente conectado para evitar que el sonido se distorsione.

E

-> Walkman de
CD/MD*, etc.

Reproductor
de CDI M D,

* WALKMAN es una marca registrada
de Sony Corporation que representa los
productos audifonos estéreo.

PC, CD 0
Altavoz izquierdo MD Walkman, Altavoz derecho
(frontal) etc. (frontal)

Altavoz izquierdo

(frontal)

POWER

SOUND MODE

BASS

VOLUME

PHONES

Antes do utilizar la unidad, lea cste manual atentamente y
consérvelo para consultarlo en el future.

Para los (Iientes en México

sistema de altavoces activo

FOR FAVOR LEA DETALLADAMENTE ESTE MANUAL DE
INSTRUCCIONES ANTES DE CONECT AR Y OIERAR ESTE
EQUIPO.

RECUERDE QUE UN MAL USO DE SU APARATO PODRlA
ANULAR LA GARANTIA.

ADVERTENCIA

Para evitar incen 05 o riesgo de electrocution, no
exponga Ia unidad a la Iluvia ni a la humedad.

Para evltar descargas eléctrlcas, no abra la unidad. En casn
de averla, sohcite los servicios de personal cualificado
solamente.

Para evitar el riesgo de lncendio, no cubra la ventilation
del aparato con periodlcos, manteles, cortlnas, etc., ni
ponga velas encendldas enclrna del aparato.

Para evltar e1 riesgo dc lncendlo o electrocuclon, no coloque
sobre el aparato objetos que Contengan liquldos Como, par
ejemplo, un jarrén.

Nn lnstale el aparato en un espaclo eerrado, Como una
estantena para Libros o un armarlo ernpotrado.

Precautiones
Seguridad

La placa donde se indica el voltaje de funcionarnjento, el

consumo de energia, etc. se eneuentra en la pane exterlor

trasera de la unidad.

I Antes do utilizar el sistema compruebe Sl la tension de la
allmentacion del mismo es identica a la de la fuente de
allrnentacion local.

on Tension de alimentacl
120 V ca, 60 Hz
220 - 230 V ca, 50 Hz

I 110 - 120 Vca, 50/60 Hz
- 220 - 230 V ca, 50 Hz

Lugar de adqlu n

EE.UU./Canada
Europa
0tros paises

La unidad no esta desconectada ale la tuente de allrnentaclon
de ca rnlentras permanezca conectada a la torna de corrlente,
lncluso si esta apagada.

. Si el sistema no se va a utlllzar durante un periodo de tlernpo
prolongado, desconectelo de la torna de corrlente. Para
desconectar el cable, tlre de el agarrando del enchufe. Nunca
debe tlrar del cable.

- Si alglln objeto solldo o liquldo cae sobre el slsterna,

desenchufe el cable de alimentaclén y haga revlsar el slsterna

por personal cualltlcado antes de volver a utillurlo.

El cable de allrnentaclon de ca 5610 debera ser sustltuldo en un

centre de servlclo cualltlcado.

Para una correcta ventllaclon, compruebe que queda sutlclente

espaclo llbre en la pane posterior del altavoz izquierdo.

Tamblén debe evltar colocar objetos enclrna de la unidad.

- No lntroduzca la mano ni nlngun objeto en el orificlo del

altavoz.

Funcionamiento

. No haga tunclonar el slsterna de altavoces permanenternente
con una potencla superlor a la potencla maxlma de entrada del
sistema.

Antes de reallzar la conexlon, apague el sistema de altavoces, el
IC y el componente de audlo para evltar danar el slsterna ale
altavoces.

El nivel d2 volumen no debe alcanzar 21 punto de dlstorslon.
Aunque este sistema esta magnéticamente protegldo, no deje
clntas grabadas, relojes, tarjetas de credlto ni drsquetes que
utilicen codificaclén magnétlca entrants del sistema durante un
largo perlodo ale tlernpo.

5i la imagen del televisor o la pantalla del monitor
aparece distorsionada debido al magnetismo

Aunque este slsterna esta magnéticamente protegldo, en
algunos casos la imagen de algunos televlsores u
ordenadores personales puede distorslonarse debido a1
magnetismo. Sl esto ocurre, apague e1 televlsor 0 el
ordenador y enciéndalo de nuevn transcurrldns de 15 a 30
minutos. En el caso del ordenador personal, tome medidas
adecuaolas, Como guardar los datos antes de apagarlo.

Si no se produce ninguna rnejora, aleje el slsterna del
televisor 0 del ordenador. Asimisrno, no coloque objetos
que contengan o utlllcen lrnanes eerca del televisor 0 del
ordenador, coma soportes de audlo, rnesas de televlsores,
juguetes, etc, ya que pueden provocar una dlstorslon
magnética de la imagen debldo a la lnteracclon con el
slstema.

Coloration

. No coloque los altavoces en poslclon lncllnada.

. No deje el slstema cerca de tuentes de calor, ni en lugares
expuestos a la luz solar dlrecta, polvo excesivo, burnedad,
lluvla o golpes.

Limpieza

No utlllce alcobol, benelna ni dlsolvente para llrnplar la unldad.

Sl tlene alguna pregunla o problema relaclonado con el slsterna
ale altavoces, consulte con su dlstrlbulalor Sony babltual.

Conex' 11 del sistema

1 Canada el altavoz izquierdo al altavoz
derecho mediante el cable suministrado.
(consulte la figura I)

Asegarese de bacer colncldlr 1os cables + (rojo) y -
(negro) con los conectores de los altavnces izquierdo
y derecbo.

Nota
No conecte ningl'xn otro altavoz a este sistema, ya que
podria produelrse una talla del slsterna o e1
componente conectado. Sl 1os cables + y - no se
conectan debidarnente a los conectores, el sonldo no
se emitlra.

2 Conecte el altavoz izquierdo al equipo
fuente. (consulte la figura E!)
Cuando el sistema esta conedado a la toma monoaural de
una radlo, etc., es poslble que el sonldo 5610 se emita por el
altavoz izquierdo. En tal caso, utrllee e1 adaptador dc clavlja
Sony PC-251MS opcional. El sonido se emlt'tré por ambos
altavoces.
Conexién a una toma telefénica para
auriculares estéreos
Utlljce el adaptador d2 claviia PC-234HS opcional 0 el cable
d2 conexlon RK-GZZ.

Nota
Para pasar de INPUT1 a INPUTZ, utlllce e1 interruptor ON /
OFF del dispositivo conedado a los altavoces.

3 Conecte el altavoz izquierdo a la toma de
corriente.

4 Coquue los altavoces. (consulte la figura

Son I do (consulte Ia figura E)

En prrrner lugar, baje el volurnen del altavoz lzqulerdo. Antes de
empezar a escucbar cualquler tuente ale programas, el volumen
debe estar al minlrno.

1 Pulse POWER en el altavoz izquierdo.
El indicador POWER so anciende.

2 Ajuste el control VOLUME.
Al conectarlo a la sallda de auriculares, aluste kambién el
volumen del com onente conectado.
Una vez haya utllfudo el aparato, pulse e1 lnterruptor
POWER (1:1 OFF).
El lndlcador POWER se apaga.

Para aiustar el nivel de volumen de los

g raves

Glre el selector BASS del altavoz lzqulerdn para
ajustar el volumen de los graves. Ajuste e1 volurnen
de los graves basta un nlvel sin ollstorslon para evltar
danns en el sistema.

Acerca del modo de sonido

Puede disfrutar de sonldo de alta calidad con el

selector SOUND MODE.

-MOVIE: dlstrute de graves profundos y agudos
nltidos en los juegos y las peljculas de la
computadora.

-MUSIC: dlsfrute reproduciendo mllsica con alta
fidelldad.

E1 slsterna puede reconoeer sonidos tuertes y camblar
la frecuencla para cada uno de los modos de sonldo.
Puede obtener la frecuencla optlrna de graves para
cada uno de los modos de sonido girando e1 selector
BASS.

C
2
C
8
a
'0
:5 / - MUSIC
3 / W. MOVIE
E

I Imagen del control BASS
Frecuencia

3 Utilization de auriculares
Conectc los auriculares a la toma PHONES.

Nota
Apague la funclon MEGA BASS o BASS BOOST (Walkman,
etc), ya que puede dlstorslonar el sonldo.

Resolution de problemas

Si tlene alglln problema con el slsterna ale altavoces, eornpruebe la
llsta slguiente y torne las rnedldas oportunas. Sl el problerna
continLla, consulte con su dlstrlbuldor Sony rnas cercano.

El sistema de altavoces no emite ninglln sonido.

- Compruebe que todas las conexlones se ban reallzado
correctarnente.

- Compruebe que el volurnen del altavoz lzqulerdo y el
componente conectado se ban aumentado correctamente.

- Compruebe silos auriculares eskan conectados. Si asl fuera,
desconéctelos.

El sonido se distorsiona.

. Bale el volumen del componente conectado. Si el componente
conectado dlspone de la tunclon de amplificaclon de graves,
desacnvela.

0 Cire VOLUME en esta unldad para reduclr el volumen.

Se perciben zumbidos o ruido en la salida de altavoz.

- Compruebe que todas las conexlones se ban reallzado
correctarnente.

- Compruebe que ninguno de los componentes de audio
se encuentre demasiado cerca del televisor.

El sonido se detiene de repente.
Cornpruebe que todas las conexjonos se ban realizado
correctamente.

El brillo del indicador POWER es inestable.

Es pnslble que el brillo del lndlcador POWER se vuelva mestable
cuando se suba el volumen. No se trata de un error de
tunclonamlento.

Especificaciones

Section de los altavoces

Slsterna de altavoces 2 vias

Altavoees 10 cm, npo comm
2,5 cm, Iipo conlco

Tipo cerradn Reflector de graves

lmpedancla 4 :2

Section de amplificador
Saljda nominal 25 w + 25 w (10 % T.H.D., 1 kHz, 4 n)
ltnpedancla de entrada 4,7 m (a 1 kHz)

Entrada Minitoma estéreo x 2
(1mm 1, INPUT 2)

Generales

Dimensiones (an/al/pr) Aprox. 140 x 330 x 203 mm

Masa Apmx. .500 g (Izquierdo),
aprox, .800 g (Derecho)

Longimd del cable Aprox. 1,5 m (I a D)

Consumo de energl'a 21 w

Longimd del cable Aprox. 2 m (cable adaptador)

Accesorios opcionales

Cable de conexron RKGZZ

Adaptadur de clavija PC~234HS, PC-ZSIMS

Disefio y especificaclones sujetos a camblo sln prevlo avlso.