Sony srf m 73 owners manual

This is the 2 pages manual for sony srf m 73 owners manual.
Read or download the pdf for free. If you want to contribute, please mail your pdfs to info@audioservicemanuals.com.

Page: 1 / 2
left right
sony srf m 73 owners manual

Extracted text from sony srf m 73 owners manual (Ocr-read)


Page 1

SONY

FM Stereo/AM PLL
Synthesized Radio

3-866-487-11 (2)

Operating Instructions
Manual de Instrucciones

$orts

FM/AM wnLHmnn
SRF-M 73 WALKMAN l5 a trademark ol Sony Covpmailon

WALKMAN es mavca reglsirada de Sony Corporation
Surly Corporatlon @1999 Printed in China I

Sony®|ine http://www.wor|d.sony.com/

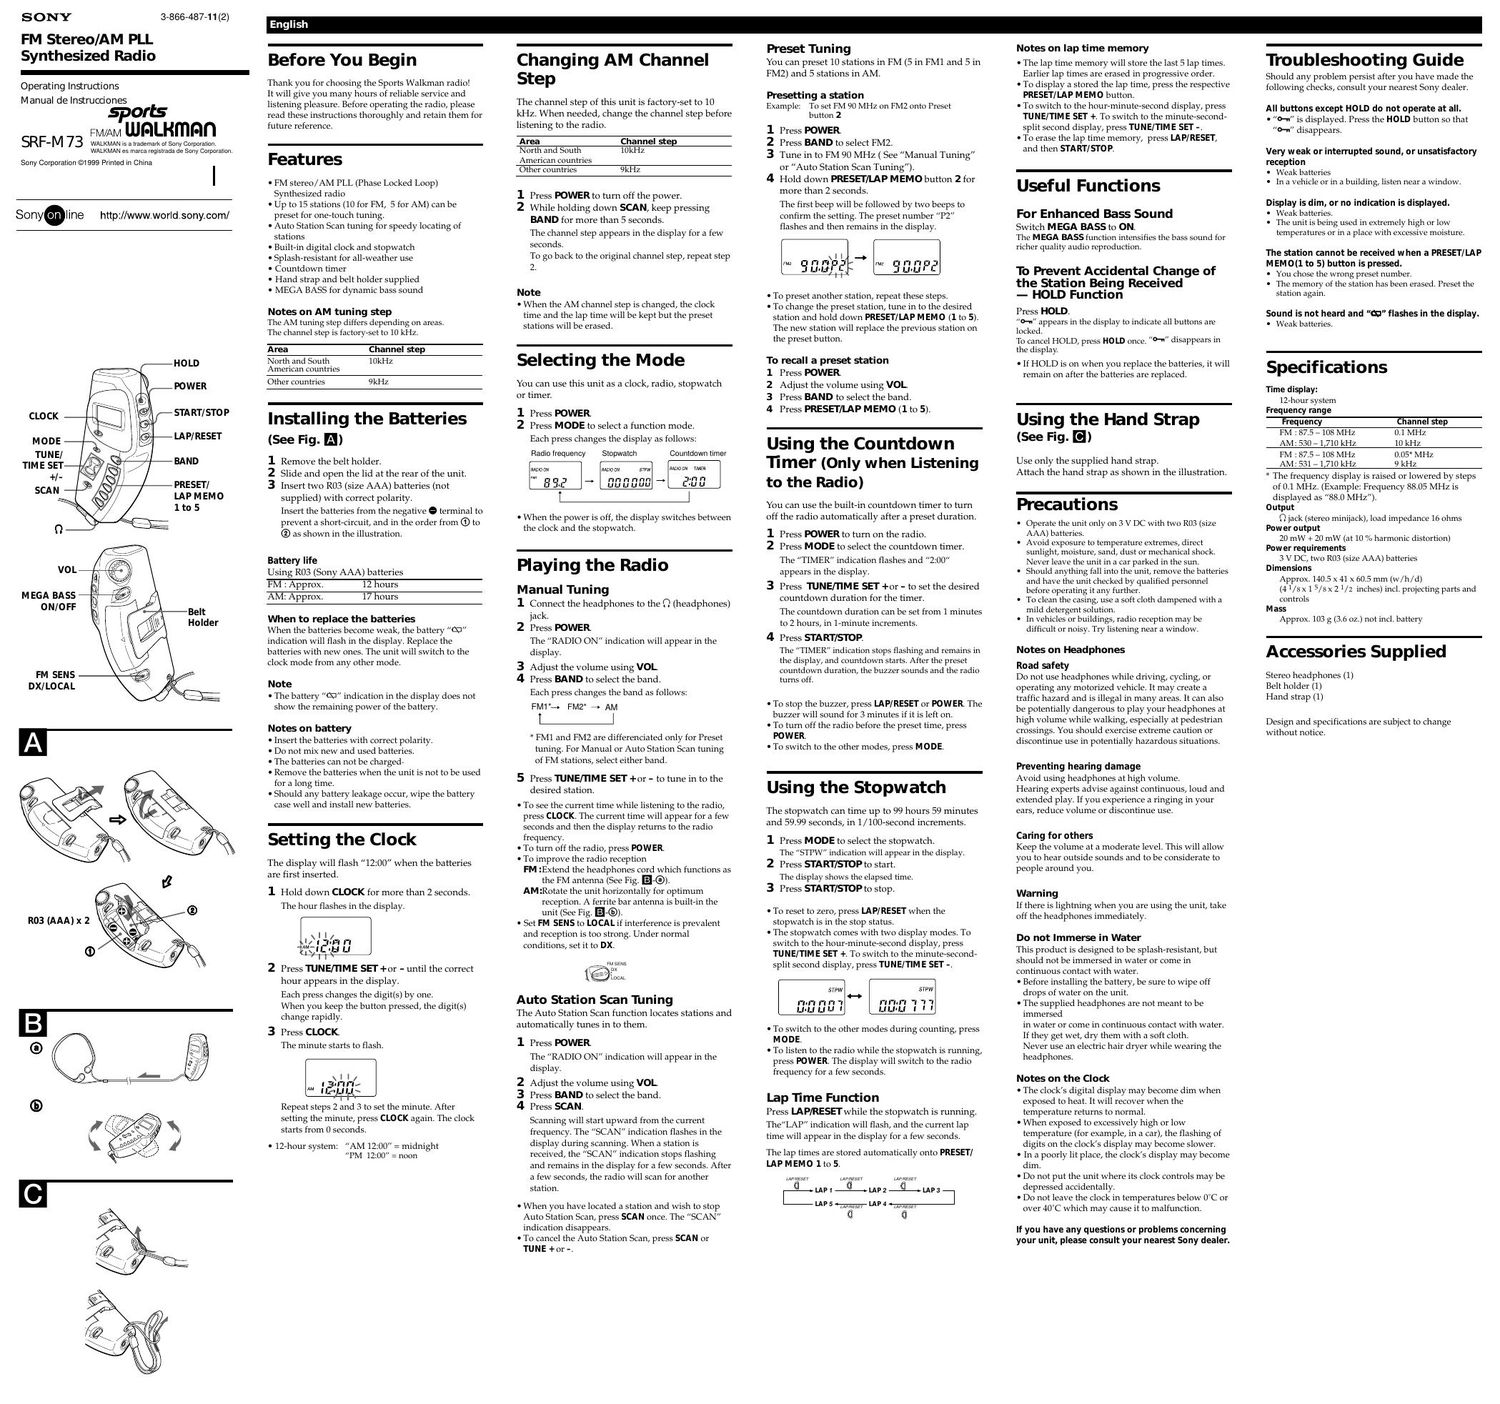
HOLD
POWER

STA RT/ STOP
LAP/ RESET
BAND

PRESET/
LAP MEMO
1 to 5

VOL

MEGA BASS
ONIOFF


Belt
Holder

FM SENS
DXI LOCAL

R03 (AAA) x 2

Before You Begin

Thank you for choosing the Sports Walkman radio!

it will give you many hours of reliable service and
listening pleasure. Before operating the radio, please
read these instructions thoroughly and retain them for
future reference.

Features

I FM stereo/AM PLL (Phase Locked Loop)
Synthesized radio

I Up to 15 stations (10 for FM, 5 for AM) can be
preset for one-touch tuning.

I Auto Station Scan tuning for speedy locating of
stations

I Built-in digital clock and stopwatch

I Splash-resistant for all-weather use

I Countdown timer

I Hand strap and belt holder supplied

I MEGA BASS for dynamic bass sound

Notes on AM tuning step
The AM tuning step differs depending on areas.
The channel step is factory-set to 10 kHz.

Area Channel step
North and South 1(JkHZ
American countries

Other countries 9kHz

Installing the Batteries
(See Fig. I)

1 Remove the belt holder.

2 Slide and open the lid at the rear of the unit.

3 Insert two R03 (size AAA) batteries (not
supplied) with correct polarity.
insert the batteries from the negative 9 terminal to
prevent a short-circuit, and in the order from (D to
(D as shown in the illustration.

Battery life

Using R03 (Sony AAA) batteries
FM : Approx. 12 hours
AM: Approx. 17 hours

When to replace the batteries

When the batteries become weak, the battery "m
indication will flash in the display. Replace the
batteries with new ones. The unit will switch to the
clock mode from any other mode.

Note
I The battery L\ indication in the display does not
show the remaining power of the battery.

Notes on battery

I Insert the batteries with correct polarity.

I Do not mix new and used batteries.

I The batteries can not be charged.

I Remove the batteries when the unit is not to be used
for a long time.

I Should any battery leakage occur, wipe the battery
case well and install new batteries.

Setting the Clock

The display will flash "12:00" when the batteries
are first inserted.

1 Hold down CLOCK for more than 2 seconds.
The hour flashes in the display.

2 Press TUNE/TIME SEI' +or - until the correct
hour appears in the display.
Each press changes the digit(s) by one.
When you keep the button pressed, the digit(s)
change rapidly.

3 Press CLOCK

The minute starts to flash.

Repeat steps 2 and 3 to set the minute. After
setting the minute, press CLOCK again. The clock
starts from 0 seconds.

I 12-hour system: AM 12:00" : midnight
PM 12:00 = noon

Changing AM Channel
Step

The channel step of this unit is factoryzset to 10
kHZ. When needed, change the channel step before
listening to the radio.

Area Channel step
North and South lilkHz
American countries

Other countries 9kHz

1 Press POWER to turn off the power.

2 While holding down SMN, keep pressing
BAND for more than 5 seconds.
The channel step appears in the display for a few
seconds.
To go back to the original channel step, repeat step
2.

Note

I When the AM channel step is changed, the clock
time and the lap time will be kept but the preset
stations will be erased.

Selecting the Mode

You can use this unit as a clock, radio, stopwatch
or timer.

1 Press POWER
2 Press MODE to select a function mode.
Each press changes the display as follows:

Countdown timer

Radlofre uency Slo watch

I When the power is off, the display switches between
the clock and the stopwatch.

Playing the Radio

Manual Tuning

1 Connect the headphones to the Q (headphones)
jack.

2 Press POWER
The RADIO ON indication will appear in the
display.

3 Adjust the volume using VOL

4 Press BAND to select the band.
Each press changes the band as follows:
FMlet FM2 4* AM

l-l

FM1 and FMZ are differenciated only for Preset
timing. For Manual or Auto Station Scan timing
of FM stations, select either band.

5 Press TUNE/TIME SEI' +or - to tune in to the
desired station.

I To see the current time while listening to the radio,
press CLOCK. The current time will appear for a few
seconds and then the display returns to the radio
frequency.
I To turn off the radio, press POWER
I To improve the radio reception
FM :Extend the headphones cord which functions as
the FM antenna (See Fig. E149).

AM:Rotate the unit horizontally for optimum
reception. A ferrite bar antenna is built-in the
unit (See Fig. B-(B).

I Set FM SENS to LOCAL if interference is prevalent
and reception is too strong. Under normal
conditions, set it to DX.

m sews
ox

Auto Station Scan Tuning
The Auto Station Scan function locates stations and
automatically tunes in to them.

1 Press POWER
The "RADIO ON indication will appear in the
display.

2 Adjust the volume using VOL.

3 Press BAND to select the band.

4 Press SCJAN.
Scanning will start upward from the current
frequency. The SCAN" indication flashes in the
display during scanning. When a station is
received, the SCAN indication stops flashing
and remains in the display for a few seconds. After
a few seconds, the radio will scan for another
station.

I When you have located a station and wish to stop
Auto Station Scan, press SCAN once. The SCAN
indication disappears.

I To cancel the Auto Station Scan, press SCAN or
TU NE + or -.

Preset Tuning
You can preset 10 stations in FM (5 in FM1 and 5 in
FMZ) and 5 stations in AM.

Presetting a station
Example: To set FM 9(1MH2 on FM2 onto lreset
button 2

1 Press POWER

2 Press BAND to select FM2.

3 Tune in to PM 90 MHZ ( See Manual Tuning"
or Auto Station Scan Tuning).

4 Hold down PRESET/LAP MEMO button 2 for
more than 2 seconds.
The first beep will be followed by two beeps to
confirm the setting. The preset number "P2
flashes and then remains in the display.

lltr' I:
W ELI-LI I.

I To preset another station, repeat these steps.

I To change the preset station, tune in to the desired
station and hold down PRESET/LAP M EM 0 (1 to 5).
The new station will replace the previous station on
the preset button.

To recall a preset station

1 Press POWER

2 Adjust the volume using VOL

3 Press BAND to select the band.

4 Press FRESH/LAP MEMO (1 to 5).

Using the Countdown
Timer (Only when Listening
to the Radio)

You can use the builtzin countdown timer to turn
off the radio automatically after a preset duration.

1 Press POWER to turn on the radio.

2 Press MODE to select the countdown timer.
The "TIMER indication flashes and "2:00
appears in the display.

3 Press TUNE/TIME SEI' +or - to set the desired
countdown duration for the timer.
The countdown duration can be set from 1 minutes
to 2 hours, in 1-minute increments.

4 Press START/STOP.
The "TIMER indication Stops flashing and remains in
the display, and countdown starts. After the preset
countdown duration, the buzzer sounds and the radio
turns Off.

I To stop the buzzer, press LAP/RESET or POW ER. The
buzzer will sound for 3 minutes if it is left on.

I To turn off the radio before the preset time, press
POW E R.

I To switch to the other modes, press MODE.

Using the Stopwatch

The stopwatch can time up to 99 hours 59 minutes
and 59.99 seconds, in 1 /1007second increments.

1 Press MODE to select the stopwatch.
The STPW indication will appear in the display.
2 Press START/STOP to start.

The display shows the elapsed time.
3 Press START/STOP to stop.

I To reset to zero, press LAP/ RESET when the
stopwatch is in the stop status.

I The stopwatch comes with two display modes. To
switch to the hour-minute-second display, press
TUNE/TIM E SET +. To switch to the minute-second-
split second display, press TUNE/TIM E SET -.

STPW 5er
I'll'l-I'l 'l 't 1

Fl! 1'! I'l I
LIILILIU 141.10.! I 1 '

I To switch to the other modes during counting, press
M O D E.

I To listen to the radio while the stopwatch is running,
press POW ER. The display will switch to the radio
frequency for a few seconds.

Lap Time Function

Press LAP/RESEI'while the stopwatch is running.
TheLAP indication will flash, and the current lap
time will appear in the display for a few seconds.

The lap times are stored automatically onto PRESET/
LAP M EM 0 1 to 5.

up arser us arser up sesrr
Ii» LAP i LAP 2 J-e LAP 3 1
L" 5 up sesrr L" 4 up sesrr

Notes on lap time memory

I The lap time memory will store the last 5 lap times.
Earlier lap times are erased in progressive order.

I To display a stored the lap time, press the respective
PRESET/LAP M EM 0 button.

I To switch to the hour-minute-second display, press
TUNE/TIM E SET +. To switch to the minute-second-
split second display, press TUNE/TIM E SET -.

I To erase the lap time memory, press LAP] RESET,
and then STA RT/ STO P.

Useful Functions

For Enhanced Bass Sound

Switch MEGA BASS to ON.

The M EGA BASS function intensifies the bass sound for
richer quality audio reproduction.

To Prevent Accidental Change of
the Station Being Received
- HOLD Function

Press HOLD.

Ito-u appears in the display to indicate all buttons are

locked.

To cancel HOLD, press HOLD once. 01 disappears in

the display.

I if HOLD is on when you replace the batteries, it will
remain on after the batteries are replaced.

Using the Hand Strap
(See Fig- I)

Use only the supplied hand strap.
Attach the hand strap as shown in the illustration.

Precautions

- Operate the unit only on 3 v DC with two R03 (size
AAA) batteries.

- Avoid exposure to temperature extremes, direct
sunlight, moisture, sand, dust or mechanical shock.
Never leave the unit in a car parked in the sun.

- Should anything fall into the unit, remove the batteries

and have the unit checked by qualified personnel

before operating it any further.

To clean the casing, use a soft cloth dampened with a

mild detergent solution.

- ln vehicles or buildings, radio reception maybe
difficult or noisy. Try listening near a window.

Notes on Headphones
Road safety

Do not use headphones while driving, cycling, or
operating any motorized vehicle. it may create a
traffic hazard and is illegal in many areas. it can also
be potentially dangerous to play your headphones at
high volume while walking, especially at pedestrian
crossings. You should exercise extreme caution or
discontinue use in potentially hazardous situations.

Preventing hearing damage

Avoid using headphones at high volume.

Hearing experts advise against continuous, loud and
extended play. If you experience a ringing in your
ears, reduce volume or discontinue use.

Caring for others

Keep the volume at a moderate level. This will allow
you to hear outside sounds and to be considerate to
people around you.

Warning
If there is lightning when you are using the unit, take
off the headphones immediately.

Do not Immerse in Water

This product is designed to be splash-resistant, but

should not be immersed in water or come in

continuous contact with water.

I Before installing the battery, be sure to wipe off
drops of water on the unit.

I The supplied headphones are not meant to be
immersed
in water or come in continuous contact with water.
if they get wet, dry them with a soft cloth.
Never use an electric hair dryer while wearing the
headphones.

Notes on the Clock

I The clocks digital display may become dim when
exposed to heat. It will recover when the
temperature returns to normal.

I When exposed to excessively high or low
temperature (for example, in a car), the flashing of
digits on the clocks display may become slower.

I in a poorly lit place, the clocks display may become
dim.

I Do not put the unit where its clock controls may be
depressed accidentally.

I Do not leave the clock in temperatures below 0C or
over 40C which may cause it to malfunction.

If you have any questions or problems mnceming
your unit, please consult your nearest Sony dealer.

Troubleshooting Guide

Should any problem persist after you have made the
following checks, consult your nearest Sony dealer.

All buttons except HOLD do not operate at all.
I "O-n is displayed. Press the HOLD button so that
"o-n disappears.

Very weak or interrupted sound, or unsatisfactory
reception

I Weak batteries

I in a vehicle or in a building, listen near a window.

Display is dim, or no indication is displayed.

I Weak batteries.

- The unit is being used in extremely high or low
temperatures or in a place with excessive moisture.

The station cannot be received when a PRESET/LAP

M EMO(1 to 5) button is pressed.

- You chose the wrong preset number.

I The memory of the station has been erased. Preset the
station again.

Sound is not heard and "m" flashes in the display.
I Weak batteries.

Specifications

Time display:
12-hour system
Frequency range

Frequency Channel step
FM : 87.5 r 108 MHZ 0.1 MHZ

AM: 530 r 1,710 kHz 10 kHz

FM : 87.5 r 108 MHZ 0.05" MHZ
AM: 531 e 1 710 kHz 9 kHZ

" The frequency display is raised or lowered by steps
of 0.1 MHz. (Example: Frequency 88.05 MHZ is
displayed as 88.0 MHZ).

Output

Q jack (stereo minijack), load impedance 16 ohms

Power output

20 mW + 20 mW (at 10 /o harmonic distortion)
Power requirements
3 v DC, two R03 (size AAA) batteries
Dimensions
Approx. 140.5 x 41 x 50.5 mm (w/h/d)
(41/3 x15/8 x 21/2 inches) incl. projecting parts and
controls
Mass
Approx. 103 g (3.5 oZ.) not incl battery

Accessories Supplied

Stereo headphones ( 1)
Belt holder (1)
Hand strap (1)

Design and specifications are subject to change
without notice.

Page 2

LA PI RESET
BAND
PRESET/

LAPMEMO
1a5

VOL

MEGA BASS
ON/OFF


Presilla
para el
cinturcm

FM SENS DX/
LOCAL

R03 (AAA) x 2

Antes de comenzar

[Muchas gracias por la eleccion de esla radio Sports
Walkman!

Le ofrecera muchas horas de servicio tiable y placer de
escucha. Antes de utiliZar la radio, lea detenidamente
eslas inst-rucciones, y guardelas para futuras
referencias.

Caracterlsticas

I Radio sintetiZada con bucle de enganche de tase
(PLL) de FM estéren/AM.

I Permile almacenar hasla 15 emisoras (10 de FM y 5
de AM) para sintonizarlas de un toque.

I Sinlonl'a con exploracion automatica para localizar
facilmenle emisoras

I Reloj y cronometro digitales incorporados

I Resistente a las salpicaduras para poder utiliZarse a
la intemperie

I TemporiZador

I Correa para la mufieca y presilla para el cinturon
suministrados

I MEGA BASS para ofrecer sonido de graves
dinamicos

Nata sabre el intervalo de sintanl'a entre
canales de AM
El intervalo do sintonia do AM difiere con ol aroa.

El intervalo d9 sintonia entre canales ha sido ajustado en
fabrica a 10 kHz

Area lntervalo entre canales
lalses do Norlc y 10lon

Sudamérica

Otros paises 9km

lnstalacién de las pilas
(Consulte la Fig. I)

1 Quite la presilla para el cinturon.

2 Deslice y abra la tapa de la parte posterior de la
unidad.

3 lnserte dos pilas de tamafio R03 (AAA) (no
suministradas) con la polaridad correcta.
lara evitar cortocircuilos, inserte las pilas desde el
terminal negalivo G en el orden de G y ®, como
se muest-ra en la ilustracion.

Duracién de las pilas
Utilizando pilas R03 (AAA) Sony

FM : Aprox. 12 horas

AM: Aprox. 17 horas

Cuéndo reernplazar las pilas

Cuando las pila se debiliten, en el Visualizador
parpadeara la indicacion de las mismas m.
Reemplace las pilas por ot-ras nuevas.

La unidad cambiara al modo de reloj desde cualquier
otro.

Nota
- La lndlcaolon m dol Visualizador no moslrara la
energia restante do las pilas

Natas sabre las pilas

lnseno las pilas con la polaridad correcta.

No mezcle una pila nuova oon otra usada.

Las pilas no puodon cargarse.

Cuando no vaya a utilizar la unidad durante mucho
tiempo, extraigale las pilas.

Si 59 fuga ol electrolilo de las pilas, llmpie blon ol
compartimiento do las mlsmas antes de lnslalar pilas
nuevas.

Ajuste del reloj

Cuando inserte por primera vez las pilas, en el
Visualizador parpadeara "12:00".

1 Mantenga presionada CLOCK durante mas de 2
segundos.
En el Visualizador parpadeara la hora.

2 Presione TUNE/TIME SEI' +0 - hasta que en el
Visualizador aparean la hora correcta.
Con cada presion el (los) digito(s) cambiara(n) una
unidad.
Si manliene presionada la recla el (los) digito(s)
cambiaram) rapidamente.

3 Presione una vez CLOCK
Los minutos comenzaran a parpadear.

Repita los pasos 2 y 3 para ajustar los minutos.
Despues de haber ajuslado los minulos, vuelva a
presionar CLOCK. El reloj comenzara a funcionar
desde 0 segundos.

I Sisrema de 12 horas: AM 12:00" : medianoche
PM 12:00 : mediodla

Cambio del intervalo de
sintoma entre canales
de AM

El intervalo de sintonia entre canales ha sido ajuslado
en fabrica a 10 kHz. Cuando sea necesario, cambie
esre intervalo antes de escuchar la radio.

Area lntervalo entre canales
Paises de Norte y 10kHz

Sudamerica

Otros paises 9kHZ

1 Presinne POWERpara desconectar la
alimentacitm.

2 Manteniendo pulsada SCJAN, mantenga
presionada BAND durante mas de 5 segundos.
El intervalo de sintonia entre canales aparecera en
el Visualizador duranle algunos segundos.
Para Volver al intervalo de sintonia entre canales
original, repita el paso 2.

Nata

. Cuando ramble ol lnlorvalo do sintonia entre canales do
AM, la hora so oonsorvara, pero las emisoras
alrnacenadas y ol tiempo do vuolla so borraran de la
momorla.

Seleccién del modo

Usled podra urilizar esta unidad Como reloj, radio,
cronometro, y temporizador.

1 Presione POWER

2 Presione MODE para seleccionar u.n modo de
funcion.
Con cada presion, la visualizacion cambiara de la
forma siguiente:

Frequencla

de la radlo Tem onzador

Cronametm

I Cuando la alimentacion esté desconeclada, la
visualiZacion cambiara enl-re el reloj y el cronomel-ro.

Escucha de la radio

Sintoma manual

1 Conecte los auriculares a Q (auriculares).

2 Presione POWER
En el Visualizador aparecera la indicacion "RADIO
ON.

3 Ajuste el volumen utilizando VOL

4 Presione BAND para seleccionar la banda.
Con cada presion, la banda cambiara de la forma
siguiente:

FMla FM2 4 AM

i-i

FM1 y FMZ solamente 5e diferencian para la
sintonia memorizada. Para la sintonia manual o
la exploracion automatica de emisoras de FM,
seleccione cualquier banda.

5 Presione TUNE/TIME SEI' +o - para sintonizar
la emisora deseada.

I Para ver la hora actual durante la escucha de la
radio, presione CLOCK. La hora actual aparecera
durante algunos segundos, y la visualiZacion
volvera a la frecuencia de la radio.

I Para desconeclar la alimentacion de la radio,
presione POW ER.

I Para mejorar la recepcion de la radio
FM: Extienda el cable de los auriculares, porque

Enciona corno anlena de FM (Consulte la Fig.
-@)-

AM: Gire horizontalmente la unidad hasta obrener
la optima recepcion. La unidad riene
incorporada una antena de barra de ferrita
(Consulte la Fig.EI-@).

I Si hay interterencias y la recepcion es demasiado
fuerte, ponga FM SENS en LOCAL. En condiciones
normales, dejelo en DX.

Sintonl'a con exploracién

automatica de emisoras

La funcion de exploracion automalica de emisoras

localizara automaticamente emisoras y las sintonizara.

1 Presinne POWER
En el Visualizador aparecera' la indicacion RADIO
ON.

2 Ajuste el volumen utilizando VOL

3 Presione BAND para seleccionar la banda.

4 Presione SCAN.
La exploracion 5e iniciara desde la frecuencia
actual hacia la mas alta. Durante la exploracion, en
el Visualizador parpadeara la indicacion SCAN".
Cuando se reciba una emisora, la indicacion
SCAN dejara de parpadear, permanecera en el
Visualizador durante algunos segundos, y se oira
la emisora. Después de algunos segundos, la radio
explorara' otra emisora.

. Cuando localice la omlsora dosoada y desee parar la
oxploraolon automatlca de emisoras, presione una vez
SCAN. La lndlcaolon SCAN desaparecera.

. Para cancelar la exploration automatica do omlsoras,
presione SCAN o TUNE + o -.

Sintoma memorizada

Usled podra almacenar 10 emisoras de FM (5 en FM1
y olras 5 en FM2) y 5 de AM.

Memorizacicm de una emisora
Ejemplo: para almacenar FM 90 MHZ en FMZ en
la tecla de memoriZacion 2

1 Presione POWER

2 Presione BAND para seleccionar FM2.

3 Sintonice FM 90 MHZ (Consulte Sintonia
manual y Sintonia con exploration automatica
de emisoras).

4 Mantenga presionada la tecla FRESH/LAP
MEMO 2 durante algunos segundos hasta que
suenen pitidos.

Despues del primer pitido seguiran otros dos para
contirmar el ajuste. El numero de memorizacion
P2 parpadeara' y después permanecera en el
Visualizador.

I Para memorizar otra emisora, repita estos pasos.

I Para cambiar una emisora memorizada, sintonice
olra y presione PRESET/LAP MEMO (1 a 5). La
nueva emisora reemplazara a la anteriorrnente
almacenada en la lecla de memorizacion.

Para invocar una emisara memorizada
1 Presione POWER

2 Ajuste el volurnen utilizando VOL

3 Presione BAND para seleccionar la banda.

4 Presione FRESH/LAP MEMO (1 a 5).

Utilizacién del
temporizador (Solamente
cuando escuche la radio)

Usled podra utilizar el temporizador incorporado para
desconectar automaticamenle la alimenracion de la
radio despues del tiempo programado.

1 Presione POWER para conectar la alimentacion
de la radio.

2 Presione MODE para seleccionar el modo de
temporizador.
En el Visualizador parpadeara la indicacion
TIMER" y aparecera 2:00".

3 Presione TUNE/TIME SEI' +0 - para programar
la duration de cuenta atras deseada para el
temporizador.

La duracion de la cuenta atras podra programarse
desde 1 minuto a 2 horas en incremenlos de 1
minuro.

4 Presione START/STOP.
La indicacién TIMER dejara' de parpadear y
permanecera en el Visualizador, se iniciara la
cuenta atras. Despues de la duracion de cuenta
alras, sonara el Zumbador y se desconecrara la
alimentacion de la radio.

I Para silenciar el zumbador, presione LAP/ RESET 0
POWER. Si lo deja activado, el Zumbador sonara
durante 3 minutos.

I Para desconectar la alimentacién de la radio antes de
la duracion programada, presione POWER.

I Para cambiar a olros modos, presione MODE.

Utilizacién del
cronémetro

El cronometro podra contar hasta 99 horas, 59
minulos, y 59,99 segundos en incrementos de 1 / 100
segundos.

1 Presione MODE para seleccionar el cronornetro.
En el Visualizador aparecera la indicacion STPW.

2 Presione SI'ART/SI'OP para poner en
funcionarniento el cronometro.
El Visualizador most-rara el tiempo lranscurrido.

3 Presione SI'ART/SI'OPpara parar el

cronérnetro.

. Para reponer ol cronometro cero, presione LAP/RESET
cuando esté on eslado do parada.

El cronomolro dispone do dos modos do visualization.
Para cambiar a la vlsuallzaolon do horas-minulos-
segundos, presione TUNE/TIM E SET +. Para cambiar a la
visualization do minutos-segundos-fracciones de
Segundo, presione TUNE/TIM E SET -.

5er

11-11 11 n '4
LMJ LIL! I

Para cambiar a otros modos duranro ol computo,
presione MODE.

Para escuchar la radio mientras ol cronornetro esté en
funcionamiento, proslono POWER. La vrsualrzaolon
oamblara a la do la frecllencia de la radio durante
algunos segundos.

Funcién de tiempo de vuelta
Presione LAP/RESETmientras el cronometro esté en
funcionarniento.

El Visualizador parpadeara la indicacion LAP y
aparecera el liernpo de vuelta.

Los tiempos de vuelta 5e almacenaran
automat-icamente en PRESET/LAP M EM 0 1 a 5.

IQ:>VUELTA1 LVUELTA 2 G VUELTA 3
WELT may vumA 4<-l

Natas sabre la memoria de tiempo de

vuelta

I La memoria del tiempo de vuelta almacenara hasta 5
iiempos de vuelta. Los anteriores 5e borraran en
orden progresivo.

I Para hacer que se visualice un tiempo de vuelta
almacenado, presione la tecla PRESET/ LAP M EMO
correspondienre.

I Para cambiar a la visualizacion de horas-minulos-
segundos, presione TU N EITIM E SET +. Para cambiar
a la Visualizacion de minuios-segundos-fracciones
de segundo, presione TUNE/TIM E SET -.

I Para borrar una memoria de tiempo de vuelta,
presione LAP/ RESET y después START.

Funciones Lltiles

Para reforzar el sonido de graves

longa MEGA BASS en ON.

La funcion MEGA BASS intensificara el sonido de
graves para otrecer una reproduccion de audio de
mayor calidad.

Para evitar el cambio accidental
de la emisora que esté
recibiéndose - Funcion de
bloqueo (HOLD)

Fresione HOLD.

En el Visualizador aparecera D-n para indicar que
todas las leclas estan bloqueadas.

lara cancelar el bloqueo, presione una veZ HOLD para
que D-n desaparezca del Visualizador.

- sr HOLD osla presionada cuando reemplace las pilas,
pormanooora asi dospuos do haberlas reemplazado.

Uti izacién de la correa
para la mufieca (Consulte
la Fig.

Utilice solamenle la correa para la mur'ieca
suministrada.

Fije la correa para la mur'ieca como se mueslra en la
ilusiracion.

Precauciones

I Alimente la unidad solamente con 3 V CC utilizando
dos pilas de lamaflo R03 (AAA).

I Evite exponer la unidad a temperaturas extremadas,
la luZ solar directa, humedad, arena, polvo, y golpes.
No la deje nunca dentro de un automovil
esracionado al sol.

I Si algo cae dentro de la unidad, extraigale las pilas y
haga que sea comprobada por personal cualiticado
antes de seguir utilizandola.

I Para limpiar la caja, utilice un pafio suave
humedecido en una solucion poco coneentrada de
detergente.

I En vehiculos o edificios, la radiorrecepcion puede
resultar dificil o ruidosa. Pruebe a escuchar cerca de
una Venlana.

Natas sabre los auriculares

Seguridad en la oarretera

No utilice los auriculares mienlras condcha, vaya en
bicicleta, o ulilice cualquier vehiculo motorizado. Eslo
podria suponer un riesgo de trafico, y es ilegal en
muchas areas. También puede resultar polencialmenle
peligroso ulilizar los auriculares a gran volumen
cuando camine, especialmenle en pasos cebra. En
siluaciones potencialmenre peligrosas debera rener
mucho cuidado o dejar de ulilizar los auriculares.

Cuidada de sus oidos

Evire uliliZar los auriculares a gran volumen.

Los experros en oidos desaconsejan la reproduccion
prolongada a gran volumen. Si experimente un
silbidos en sus oidos, reduzca el Volumen o deje de
urilizar los auriculares.

Respeto a los demas

Mantenga el volumen a un nivel moderado. Esto le
permitira oir los sonidos del exterior y no molestar a
quienes se encuenrren a su alrededor.

Advertencia
En caso de tormentas electricas cuando eslé utilizando
la unidad, quilese inmediatamente los auriculares.

No sumerja la unidad en agua

Esta unidad ha sido disenada para resislir las
salpicaduras, pero no debera sumergirse en ella ni
estar en contacto conlinuo con la misma.

I Antes de inslalar las pilas, seque las gotas de agua
de las mismas y de la unidad.

I Los auriculares suministrados no han sido disenados
para sumergirse en agua ni para eslar en contacto
continuo con ella. Si se humedecen, séquelos con un
pano suave.

No utilice nunca un secador del pelo cuando tenga
los auriculares pueslos.

Notas sobre el reloj

. El vlsuallzador digital dol reloj puede vorso débilmcnte
cuando so exponga al calor. Sin embargo so recuperara
cuando la lemperatura vuelva a sor normal.

sr expone la unrdad a lemperaturas exceslvarnente alras
o bajas (por ejemplo, on un automovil), ol parpadeo do
105 digitos del Visualizador dol reloj puodo sor mas
lento.

En un lugar dobllmonlo ilumlnado, es posible que el
Visualizador dol reloj so vea mal.

No coloque la unldad donde los coniroles dol reloj
puedan prosronarso accidentalmente.

No deje o1 reloj a lemperaturas inferiores a 0°C ni
snporloros a 40°C, porquo podrla funcionar mal.

Si tiene alguna pregunta a problema en
relacién con su unidad, péngase en contacto
con su pmveedor Sony.

Guia para la solucién de
problemas

Si el problema persiste después de haber realiZado las
comprobaciones siguienles, consulte a su proveedor
Sony.

Las teclas del panel frontal no funcionan en

absoluto excepto HOLD.

I Esta visualizandose O-n. Presione la lecla HOLD
para hacer que "o-n desaparean.

Sonido muy débil o interrumpida, a recepcion

insatisfactoria

I Pilas débiles

I En u.n vehiculo 0 un edificio, escuche cerca de una
venrana.

El Visualizador es difl'cil de ver, a no aparece

ninguna indicacién.

I Pilas debiles.

I La unidad esia utilizandose a temperaturas
extremadamenle altas o bajas o en un lugar con
excesiva humedad.

No es posible recibir una emisara al presionar

una tecla PRESET/LAP MEMO (1 a 5).

I Ha elegido un numero de memorizacion erroneo.

I La emisora se ha borrado de la memoria. Vuelva a
memoriZarla.

El sonido no se aye y en el Visualizador
parpadea "m".
I Pilas débiles

Especificaciones

Visualizacién de la hora
Sistema de 12 horas
Gamas de frecuencias

Frecuencia lntervalo de sintonl'a
entre canales

FM: 87.5 7108 MHZ 0,1 MHZ

AM: 530 A 1.710 kHz 10 kHz

FM: 87.5 - 108 MHZ 0,05" MHZ

AM: 531 A 1.710 kHz 9 kHZ

* La visualizaclon de la frecuencia aumenlara o
dlsmlnulra on pasos de 0,1 MHz (Eiernplo: la frecuencia
de 88,05 59 Vlsuallzara Como 88.0 MHZ).

Salida

Toma r? (mlnitoma estéreo), impedancia de carga do

16 ohmlos
Salida de potencia

20 mW + 20 mW (al 10% de distorsirm armonica)
Alimentacién

3 V cc, dos pilas do tamano R03 (AAA)
Dimensiones

Aprox. 140,5 x 41 x 60,5 mm (an/al/prf), lncluyondo

partes y controles sallenles.

M asa

Aprox. 103 g, excluyendo las pilas

Accesorios
suministrados

Auriculares estereo (1)
Presilla para el cinturon (1)
Correa para la mufieca (1)

El disefio y las especificaciones estan sujetos a cambio
sin previo aviso.