Sony rm ez 2 owners manual

This is the 2 pages manual for sony rm ez 2 owners manual.
Read or download the pdf for free. If you want to contribute, please mail your pdfs to info@audioservicemanuals.com.

Page: 1 / 2
left right
sony rm ez 2 owners manual

Extracted text from sony rm ez 2 owners manual (Ocr-read)


Page 1

3-252-844-11(1)

SON!

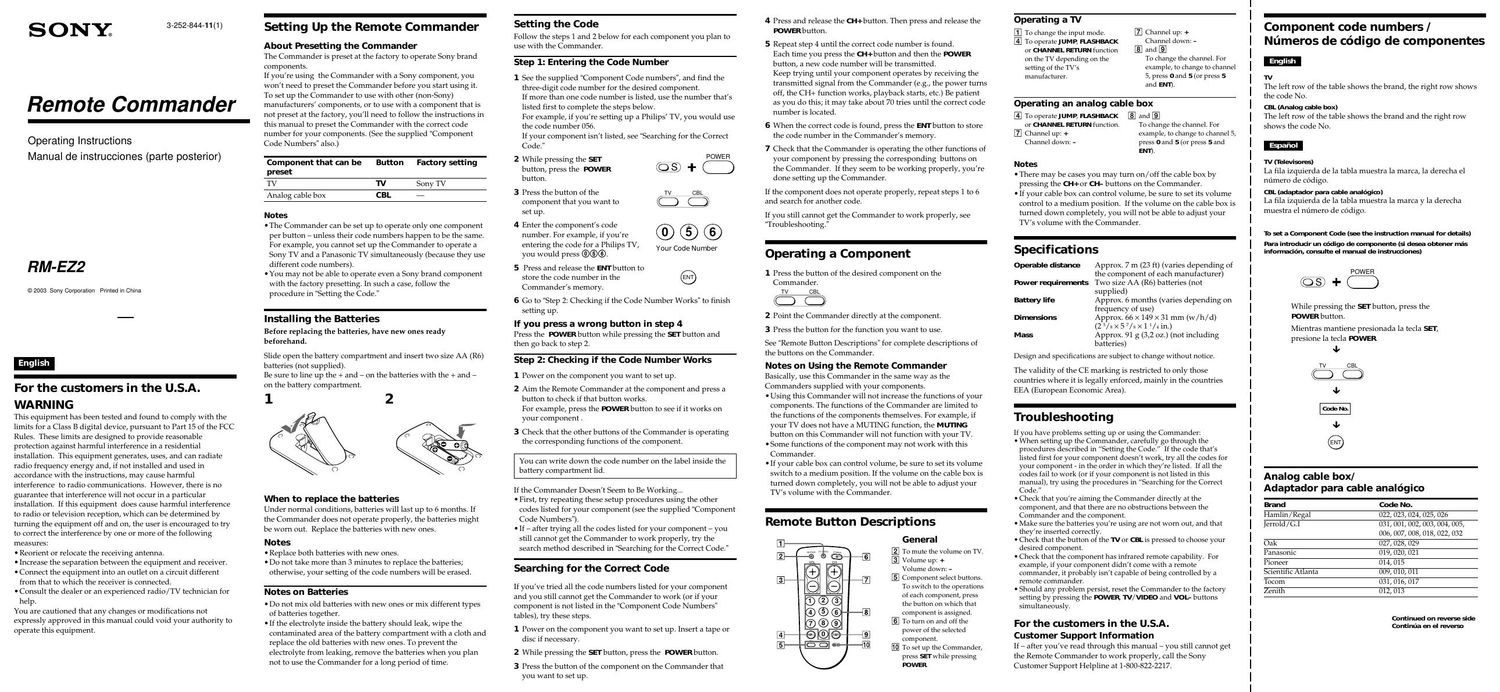
Remote Commander

Operating Instructions
Manual de instrucciones (parte posterior)

RM-EZZ

o 2003 Sony Corporatlon Printed in China

For the customers in the U.S.A.
WARNING

This equipment has been tested and found to comply with the
limits for a Clasr B digital device, pursuant to Part 15 of the FCC
Rules. These lirruts are designed to provide reasonable
protection against harmful interference in a residential
installation. This equipment generates, uses, and can radiate
radio frequency energy and, if not installed and used in
accordance with the instructions, may cause harmful
interference to radio communications. However, there is no
guarantee that interference will not occur in a particular
installation. if this equipment does cause harmful interference
to radio or television reception, which can be determined by
turning the equipment off and on, the user is encouraged to try
to correct the interference by one or more of the following
measures:
I Reorient or relocate the receiving antenna.
I increase the separation between the equipment and receiver.
I Connect the equipment into an outlet on a circuit different
from that to which the receiver is connected.
I Consult the dealer or an experienced radio/TV technician for
help.
You are cautioned that any changes or modifications not
expressly approved in this manual could void your authority to
operate this equipment.

Setting Up the Remote Commander
About Presetting the Commander

The Commander is preset at the factory to operate Sony brand
components.

If youre using the Commander with a Sony component, you
wont need to preset the Commander before you start using it.
To set up the Commander to use with other (non75ony)
manufacturers components, or to use with a component that is
not preset at the factory, youll need to follow the instructions in
this manual to preset the Commander with the correct code
number for your components. (See the supplied Component
Code Numbers" also.)

Component that can be Button Factory setting
preset

TV TV Sony TV

Analog cable box CBL 7

Notes

I The Commander can be set up to operate only one component
per button 7 unless their code numbers happen to be the same.
For example, you cannot set up the Commander to operate a
Sony TV and a Panasonic TV simultaneously (because they use
different code numbers).

I You may not be able to operate even a Sony brand component
with the factory presetting. In such a case, follow the
procedure in Setting the Code."

Installing the Batteries

Before replacing the batteries, have new ones ready
beforehand.

Slide open the battery compartment and insert two size AA (R6)
batteries (not supplied).

Be sure to line up the + and 7 on the batteries with the + and 7
on the battery compartment.

1 2

3%

When to replace the batteries

Under normal conditions, batteries will last up to 6 months. If
the Commander does not operate properly, the batteries might
be worn out. Replace the batteries with new ones.

Notes

I Replace both batteries with new ones.

I Do not take more than 3 minutes to replace the batteries;
otherwise, your setting of the code numbers will be erased.

Notes on Batteries

I Do not mix old batteries with new ones or mix different types
of batteries together.

I It the electrolyte inside the battery should leak, wipe the
contaminated area of the battery compartment with a cloth and
replace the old batteries with new ones. To prevent the
electrolyte from leaking, remove the batteries when you plan
not to use the Commander for a long period of time.

Setting the Code

Follow the steps 1 and 2 below for each component you plan to
use with the Commander.

Step 1: Entering the Code Number

1 See the supplied Component Code numbers", and find the
threesdigit code number for the desired component.
if more than one code number is listed, use the number thats
listed first to complete the steps below.
For example, if youre setting up a Philips TV, you would use
the code number 056.
If your component isnt listed, see Searching for the Correct
Code."

2 While pr 'ng the SEI' / , POWER
button, press the POWER (378) +
button.

3 Press the button of the M
component that you want to Q Q
set up.

4 Enter the components code
number. For example, if youre
entering the code for a Philips TV,
you would press @©©.

5 Press and release the ENTbutton to
store the code number in the @
Commanders memory.

6 Go to Step 2: Checking if the Code Number Works" to finish
setting up.

If you press a wrong button in step 4

Press the POWER button while pressing the SEl'button and

then go back to step 2.

@6369

Your Code Number

Step 2: Checking if the Code Number Works
1 Power on the component you want to set up.

2 Aim the Remote Commander at the component and press a
button to check if that button works.
For example, press the POWER button to see if it works on
your component .

3 Check that the other buttons of the Commander is operating
the corresponding functions of the component.

You can write down the code number on the label inside the
battery compartment lid.

If the Commander Doesnt Seem to Be Working...

I First, try repeating these setup procedures using the other
codes listed for your component (see the supplied Component
Code Numbers").

I if 7 after trying all the codes listed for your component 7 you
still cannot get the Commander to work properly, try the
search method described in Searching for the Correct Code."

Searching for the Correct Code

If youve tried all the code numbers listed for your component
and you still cannot get the Commander to work (or if your
component is not listed in the Component Code Numbers"
tables), try these steps.

1 Power on the component you want to set up. insert a tape or
disc if necessary.

2 While pressing the SEl'button, press the POWERbutton.

3 Press the button of the component on the Commander that
you want to set up.

4 Press and release the CH+button. Then press and release the
POWERbutton.

5 Repeat step 4 until the correct code number is found.
Each time you press the O-l+button and then the POWER
button, a new code number will be transmitted.
Keep trying until your component operates by receiving the
transmitted signal from the Commander (e.g., the power turns
off, the CH+ function works, playback starts, etc.) Be patient
as you do this; it may take about 70 tries until the correct code
number is located.

6 When the correct code is found, press the ENTbutton to store
the code number in the Commanders memory.

7 Check that the Commander is operating the other functions of
your component by pressing the corresponding buttons on
the Commander. if they seem to be working properly, youre
done setting up the Commander.

if the component does not operate properly, repeat steps 1 to 6
and search for another code.

if you still cannot get the Commander to work properly, see
Troubleshooting."

Operating a Component

1 Press the button of the desired component on the
Commander.
[7 TV CBL\
Q Q
2 Point the Commander directly at the component.
3 Press the button for the function you want to use.

See Remote Button Descriptions" for complete descriptions of
the buttons on the Commander.

Notes on Using the Remote Commander

Basically, use this Commander in the same way as the

Commanders supplied with your components.

I Using this Commander will not increase the functions of your
components. The functions of the Commander are limited to
the functions of the components themselves. For example, if
your TV does not have a MUTING function, the MU'nNG
button on this Commander will not function with your TV.

I Some functions of the component may not work with this
Commander.

I if your cable box can control volume, be sure to set its volume
switch to a medium position. If the volume on the cable box is
turned down completely, you will not be able to adjust your
TVs volume with the Commander.

Remote Button Descriptions

Genelal

To mute the volume on TV.

El Volume up: +
Volume clown: -

El Component select buttons.
To switch to the operations
of each component, press
the button on which that
component is assigned.

E To turn on and off the

-l; '- power of the selected
E U V E component.
El- m 5- To set up the Commander,

press SErwhilc pressing
POWER

Operating a TV

E To change the input mode.

E To operate JUMP, HASHBAO<
or CHANNE RETURN function
on the TV depending on the
setting of the TVs
manufacturer.

Channel up: +
Channel down: -

and El
To change the channel. For
example, to change to channel
5, press Dand 5(or press 5
and am.

Operating an analog cable box
E To operatejuMP, FLASHBACK and El
or O'IANNEL ETURN function. To change the channel. For
Channel up: + example, to change to channels,
Channel down: - press Oand 5 (or press sand
EN'I').

Notes

I There may be cases you may turn on/off the cable box by
pressing the CH+or CH- buttons on the Commander.

I If your cable box can control volume, be sure to set its volume
control to a medium position. if the volume on the cable box is
turned down completely, you will not be able to adjust your
TVs volume with the Commander.

Specifications

Opaable disarm Approx. 7 m (23 ft) (varies depending of
the component of each manufacturer)
Power requiranans Two size AA (R6) batteries (not

supplied)

Battery life Approx. 6 months (varies depending on
frequency of use)

Dimens'ons Approx. 66 x 149 x 31 mm (w/h/d)
(2 3/ 5 7/3 x 1 '/4in.)

Mass Approx. 91 g (3,2 oz.) (not including

batteries)
Design and specifications are subject to change without notice.
The validity of the CE marking is restricted to only those

countries where it is legally enforced, mainly in the countries
EEA (European Economic Area).

Troubleshooting

If you have problems setting up or using the Commander:

I When setting up the Commander, carefully go through the
procedures described in Setting the Code." If the code thats
listed first for your component doesnt work, try all the codes for
your component - in the order in which theyre listed. if all the
codes fail to work (or if your component is not listed in this
manual), try using the procedures in "Searching for the Correct
Code.

I Check that youre aiming the Commander directly at the
component, and that there are no obstructions between the
Commander and the component.

I Make sure the batteries youre using are not worn out, and that
theyre inserted correctly.

I Check that the button of the TVor CBLis pressed to choose your
desired component.

I Check that the component has infrared remote capability. For
example, if your component didnt come with a remote
commander, it probably isnt capable of being controlled by a
remote commander.

I Should any problem persist, reset the Commander to the factory
setting by pressing the POWER TV/ VIDEO and VOL- buttons
simultaneously.

For the customers in the U.S.A.

Customer Support Information

If 7 after youve read through this manual 7 you still cannot get
the Remote Commander to work properly, call the Sony
Customer Support Helpline at 17800782272217.

Component code numbers/
NL'Imeros de codigo de componentes

TV

The left row of the table shows the brand, the right row shows
the code No.

CBL (Analog cable box)

The left row of the table shows the brand and the right row
shows the code No.

TV (Televisarfi)

La fila izquierda de la tabla muestra la marca, la derecha el
numero de codigo.

CBL (adaptador para able analégicn)

La fila izquierda de la tabla muestra la marca y la derecha
muestra el numero de codigo.

To set a Catrwnait Cnde (seefl'le ilflruction nannal for deails)

Para intruducir un oodigo de mmponenhe (st dasa obtener ma's
infonradcm. cons-me at nanual de insrucdons)

POWER

gs>+<:)

While pressing the SEI'button, press the
IOWER button.

Mientras mantiene presionada la tecla SEI',
presione la tecla POWER
4r

TV CBL
(C) <3
*9

@

Analog cable box/
Adaptador para cable analégico

Brand Code No.

Hamlin/Regal 022, 023, 024, 025, 026

Jerrold/(3.1 031, 001, 002, 003, 004, 005,
006, 007, 008, 018, 022, 032

Oak 027, 028, 029

Panasonic 019, 020, 021

Pioneer 014, 015

Scientific Atlanta 009, 010, 011

Tocom 031, 016, 017

Zenith 012, 013

Cnmirlued on revel: s'de
Cnntinua an d revels)

Page 2

Notas

I El telemando stylamente podra prngramarse para que un botén
contrnle un componente a la vez, a menos que los numerns de
cédigo sean iguales. Por ejemplo, usted no podra programar el
telemando para controlar un televisor Sony y otro Panasonic
simultaneamente (porque sus numeros de codigo son
diferentes).

I Quizas no pueda controlar un componente Sony con el
preajuste de fabrica. En tal caso, realice el procedimiento de
Programacién del cédigo."

|
TV / Televisores I Bpam'
m Code No. | ,
Sony 001 | Para los cl lentes de EE. UU.
:Efiiral 23:, 014, 009 I A DVE R-[E NCIA
AOC (112 I Este equipo ha sido probado y se ha encontrado que cumple con
Audinac (134 I los limites para dispositivos digitales de Clase B, de acuerdo con
Bell&Hn\A]ell 014, (109 038 la Parte 15 de las normas de la FCC. Estos limites han sido
Broksoniq 003, 012, 072 I disenados para proporcionar una proteccién razonable contra
Craig 022, 034, 020 021 I interferencias perjudiciales en una instalacion residencial. Este
Croslex 011 I equipn genera, utiliza, y puede radiar energia de radiofrecuencia
Crown 034 y, si no se instala y utiliza de acuerdo con las instrucciones,
Curtis Mathis 003, 019, 034 l puede causar interferencias perjudiciales en las
Daewoo 035, (135, 003, (141, 029 I radiocomunicaciones. Sin embargo, no existe ninguna garantia
Dayt-mn 013 I de que tales interferencias no se produzcan en una instalacion
Emerson 022, 013, 020, 021, 003, 015, 042, particular. Si este equipo causa interferencias perjudiciales, lo
034 l que podra determinarse desconectando y volviendo a conectar
Fisher 025 I su alimentacién, se ruega que el usuario corrija las interferencias
General Electric 002, 018, 003, 007, 045 l tomando una o mas de las medidas siguientes:
GoldStar/ LG 003, 013, 012, 030, 046, 050, 051, I Reorientacion o reubicacion de la antena receptnra.
049 I I Aumento de la separation entre el equipo y el receptor.
Hitachi 031, 013, 003, 032 I I Conexion del equipo a un tomacorriente diferente del utilizado
IC Penny 003, 002, 030, 007 I por el receptor.
IVC 028 I Solicitud de ayuda al proveedor 0 a u.n técnico de radio/
KTV 033, 013, 003, 034 I televisién experimentado.
LXI(Sears) 002, 003, 011, 025, 019, 012, 052 I Tenga en cuenta que cualquier cambio o modificacién n0
Magnavox 011, 012, 013, 003, 043, 047 I expresamente aprobado en este manual puede anular su
Marantz 024 autoridad para utilizar este equipo.
Mitsubishi/MGA 024, 003, 012, 066 I
NEC 003 012 I -
Panasonic 018, 016, 007, 049, 067, 074, 076 I Preparacién de| te|emando
[hilco 011 013 003 068 035 031
- - ' / ' ' ' I Sobre el preajuste del telemando
Ellis; 2:17: 2:: (2:: 017 I El telemando ha sido preajustado en fabrica para controlar
Portland 003 008 I componentes de marca Sony.
Quasar 018, 007, 048 Si va a utilizar el telemando con componentes Sony, no
Radio Shack 002 012 024 023 I necesitara preajustarlo antes de comenzar a utilizarlo.
RCA/PROSCAN 002: 003: 004: 005 006, 007 008, I Para ajustar el telemando a fin de utilizarlo con componentes de
044 045, 046, 053 I otros fabricantes (no Sony), 0 con un componente que no haya
Samsung 026, 012, 013/ 003 055 sido preajustado en fabrica, tendra que seguir las instrucciones
Sanyn 025 023, 054 I de este manual para preajustar el telemando con los numeros de
5, 034 012 I codigo correctos para sus componentes. (Consulte también los
Sharp 014 013, 015, 070 I Numeros de codigo de componentesu suministrados.)
Signature 2000 014, 009 I
Egggiink 8:: 313: 22: 2:: I Componente a programar Tecla Ajuste de fabrioa
Toshiba Goo, 019, 014, 052, 059, 075 I Televisnf TV Televisor Sony
Videch 031, 003, 012 I Adaptador para cable analégico CBL i
Wards 013, 003, 015, 012
Zenith 009, 010 I
|
|
|
|
|
|
|
|
|
|
|
|
|
|
l

Colocacién de las pilas

Antes de reemplazar las pilas, tenga unas nuevas preparadas.

Deslice y abra el compartimiento de las pilas, e inserte dos pilas
de tamano AA (R6) (no suministradas).

Cerciorese de alinear + y 7 de las pilas con + y 7 del
compartimiento de las mismas.

Cuando reemplazar las pilas

En condiciones normales, las pilas duraran hasta 6 meses. Si el
telemando no funciona adecuadamente, es posible que las pilas
esten agotadas. Reemplace las pilas por otras nuevas.

Notas

I Reemplace ambas pilas por otras nuevas.

I No tarde mas de 3 minutos en reemplazar las pilas, porque de
lo contrario su ajuste de numeros de codigo se borrara.

Notas sobre las pilas

I No mezcle una pila nueva con otra Vieja, ni dos de tipos
diferentes.

I Si se fuga el electrolito de las pilas, limpie la parte contaminada
del Compartimiento de las pilas con un pano y reemplace las
pilas viejas por otras nuevas. Para evitar la fuga del electrtvlito,
extraiga las pilas cuando no vaya a utilizar el telemando
durante un periodo prolongado de tiempo.

Programacién del cédigo
Realice los pasos 1 y 2 siguientes para cada componente que
planee utilizar con el telemando.

Paso 1: lntroduccion del nl'lmero de codigo

1 Consulte los Numeros de codigo de componentes"
suministrados, y busque el numero de codigo de tres cifras
para el componente deseado.

Si hay mas de un numern de codigo en la lista, utilice el
primero de ellos para completar los pasos siguientes.

Por ejemplo, para un televisor Philips, utilice el numern de
codigo 056.

Si su componente no esta en la lista, consulte Busqueda del
codigo correcto."

2 Mientras mantiene POWER
. \
presionada la tecla SEI', CC) 8/ +
presione la tecla POWER
3 Presione la tecla del TV CBL
f 0.
componente que desee Q C)

ajustar.

4 lntrnduzca el numero de codigo del
componente. Por ejemplo, para @ 6) @
introducir el codigo para un Su nleero de Cédigo
televisnr Philips, presione ©©©.

5 Presione la tecla ENT para almacenar
el numero de crydigo en la memoria @
del telemando.

6 Para finalizar la programacién, vaya al Paso 2:
Comprobacion del funcionamiento de un numero de cédigo."

Si ha presionado una tecla errénea en el paso 4
Al tiempo que mantiene presionada la tecla SEI', presione la
tecla mWERy, a continuacion, vaya al paso 2.

Paso 2: Comproba ién del funcionamiento de
un ntlmero de codigo

1 Conecte la alimentacion del componente que desee ajustar.

2 Apunte con el telemando hacia el componente y presione una
tecla para comprobar si funciona.
Por ejemplo, presione la tecla POWER para ver si funciona en
su componente.

3 Cnmpruebe si las otras teclas del telemando controlan las
funciones correspondientes del componente.

Usted podra escribir el numero de codigo en la etiqueta del
interior de la tapa del compartimiento de la bateria.

Si el telemando parece que no funciona...

I En primer lugar, repita estos procedimientos de programacion
utilizando los otros codigos de la lista para su componente
(consulte las tablas de Numeros de cédigo de componentes").

I Si, después de haber probado todos los crydigos de la lista para
su componente, el telemando sigue sin funcionar
adecuadamente, consulte el método de busqueda descrito en
Busqueda del codigo correcto."

Basqueda del codigo correcto

Si ha intentado todos los numeros de codigo de la lista para su
componente y el telemando sigue sin funcionar (o si sus
componentes no estan indicados en las tablas de Numeros de
codign de cornponentes"), pruebe estns pas s.

1 Conecte la alimentacién del componente que desee ajustar. Si
es necesario, inserte u.n cassette o un disco.

2 Mientras mantiene presionada la tecla SEI', presione la tecla
POWER

3 Presione la tecla del componente que desee ajustar.

4 Presione y suelte la tecla 04+. A continuacion, presione y
suelte la tecla RDWER

5 Repita el paso 4 hasta que encuentre el numero de codigo
correcto.
Cada Vez que presione la tecla CH+y después la tecla RDWER,
se transmitira un nuevo numero de codigo.
Continue intentandolo hasta que su componente funcione al
recibir la senal transmitida desde el telemando (p. ej., se
desconecta la alimentacirJn, la funcion de CH+ funciona, se
inicia la reproduccién, etc). Tenga paciencia cuando realice
esto, porque es posible que tenga que realizar 7O intentos
hasta encontrar el numero de cédigo correcto.

6 Cuando encuentre el codigo correcto, presione la tecla ENT
para almacenar el numero de codigo en la memoria del
telemando.

7 Cnmpruebe si el telemando controla las otras funciones de su
componente presionando las teclas correspondientes de dicho
telemando. Si parece funcionar correctamente, habra
finalizado el preajuste del telemando.

Si el componente n0 funciona correctamente, repita los pasos 1 a
6 y busque otro c0digo.

Si el telemando sigue sin funcionar adecuadamente, consulte
Solucién de problemas."

Control de un componente

1 Presione la tecla correspondiente al componente deseado del
telemando.

TV CEL

(CDC)

2 Apunte con el telemando directamente hacia el componente.

3 Presione la tecla correspondiente a la funcion que desee
utilizar.

Con respecto a la descripcion completa de las teclas del
telemando, consulte D cripcion de las teclas del telemando."

Notas sobre la ut zacion del telemando
Basicamente, utilice este telemando de la misma forma que el
suministrado con sus componentes.

I La utilizacion de este telemando no aumentara las funciones
de sus componentes. Las funciones del telemando estaran
limitadas a las de los propios componentes. Por ejemplo, si su
televisor no posee funcion de silenciamiento (MUTING), la
tecla MU11NG de este telemando no funcionara con su
televisor.

I Algunas funciones del componente puede que no funcionen
con este telemando.

I Si su adaptador para cablevision puede controlar el volumen,
cerciorese de ajustar su selector de volumen a una posicién
intermedia. Si redujese completamente el volumen del
adaptador para cablevision, no podria ajustar el volumen de su
televisor con el telemando.

Descripcién de las teclas del telemando

General

Para silenciar el volumen del
televisor.

@ Para aumentar e1 volumen: +
Para reducir cl volumen: .

E chlas selectoras de
componentes. Para cambiar a
las operationes de cada
componente, presione la tecla
a la que haya asignado 91
components.

E Para conectar y desconectar 1a
allmentacion del componente
scleccionado.

Para configurar el telemando,
presione sermamemendo
presionado POWER

8
IE 9
a--a-a

U

Control de un televisor (N)

m Para cambiar e1 modo cle Para pasar a canales
entrada. superiores: +

I11 Para controlar la tuncion de Para pasar a canales
cambio entre dos canales lnteriores: -
UUMP, HASHBACKo y IEI
O-IANNEL mum) do1 Para cambiar el canal. Por
televisor, dependiendo 1191 ejemplo, para cambiar al canal
ajuste 1191 tabricante de dichn 5, presione 0y 5 (o presione 5y
televisor. arm.

Control de un adaptador para cable analégico

E Para controlar 1a funcién de y E
cambio entrc dos canales Para cambiar 91 canal. For
(] UMP, FLASHBACKo ejemplo, para cambiar a1 canal
CHANNEL REl'URN). 5, presione 0y 5(0 presione 5y
c1 Canal siguiente. am
CH-z Canal anterior.

Notas

I Puede darse el caso de que resulte posible conectar/desconectar la
alimenracion del adaptador para cablevision presionando la tecla
CH+o CH- del telemando.

I Si su adaptador para cablevisién puede controlar el volumen,
cerciorese de ajustar su selector de volumen a una posicién
intermedia. Si redujese completarnente e1 Volumen del adaprador
para cablevision, no podria aiustar el Volumen de su televisor con
el telemando.

EspeCIflcaCIones

Alance de control Aprox. 7 In (23 ft) (puede variar
dependiendn del componente de cada
fabricante)

Alinerltadén Dos pilas de tamano AA (R6) (no
suministradas)

Wradén de Ias pilas Aprox. 6 meses (puede variar
dependiendo de la frecuencia de

utilizacion)
Dimensons Aprox. 66 x 149 x 31 mm (an/al/prf)
Mo Aprox. 91 g (excluyendo las pilas)

El diseno y las especificaciones estan sujetos a cambio sin previo
aviso.

La validez de la marca CE se limita linicamente a aquellos paises
en los que la legislacion la impone, especialmente los paises de
la EEA (Area econémica eurnpea).

Solucién de problemas

Si t-iene problemas al programar o utilizar el telemando:

I Cuando programe e1 telemando, siga cuidadosamente los
procedimientos descritos en Programacion del codigo." Si el
primer codign de la lista para s11 componente no funciona, pruebe
los demas de la lista para dicho componente, siguiendo el nrden de
la lista. Si no funciona ninguno de los cédigos (o si su componente
no aparece en la lista de este manual), pruebe los procedimientos
de Busqueda del codign correcto."

I Compruebe si esta apuntando directamente hacia el componente, y
que no haya obstaculos entre el telemando y el componente.

I Cerciérese de que las pilas que esré utilizando no estén agoradas y
de que estén insertadas correctamente.

I Compruebe 5i ha presionado la tecla TVo CBLdel telemando
correspondiente al componente deseado.

I Compruebe que el componente plieda cont-rolarse con rayos
infrarrojos. Por ejemplo, si 511 componente no vino con telemando,
probablemenre no podra controlarse con un telemando.

I Si el probiema persiste, reponga el telemando a los ajustes de
fabrica presionando simultaneamente las teclas POWER TV/
VIDEO y VOL-.

Para los clientes de EE.UU.

lnformacion para ayuda a los clientes

Si después de haber leido este manual, el telemando sigue sin
funcionar adecuadamente, llame a Customer Support Helpline,
17800782272217.