Sony icf s 79 w owners manual

This is the 2 pages manual for sony icf s 79 w owners manual.
Read or download the pdf for free. If you want to contribute, please mail your pdfs to info@audioservicemanuals.com.

Page: 1 / 2
left right
sony icf s 79 w owners manual

Extracted text from sony icf s 79 w owners manual (Ocr-read)


Page 1

3-860-702-13 (1)

SONY
FM/AM Synthesized Radio ICF-S79
FM/MW/LW Synthesized Radio ICF-S79L
TV/WEA11-lER/FM/AM

Synthesized Radio ICF-S79V

Operating Instructions

Mode d'emploi
Bedienungsanleitung (Riickseite)
lstruzioni per I'Uso (facciata opposta)

SHUllJ R [Hill

Sony Corporation ta 1997

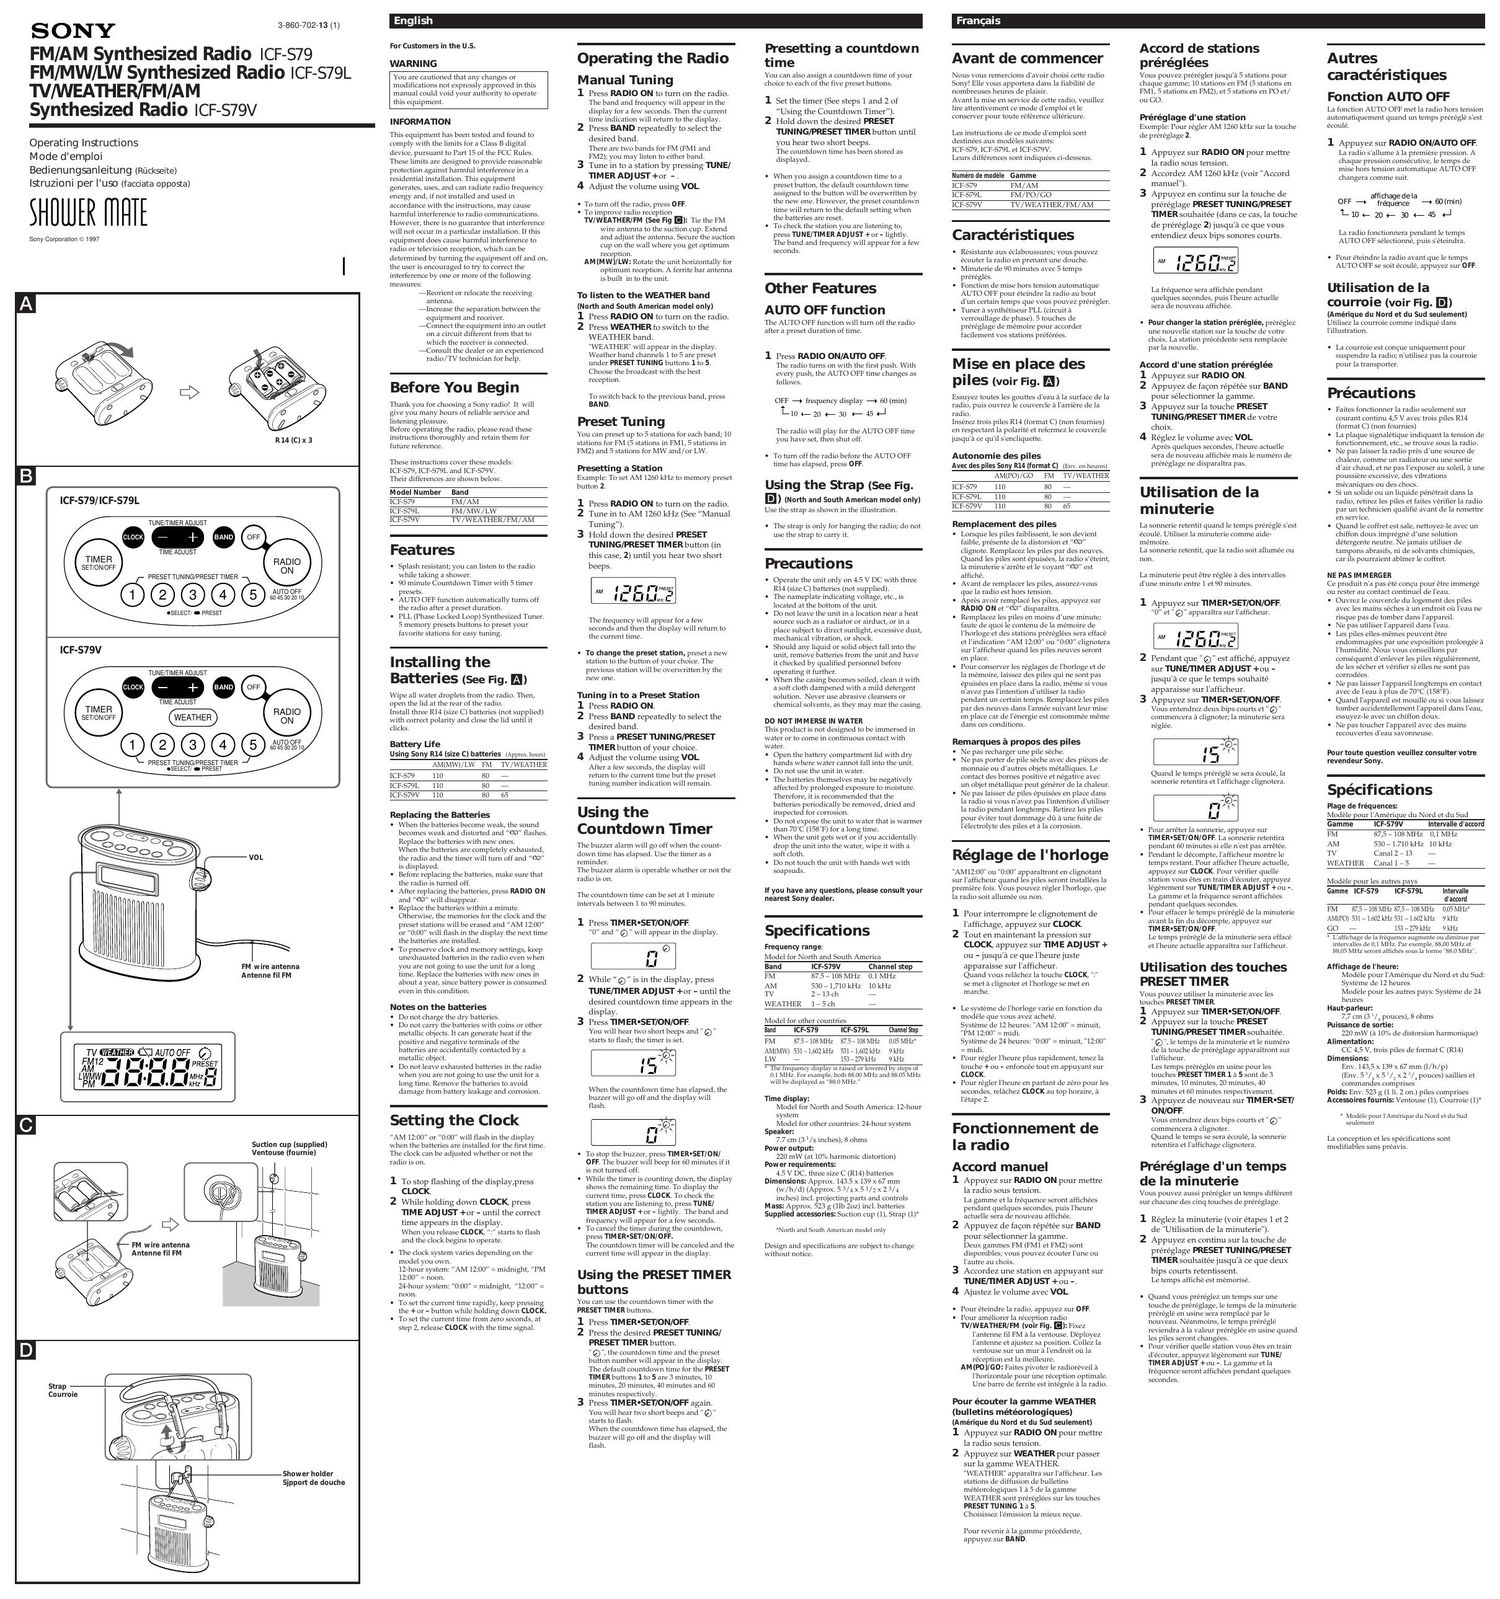
R14(C)X3

ForCustomers in the U.S.

WARNING

You are cautioned that any changes or
modifications not expressly approved in this
manual could void your authority to operate
this equipment.

INFORMA110N

This equipment has been tested and found to
comply with the limits for a Class B digital
device, pursuant to Part 15 of the FCC Rules.
These limits are designed to provide reasonable
protection against harmful interference in a
residential installation. This equipment
generates, uses, and can radiate radio frequency
energy and, if not installed and used in
accordance with the instructions, may cause
harmful interference to radio communications.
However, there is no guarantee that interference
will not occur in a particular installation. if this
equipment does cause harmful interference to
radio or television reception, which can be
determined by turning the equipment off and on,
the user is encouraged to try to correct the
interference by one or more of the following
measures:
7Keorient or relocate the receiving
antenna.
7lncrease the separation between the
equipment and receiver.
7Connect the equipment into an outlet
on a circuit different from that to
which the receiver is connected.
7Consult the dealer or an experienced
radio/TV technician for help.

Before You Begin

Thank you for choosing a Sony radio! it will
give you many hours of reliable service and
listening pleasure.

Before operating the radio, please read these
instructions thoroughly and retain them for
future reference.

These instructions cover these models:
lCF-S79, lCF-S79L and lCF-S79V.
Their differences are shown below.

r 1

lCF-S79/ IC F-S79L

TUNE/TIMER ADJUST

TIME ADJUST

3 PRESET TUNING/PRESET TIMER

ISELECT/ O FRESET

TIMER
SET/ON/OFF

ICF-S79V

TUNE/TIMER ADJUST

TIME ADJUST


TIMER
SET/ONIOFF

RADIO

o

ON
Q®®®®W
6045302010

PRESET TUNING/PRESET TIMER
OSELECT/ - PRESET


VOL

\

FM wire antenna
Antenne fil FM

uro OFF Q"

L". " PRE'SET

Suction cup (supplied)
Ventouse (fournie)


FM wire antenna
Antenne fil FM

Strap
Courroie

Shower holder
Sjpport de douche

M odel Number Band

TV / WEATHER / FM / AM

Features

. Splash resistant; you can listen to the radio
while taking a shower.

. 90 minute Countdown Timer with 5 timer
presets.

. AUTO OFF function automatically turns off
the radio after a preset duration.

. PLL (Phase Locked Loop) Synthesized Tuner.
5 memory presets buttons to preset your
favorite stations for easy timing.

Installing the
Batteries (See Fig. I)

Wipe all water droplets from the radio. Then,
open the lid at the rear of the radio.

install three R14 (size C) batteries (not supplied)
with correct polarity and close the lid until it
clicks.

Battery Life

Using Sony R14 (size C) batteries (Approx. hours)
AM(MW)/LW FM TV/WEATHER

[CF-S79 110 so 7

1C S79L 110 so 7

lCF-S79V 110 80 65

Replacing the Batteries

0 When the batteries become weak, the sound
becomes weak and distorted and m" flashes.
Replace the batteries with new ones.

When the batteries are completely exhausted,
the radio and the timer will turn off and no
is displayed.

. Before replacing the batteries, make sure that
the radio is turned off.

. After replacing the batteries, press RADIO 0N
and Q will disappear.

. Replace the batteries within a minute.
Otherwise, the memories for the clock and the
preset stations will be erased and "AM 12:00
or 0:00 will flash in the display the next time
the batteries are installed.

. To preserve clock and memory settings, keep
unexhausted batteries in the radio even when
you are not going to use the unit for a long
time. Replace the batteries with new ones in
about a year, since battery power is consumed
even in this condition.

Notes on the batteries

. Do not charge the dry batteries.

. Do not carry the batteries with coins or other
metallic objects. it can generate heat if the
positive and negative terminals of the
batteries are accidentally contacted by a
metallic object.

. Do not leave exhausted batteries in the radio
when you are not going to use the unit for a
long time. Remove the batteries to avoid
damage from battery leakage and corrosion.

Setting the Clock

AM 12:00 or "0:00 will flash in the display
when the batteries are installed for the first time.
The clock can be adjusted whether or not the
radio is on.

1 To stop flashing of the display,press
CLOCK

2 While holding down CLOCK, press
TIME AD] USI' +or - until the correct
time appears in the display.
When you release CLOCK, :" starts to flash
and the clock begins to operate.

. The clock system varies depending on the
model you own.
12-hour system: AM 12:00 = midnight, "PM
1200 = noon.
24-hour system: "0:00 = midnight, 12:00" =
noon.

. To set the current time rapidly, keep pressing
the + or - button while holding down CLOCK.

. To set the current time from zero seconds, at
step 2, release CLOCK with the time signal.

Operating the Radio

Manual Tuning
1 Press RADIO ON to turn on the radio.

The band and frequency will appear in the
display for a few seconds. Then the current
time indication Will return to the display.

2 Press BAND repeatedly to select the
desired band.

There are two bands for FM (FM1 and
FMZ); you may listen to either band.

3 Tune in to a station by pressing TUNE]
11MER AD] USI'+or -.

4 Adjust the volume using VOL

I To turn off the radio, press OFF.
I To improve radio reception
TV/WEATHERIFM (See Fig I): Tie the FM
wire antenna to the suction cup. Extend
and adjust the antenna. Secure the suction
cup on the wall where you get optimum
reception.
AM(Mw)/Lw: Rotate the unit horizontally for
optimum reception. A ferrite bar antenna
is built in to the unit.

To listen to the WEATHER band

(North and South American model only)

1 Press RADIO ON to turn on the radio.

2 Press WEATHER to switch to the
WEATHER band.
WEATHER" will appear in the display.
Weather band channels 1 to 5 are preset
under PRESET TUNING buttons 1 to 5.
Choose the broadcast with the best
reception.

To switch back to the previous band, press
BAND.

Preset Tuning

You can preset up to 5 stations for each band; 10
stations for FM (5 stations in FM1, 5 stations in
FMZ) and 5 stations for MW and /or LW.

Presetting a Station
Example: To set AM 12o0 kHz to memory preset
button 2.

1 Press RADIO ON to turn on the radio.

2 Tune in to AM 1260 kHz (See Manual
Tuning).

3 Hold down the desired PRESEI'
TUNING/PRESEI' 11MER button (in
this case, 2) until you hear two short
beeps.

The frequency will appear for a few
seconds and then the display will return to
the current time.

I To change the preset station, preset a new
station to the button of your choice. The
previous station will be overwritten by the
new one.

Tuning in to a Preset Station

1 Press RADIO ON.

2 Press BAND repeatedly to select the
desired band.

3 Press a PRESEI' TUNING/PRESEI'
TIMER button of your choice.

4 Adjust the volume using VOL
After a few seconds, the display will
return to the current time but the preset
tuning number indication will remain.

Using the
Countdown Timer

The buzzer alarm will go off when the count»
down time has elapsed. Use the timer as a
reminder.

The buzzer alarm is operable whether or not the
radio is on.

The countdown time can be set at 1 minute
intervals between 1 to 90 minutes.

1 Press TIM ER'SEI'ION/OFF.

0 and Q} ,, will appear in the display.

2 While Q3" is in the display, press
TUNE/TIMER AD] USI' +or - until the
desired countdown time appears in the
display.

3 Press nMER-SEr/oN/OFF.

You will hear two short beeps and Q
starts to flash; the timer is set.

When the countdown time has elapsed, the
buzzer will go off and the display will
flash.

I To stop the buzzer, press TIM ER-SETION/
OFF. The buzzer will beep for 60 minutes if it
is not turned off.

I While the timer is counting down, the display
shows the remaining time. To display the
current time, press CLOCK. To check the
station you are listening to, press TU NE/

TIM ER ADJUST + or - lightly. The band and
frequency will appear for a few seconds.

I To cancel the timer during the countdown,
press TIM ER-SET/ON/OFF.

The countdown timer will be canceled and the
current time will appear in the display.

Using the PRESET11MER
buttons

You can use the countdown timer with the
PRESET TIM ER buttons.

1 Press TIM ER'SEr/ON/OFF.

2 Press the desired PRESEI'TUNINGI
PRESEI' TIM ER button.

Q} the countdown time and the preset
button number will appear in the display.
The default countdown time for the PRESET
TIM ER buttons 1 to 5 are 3 minutes, 10
minutes, 20 minutes, 40 minutes and oil
minutes respectively.

3 Press TIMER'SEI'ION/OFF again.
You will hear two short beeps and Q;-
starts to flash.

When the countdown time has elapsed, the
buzzer will go off and the display will
flash

Presetti ng a cou ntdow n
ti me

You can also assign a countdown time of your
choice to each of the five preset buttons.

1 Set the timer (See steps 1 and 2 of
Using the Countdown Timer).

2 Hold down the desired PRESEI'
TUNING/PRESEI' 11M ER button until

you hear two short beeps.
The countdown time has been stored as
displayed.

I When you assign a countdown time to a
preset button, the default countdown time
assigned to the button will be overwritten by
the new one. However, the preset countdown
time will return to the default setting when
the batteries are reset.

To check the station you are listening to,
press TUNE/TIM ER ADJUST + or - lightly.
The band and frequency will appear for a few
seconds.

Other Features
AUTO OFF function

The AUTO OFF function will turn off the radio
after a preset duration of time.

1 Press RADIO ONIAUTO OFF.
The radio turns on with the first push. With

every push, the AUTO OFF time changes as

follows.

OFF 7 frequency display 7) no (min)
1710 I7 2U (- 30 I- 45 4-1

The radio will play for the AUTO OFF time
you have set, then shut off.

I To turn off the radio before the AUTO OFF

time has elapsed, press OFF.

Using the Strap (See Fig.

E) (North and South American model only)
Use the strap as shown in the illustration.

I The strap is only for hanging the radio; do not
use the strap to carry it.

Precautions

I Operate the unit only on 4.5 V DC with three

R14 (size C) batteries (not supplied).

The nameplate indicating voltage, etc., is

located at the bottom of the unit.

I Do not leave the unit in a location near a heat
source such as a radiator or airduct, or in a
place subject to direct sunlight, excessive dust,
mechanical vibration, or shock.

I Should any liquid or solid object fall into the
unit, remove batteries from the unit and have
it checked by qualified personnel before
operating it further.

I When the casing becomes soiled, clean it with
a soft cloth dampened with a mild detergent
solution. Never use abrasive cleansers or
chemical solvents, as they may mar the casing.

DO NOT IM MERSE IN WATER

This product is not designed to be immersed in

water or to come in continuous contact with

water.

I Open the battery compartment lid with dry

hands where water cannot fall into the unit.

DO not use the unit in water.

The batteries themselves may be negatively

affected by prolonged exposure to moisture.

Therefore, it is recommended that the

batteries periodically be removed, dried and

inspected for corrosion.

' Do not Expose the unit to Water that is Warmer
than 70°C (1581) for a long time

I When the unit gets wet or if you accidentally
drop the unit into the water, wipe it with a
soft cloth.

' Do not touch the unit with hands wet with
soapsuds.

If you have any questions, please consult your
nearest Sony dealer.

Specifications

Frequency range:
Model for North and South America

Band IC 79V Channel step
PM 87.5 7108 MHZ 0.1 MHZ

AM 530 7 1,710 kHz 10 kHz

TV 2 7 13 ch 7

WEATHER 1 7 5 ch 7

Model for other countries

Band lCF-S79 ICF-S79L Channel Step
FM 87.5 7108 MHz 87.5 , 108 Ml-lz () 05 MHZ"
AM(MW 531 ~1,602 kHz 1 71,602 kHz 9 kHz

LW 7 .3 7 27) kHz 9 kHz

* lhe frequency display is raised or lowered by steps of
(1.1 MHz For example, both 88.00 Mtiz and tit; 05 Milz
wille displayed as "still Miiz."

Time display:

Model for North and South America: 12-hour

system

Model for other countries: 24-hour system
Speaken

7.7 cm (3 /s inches), 8 ohms
Power output:

220 inW (at 111% harmonic distortion)
Power requirements:

4.5 v DC, three size c (Ri4) batteries
Dimensions: Approx. 143.5 x 139 x 67 mm

(w/h/d) (Approx. 5 3/4 x5 1/2x 2 3/4

inches) incl. projecting parts and controls
Mass: Approx. 523 g(1lb 2oz) incl. batteries
Supplied accessories: Suction cup (1), Strap (1)*

North and South American model only

Design and specifications are subject to change
without notice.

Avant de commencer

Nous vous remercions davoir choisi cette radio
Sony! Elle vous apportera dans la fiabilite de
nombreuses heures de plaisir.

Avant la mise en service de cette radio, veuillez
lire attentivement ce mode d'emploi et le
conserver pour toute reference ulterieure.

Les instructions de ce mode demploi sont
destinees aux modeles sulvants:

[CF-S79, [CF-S791. et lCF-S79V.

Leurs differences sont indiquees ci-dessous.

Nume'ro de modele Gamme

[CF-S79 FM/AM

1C S79L FM/lO/GO

ICF-S79V TV/WEATHEK/FM/AM

Caractéristiques

I Resistante aux eclaboussures; vous pouvez
ecouter la radio en prenant une douche.

I Minuterie de 90 minutes avec 5 temps
preregles.

I Fonction de mise hors tension automatique
AUTO OFF pour eteindre la radio au bout
dun certain temps que vous pouvez preregler.

I Tuner a synthetiseur PLL (circuit a
verrouillage de phase) 5 touches de
prereglage de mémoire pour accorder
facilement vos stations preferees

Mise en place des
piles (voir Fig. l)

Essuyez toutes les gouttes deau a la surface de la
radio, puis ouvrez le couvercie a l'arriere de la
radio.

inserez trois piles Ri4 (format C) (non fournies)
en respectant la polarite et refermez le couvercie
iusqu'a ce quil senclicjuette.

Autonomie deS piles
Avec des piles Sony R14 (format C) (Env en heures)
AM(lO)/GO FM TV/WEATHER

Accord de stations
prereglees

Vous pouvez preregler jusqua 5 stations pour
chaque gamme; 10 stations en FM (5 stations en

FMl, 5 stations en FMZ), et 5 stations en PO et/
ou GO.

Prére'glage d'une station
Exemple: Pour regler AM 1261) kHz sur la touche
de prereglage 2.

1 Appuyez sur RADIO ON pour mettre
la radio sous tension.

2 Accordez AM 1260 kHz (voir Accord
manuel).

3 Appuyez en continu sur la touche de
préréglage PRESEI' TUNING/FRESH
TIMER souhaitée (dans ce cas, la touche
de préréglage 2) jusqua ce que Vous
entendiez deux bips sonores courts.

La frequence sera affichee pendant
quelques secondes, puis l'heure actuelle
sera de nouveau affichee.

I Pour changer la station preréglée, préréglez
une nouvelle station sur la touche de votre
choix. La station precedente sera remplacee
par la nouveile.

Accord d'une station préréglée

1 Appuyez sur RADIO ON.

2 Appuyez de tacon répétée sur BAND
pour sélectionner la gamme.

3 Appuyez sur la touche PRESET
TUNING/PRESEI' 11MER de votre
choix.

4 Réglez le Volume avec VOL
Apres quelques secondes, l'heure actuelle
sera de nouvcau affichéc mais le numéro dc
prereglage ne disparaitra pas.

[CF 579 1 1 0 80
1C S79 L 1 1 0 80
IC S79 V 1 10 80 65

Rempiacement des piles

I Lorsque les piles faiblissent, le son devient
faible, presente de la distorsion et L\ "
clignote. Rempiacez les piles par des neuvcs.
Quand les piles sont epuisees, la radio séteint,
la minuterie sarrete et le voyant m est
affiche.

I Avant de remplacer les piles, assurcz-vous
que la radio est hors tension.

I Apres avoir remplace lcs piles, appuyez sur
RADIO 0N et m" disparaitra.

I Rempiacez les piles en moins dune minute;
faute de quoi le contenu de la memoire de
l'horloge et des stations prereglees sera efface
et lindication AM 12:00 ou 0:00" clignotera
sur laffichcur quand les piles neuves seront
en place.

I Pour conserver les reglages de lhorloge et de
la memoire, laissez des piles qui ne sont pas
epuisees en place dans la radio, meme si vous
navez pas l'intention dutiliser la radio
pendant un certain temps. Rempiacez les piles
par des neuves dans lannée suivant leur mise
en place car de lenergie est consommee meme
dans ces conditions.

Remarques a propos des piles

I Ne pas recharger une pile seche.

I Ne pas porter de pile seche avec des pieces de
monnaie ou dautres objets metalliques. Le
contact des bornes positive et negative avec
un objet metallique peut generer de la chaleur.

I Ne pas laisser de piles epuisees en place dans
la radio si vous n'avez pas lintention dutiliser
la radio pendant longtemps. Retirez les piles
pour eviter tout dommage du a une fuite de
lelectrolyte des piles et a la corrosion.

Réglage de l'horloge

"AM1Z:[l0" on 0:00 apparaitront en clignotant
sur l'atticheur quand les piles seront installees la
premiere fois. Vous pouvez regler lhorloge, que
la radio soit allumee ou non.

1 Pour interrornpre le clignotement de
laffichage, appuyez sur CLOCK

2 Tout en maintenant la pression sur
CLOCK, appuyez sur TIME AD] USI' +
ou - jusqu'a ce que l'heure iuste
apparaisse sur lafticheur.
Quand vous relachez la touche CLOCK, "3

se met a clignoter et lhorloge se met en
marche.

I Le systeme de l'horloge varie en fonction du
modeie que vous avez achete.

Systeme de 12 heures: "AM 12:01) = minuit,
PM 12:00" = midi.

Systeme de 24 heures: "0:01) = minuit, "12:01)"
= midi.

Pour regler lheure plus rapidement, tenez la
touche + ou - enfoncée tout en appuyant sur
CLOCK.

Pour regler lheure en partant de zero pour les
secondes, relachez CLOCK au top horaire, a
etape 2,

Fonctionnement de
la radio

Accord manuel

1 Appuyez sur RADIO ON pour mettre
la radio sous tension.
La gamme et la frequence seront affichees
pendant quelques secondes, puis l'heurc
actuelle sera de nouveau affichée.

2 Appuyez de facon répétée sur BAND
pour sélectionner la gamme.
Deux gammes FM (FM1 et FMZ) sont
disponibles; vous pouvez écouter l'unc ou
lautre au choix.

3 Accordez une station en appuyant sur
TUNE/'I1MER AD] USI' +ou -.

4 Ajustez le volume avec VOL.

I Pour eteindre la radio, appuyez sur OFF
I Pour ameliorer la reception radio
TV/WEATH ERIFM (voir Fig. I): Fixez
l'antenne fil PM a la ventouse. Deployez
l'antenne et ajustez sa position. Collez la
ventouse sur un mur a l'endroit ou la
reception est la meilleure.
AM(PO)/GO: Faites pivoter ie radioreveil a
l'horizontale pour une reception optimale.
Une barre de ferrite est integree a la radio.

Pour écouter la gamme WEATHER
(bulletins rnétéorolagiques)
(Amérique du Nord et du Sud seulement)

1 Appuyez sur RADIO ON pour mettre
la radio sous tension.

2 Appuyez sur WEATHER pour passer
sur la gamme WEATHER.
WEATHER apparaitra sur l'afficheur. Les
stations de diffusion de bulletins
me'téorologiques 1 a 5 de la gamme
WEATHER sont prereglees sur les touches
PRESET TUNING 1 a 5.

Choi, sez l'émission la mieux recue.

Pour revenir a la gamme precedente,
appuyez sur BAND.

Utilisation de la
minuterie

La sonnerie retentit quand le temps preregle sest
ecoule. Utilisez la minuterie comme aide-
memoire.

La sonnerie retentit, que la radio soit allumee ou
non.

La minuterie peut etre reglee a des intervalles
d'une minute entre 1 et 90 minutes.

1 Appuyez sur TIMER'SEI'ION/OFF.

0 et apparaitra sur lafficheur.

2 Pendant que " .E est aftiché, appuyez
sur TUNE/11MER AD] USI' +ou -
jusqu'a ce que le temps souhaité
apparais surlafficheur.

3 Appuyez sur TIMER'SEI'ION/OFF.
Vous entendrez deux bips courts et " Q-
commencera a clignoter; la minuterie sera
reglee.

Quand le temps preregle se sera ecoule, la
sonnerie retentira ct l'affichage clignotera.

I Pour arreter la sonnerie, appuyez sur
TIM ER-SET/ON/OFF. La sonnerie retentira
pendant of) minutes si elle n'est pas arretee.
Pendant le decompte, l'afficheur montre le
temps restant. Pour afficher lheure actuelle,
appuyez sur CLOCK. Pour verifier quelie
station vous etes en train d'ecouter, appuyez
legerernent sur TUNE/TIM ER ADJUST + ou -.
La gamme et la frequence seront affichees
pendant quelques secondes.
I Pour effacer le temps preregle de la minuterie

avant la fin du decompte, appuyez sur

TIM ER-SET/ON/OFF.

Le temps preregle de la minuterie sera efface

et l'heure actuelle apparaitra sur l'atficheur.

Utilisation des touches
PRESET11MER

Vous pouvez utiliser la minuterie avec les

touches PRESET TIM ER.

1 Appuyez sur TIMER'SEI'ION/OFF.
Appuyez sur la touche PRESEI'
TUNING/FRESH TIM ER souhaitée.

Q.., le temps de la minuterie et le numero
de la touche de prereglage apparaitront sur
l'afficheur

Les temps preregles en usine pour les
touches PRESET TIM ER 1 a 5 sont de 3
minutes, 10 minutes, 21) minutes, 40
minutes et 60 minutes respectivement.

3 Appuyez de nouveau sur TIMER'SETI
ON/OFF.

Vous entendrez deux bips courts et " Q
commencera a clignoter.

Quand le temps se sera ecoule, la sonnerie
retentira et latfichage clignotera.

Préréglage d'un temps
de la minuterie

Vous pouvez aussi preregler un temps different
sur chacune des cinq touches de prereglage.

1 Réglez la minuterie (voir étapes 1 et 2
de Utilisation de la minuterie).

2 Appuyez en continu sur la touche de
préréglage PRESEI' TUNING/FRESH
TIMER souhaitée jusqu'a ce que deux
bips courts retentissent.

Le temps affiche est meinorise.

I Quand vous prereglez un temps sur une
touche de prereglage, le temps de la minuterie
preregle en usine sera remplace par le
nouveau. Neanmoins, le temps prercgie
reviendra a la valeur prereglee en usine quand
les pile seront changees.

I Pour verifier quelle station vous etes en train
découter, appuyez legerement sur TUNE/

TIM ER ADJUST + ou -. La gamme et la
frequence seront affichees pendant quelques
secondes.

Autres
caractéristiques

Fonction AUTO OFF

La fonction AUTO OFF met la radio hors tension
automatiquement quand un temps preregle sest
ecoiile.

1 Appuyez sur RADIO ONIAUTO OFF.
La radio sallume a la premiere pression. A
chaque pression consecutive, le temps de
mise hors tension automatique AUTO OFF
changera comme suit.

affichagedela ,
OFF -> fréquence 7. 60(mln)
T7107 207 30 I745 47

La radio fonctionnera pendant le temps
AUTO OFF selectionne, puis seteindra.

I Pour eteindre la radio avant que le temps
AUTO OFF se soit ecoule, appuyez sur OFF.

Utilisation de la
courroie (voir Fig. El)

(Amérique du Nord et du Sud seulement)
Utilisez la courroie comme indique dans
l'illustratlon.

I La courroie est concue iquement pour
suspendre la radio; n'utilisez pas la courroie
pour la transporter.

Précautions

I Faites fonctionner la radio seulement sur
courant continu 4,5 v avec trois piles R14
(format C) (non fournies)

I La plaque signaletique indiquant la tension de
fonctionnement, etc., se trouve sous la radio.

I Ne pas laisser la radio pres dune source de
chaleur, comme un radiateur ou une sortie
dair chaud, et ne pas lexposer au soleil, a une
poussiere excessive, des vibrations
mecaniques ou des chocs.

I Si un soiide ou un liquide penetrait dans la
radio, retirez les piles et faites verifier la radio
par un technicien qualifie avant de la remettre
en service.

I Quand le coffret est sale, nettoyez-ie avec un
chiffon doux impregne dune solution
detergente neutre. Ne jamais utiliser de
tampons abrasifs, ni de solvants chimiques,
car ils pourraient abimer ie coffret.

NE PAS IMM ERGER

Ce produit n'a pas ete concu pour etre immerge

Du rester au contact continuel de leau.

I Ouvrez ie couvercie du logement des piles

avec les mains seches a un endroit ou l'eau ne

risque pas de tomber dans l'appareil.

Ne pas utiliser l'appareil dans leau.

Les piles elles-memes peuvent etre

endommagees par une exposition prolongee a

lhumidite. Nous vous conseillons par

consequent denlever les piles regulierement,

de les secher et verifier si elles ne sont pas

corrodées.

I Ne pas laisser iappareil longtemps en contact

avec de l'eau a plus de 7(1"C (158"F).

Quand l'appareil est mouille ou si vous laissez

tomber accidentellement lappareil dans l'eau,

essuyez-le avec un chiffon doux.

I Ne pas toucher lappareii avec des mains
recouvertes deau savonneuse.

Pour toute question veuillez consulter votre
revendeur Sony.

Specifications
Plage de frequences:

Modele pour lAmerigue du Nord et du Sud
Gamme lCF-579V lntervalle d'aocord

FM 87,5 - 108 MHz 0,1 MHz
AM 5307 1.710 kHz in kHz
TV Cana12713 a

WEATHER Canal 1 7 5 7

Modele pour les autres Eavs
Gamme lCF-S79 lCF-S79L lntervalle

dacoord
FM 87,5 7108 MHZ 87,5 71% MHZ 0,05 MHZ
AM(IO) 531 71.602 kHz 53171 602 kHz 9 kHz
GO 7 153 7 279 kHz 9 kHz
* Laffichage de la frequence augmente ou diminue par

Intervallcs dc [1,1 MHZ. Par exemplc, 85,00 MHZ ct
88,05 MHZ seront atflchés sous la torme 88.0 M1 12,

Affichage de l'heure:
Modele pour lAmerique du Nord et du Sud:
Systeme de 12 heures
Modele pour les autres pays: Systeme de 24
heures
Haut-parieur:
7,7 cm (3 I/x pouces), 8 ohms
Puissance de sortie:
220 mW (a 10% de distorsion harmoniquc)
Alimentation:
CC 4,5 v, trois piles de format C (R14)
Dimensions:
Env. 143,5 x 139 x 67 min (l/h/p)
(Env. 5 V) x 5 /, x 2 /4 pouces) saillies et
commandes comprises
Poids: Env. 523 g (1 1i. 2 on.) piles comprises
Accessoires foumis: Ventouse (1), Courroie (1)*

e Modelc pour lAmc'rIquc du Nord et du Sud
seulement

La conception et les specifications sont
modifiables sans preavis.

Page 2

R14(C)x3

ICF-S79/ IC F-S79L

TIMER
SET/ONIOFF

TUNE/TIMER ADJUST

TIME ADJUST

3 PRESET TUNING/PRESET TIMER

ISELECT/ I PRESET

ICF-S79V

TIMER
SET/ON/OFF


TIME ADJUST

TUNE/TIMER ADJUST

® ® ® @ AUTOOFF
6045302010
_/

PRESET TUNING/PRESET TIMER
OSELECT/ I PRESET

.@

RADIO
ON


VOL

E\

UKW-Drahtantenne
Antenna FM a filo

" PREsg

kHz

u
MHZL'


UKW-
Drahtantenne
Antenna FM a filo

Saugnapf (mitgeliefert)
Ventosa (in dutazione)

Schnur
Cingliia

Duschhalter
Attacoo per la doccia

Vor dem Betrieb

Wir heglnckwunschen Sie Zum Kauf dieses Sony
Radios und sind I'lberzeugt, daB Sie lange
Freunde an diesem zuverlassigen Ceral haben
werden.

Bevor Sie das Radio in Betrieb nehmen, lesen Sie
diese Anleilung genau durch und bewahren Sie
sie Zum spateren Nachschlagen sorgf'altig auf.

Diese Anleltung behandelt die Mndelle lCF-S79,
[CF-S791. und 1CF-S79V, die slch wie folgt durch
den Wellenbereich unterscheiden:

Modell
[CF-S79
1C S79L
ICF-S79V

Wellenhereich

UKW/MW

UKW/MW/LW
TV/WEATHER/UKW/MW

Merkmale

- Das Cerat ist spritzwassergeschulzt; Sie
Ronnen aucl] helm Duschen Radio horen.

- 90-Minuten-Alarmtimer mit tunt
Spelcherpla'tzen.

. Automatische Ausschaltung des Radios nach
einer bestimmten Zeit (AUTO OFF-Funktion).

- PLL-Synlhesizer-Tuner (Phase Locked Loop)
mit funf trei belegbaren Stationstasten.

Einlegen der
Batteri en (siehe Abb.

Wischen Sie alle Wassertropten vom Radio ab,
offnen Sie den Deckel an der Ruckseite, legen Sie
drei R14/C-Batterien (nicnt mitgeliefert) ein, und
scnlrelgen Sie den Deckel wieder. Aenten Sie
daraut, daG er richllg einrastet.

Batterie-Lebensdauer
M it Sony Bahyzellen (RM/Grime C)
(un efa'hre Angaben in Stunden)
AM(MW)/LW UKW TV/WEATHER
[CF-S79 110 80 -
1C 579 L 1 10 80
ICh-S79V 110 80 6o

Auswechseln der Batterien

- Bel erschoptten Batterien ist der Ton scnwacn
und verzerrt und auEerdem blinkt die
Anzeige m. Wechseln Sie die Batterien dann
aus, Wenn die Batterien ganz leer sind, stelll
das Radio und der Timer den Betrieb ein. Die
Anzeige m erscneint dann standig.

. Vor dem Auswecnseln der Batterien schalten
Sie das Radio stets aus.

- Drucken Sie nach dem Batteriewechsel die
Taste RADIO 0N, so daG die Anzeigc m
erlischl.

- Acnten Sie daraul, dal; der Batteriewecnsel
nicht langer als eine Minute dauert.
Ansonsten werden die Uhrzeit und die
gespeicherten Sender geloscht, und nach dem
Batteriewechsel blinkt die Anzeige ,,AM
12:00 oder ,,0:00 im Display.

- Acnten Ste auch bei einer langeren
Nichtverwendung daraut, daB volle Batterien
eingeselzt sind, damit die Uhr und der
Speicner mit Strom versorgt werden. Nacn
etwa einem lahr sollten die Batterien
ausgewechselt werden, selbst wenn das Gerat
nicht benutzt wurde.

Hi nweise zu den Batteri en
- Versucnen Sie niemals, Trockenbatterien
autzuladen.
. Stecken Sie Batterien nicnt zusammen mit
Munzen oder anderen Melallgegenslanden in
eine Tascne, da es sonst durcn KurzschluG der
Batterien zu Hitzeenlwlcklung kommen kann.
Lassen Sie keine erscnoptten Batterien im
Gerat, wenn es langere Zeit nichl henulzt
wird. Die Batterien konnen sonst auslauten
und Korrosionsschaden verursachen.

Einstellen der Uhr

Wenn Sie Zum ersten Mal Batterien in das Radio
einlegen, blinkt ,,AM 12:00 oder ,,0;00" im
Display. Die Uhr kann sowohl bei
ausgeschallelem als auch bei eingeschaltetem
Radio eingestellt werden.

1 Driicken Sie CLOCK, um das Blinken
abzuschalten.

2 wanrend Sie CLOCK gedrfickt halten,
stellen Sie mit TIME ADJUST +oder -

die Uhrzeit eirl.

Beim Loslassen Von CLOCK beginnl ,,: Zu
blinken, und die Uhr nimmt den Betrieb
auf.

- Das Uhrzeil-Anzeigesystem ist ie naCh Modell
verschieden.
12-Stunden-System: ,,AM 12:00 =
Mitternacht, ,,l>M 12 )0 = Miltag.
24-Stunden-System; ,,0;00 = Mitternacht,
,,12:00 = Mittag.

- Zum scnnelleren Andern der Zitrern halten
Sie die Taste + oder - gedruckl, wahrend Sie
gleichzeitig auch CLOCK gedrUCkl halten.

- Zum sekundengenauen Einstellen der Uhr
lassen Sie CLOCK im obigen Scnritt 2 bei
Ertonen eines Zeitzeichcns los.

Betrieb des Radios

Manuel les Abstimmen

1 Driicken Sie RADIO ON, urn das Radio
einzuschalten.
Wellenbereich und Frequenz erscheinen
dann einige Sekunden lang 1m Display.
Danach wird die Uhrzeit angezeigt.

2 Drficken Sie wiederholt BAND, um den
Wellenbereich zu wahlen.
Bei UKW kann Zwischen FMl und FMZ
gewahlt werden.

3 Stimmen Sie mit TUNE/11MER
AD] USI' +oder - auf den Sender ab.

4 Stellen Sie mit VOL die Lautstarke ein.

- Zum Ausschallen des Radios drucken Sie OFF.
- Fiir besseren Empfan
TV/WEATH ERIUKW (siehe Abb. :
Befesligen Sie die URw-Drantantenne am
Saugnapf, breiten Sie sie auf volle Lange
aus, und befesligen Sie den Saugnapf so an
der Wand, daB der Empfang optimal ist.
AM(MW)/LW: Drenen Sie das Gerat, his der
Empfang optimal ist. ln diesen
Wellenbereichen arbeitet die eingebaule
riclitemptindliche Ferrilstabantenne.

Empfang des WEATHER-Bandes

(nur Modell fIl'Ir Nord- und SDd-Amerika)

1 Driicken Sie RADIO ON, um das Radio
einzuschalten.

2 Driicken auf WEATHER, um auf
,,Wetterberichtempfar\g zu schalten.
WEATHER erschelnt im Display. Die
PRESET TUNING-Tasten 1 bis 5
errnoglichen nun den Abruf der
Wetterberichtskanale 1 bis 5.

Wahlen Sie den Kanal mit dem besten
Empfang.

Durch Drucken Von BAND konnen Sie aut
den Vorausgegangenen Wellenbereich
zuruckscnalten.

Verwendung der
Stationstasten (PRESET
TUNI NG-Tasten)

ln iedern Wellenbereich konnen tunt Sender
gespeicherl werden: funf MW- Imd/oder LW-
Sender, flinf FMiSender und tun; FMZ-Sender
(insgesamt also zenn UKw-Sender),

Speichern von Sendern
Beisprel: Speicnern yon AM 1260 kHz aut der
PRESETTUNING-Taste 2.

1 Drficken Sie RADIO ON, um das Radio
einzuschalten.

2 Stimmen Sie aut AM 1250 kHz ab (siehe
,,Manuelle Abstimmung).

3 Halten Sie die PRESET TUNING/
PRESEI' TIM ERsTaste (im Falle des
Beispiels die Taste 2) gedriickt, bis zwei
kurze Fieptorle zu hbren sind.

Die Frequenz wird einlge Sekundcn 12mg
angezeigl; danacn erscheint wieder die
momentane Uhrzelt.

- Zum Andern der Speichemng speichem Sie
einen neuen Sender auf dcr betreffenden Taste
ab. Die alte Speicherung wlrd dabei
uberschrieben.

Abrufen eines gespeicherten

Senders

1 Driicken Sie RADIO ON.

2 Driicken Sie wiederholt BAND, um den
Wellenbereich zu wéhlen.

3 Drficken Sie die gewfinschte PRESEI'
TUNING/PRESET'HMERsTaste.

4 Stellen Sie mit VOL die Lau rke ein.
NaCh einigen Sekunden wird im Display

wleder die momentane Uhrzeil angezeigt;
die Stationsnummer ist weiterhin zu sehen.

Verwendung des
Alarmtimers

Nach der von lhnen eingestellten Zeitspanne
ertont ein akuslisches Signal, von dem Sie sich
beispielsweise an einen wichtigen Termin
erinnern lassen konnen.

Der Alarmtimer arheltel sowohl bei
eingeschalletem als auCh bei ausgeschaltetem
Radio.

Zeitspannen Zwischen 1 und 90 Minulen (in 1-
MinutensSchritlen) konnen eingestellt werden.

1 Driicken Sie TIMER'SEI'ION/OFF.

0 und Q erscheinenim Display.

2 Wahrend m Display angezeigt
wird, eriCken Sie TUNE/TIMER
AD] USI' +oder -, bis die gewdnschte
Zeitspanne im Display angezeigt wird.
3 Driicken Sie nMER-SEr/ON/OFF.
Zwei kurze Iieptone sind Zu hfiren, und
Q.. beginnl zu blinken. Der Alarmtimer ist
nun eingestelll.

NaCh Ablauf der Cingestellten Zeitspanne
ertont der Alarmton, und die Anzeige im
Display blinkt.

- Zum Abschalten des Alarmtons drucken Sie
TlM ER-SET/ON/OFF. Wenn Sie den Alarmton
nicnt ausscnalten, ist er o0 Minuten lang zu
hnren.

- Bel aktivmrtem Alarmtimcr zeigt das Display
die Restzeit an. Wenn Sie die momentane
Uhrzeit anzeigen wollen, drueken Sie CLOCK.
Zum Uberpruten des momentan
empfangenen Senders drucken Sie leicht aut
TUNE/TIM ER ADJUST + oder -. Der
Wellenberelch und die Frequenz werden dann
einige Sekunden lang angezeigt.

- Durch Driicken Von TlM ER-SET/ON/OFF
konnen Sie den Alarmtimer vorzeitig
abschallen.

lm Display erscheint dann wieder die
momentane Unrzeit.

Verwendung der PRESET
11 M ER-Tasten

Die auf den PRESET TIM ER-Tasten gespeicherten
Alarmtimer-Zeitspannen konnen wle folgt
abgerufen \verden.

1 Driicken Sie TIMER'SEI'ION/OFF.

2 Driicken Sie ein PRESEI'TUNING/
PRESEI'11MERsTaste.
Die Anzeige Q7, die Alarmtimer-
Zeitspanne und die Nummer der PRESET
TIM ER-Tasle erscneinen im Display.
Werksseitig sind die PRESET TIM ER-Tasten
1 bis 5 wie folgl belegl: 3 Minuten 10
Sekunden, 20 Minuten, 40 Minuten und 60
Minuten.

3 Driicken Sie nMER-SEr/ON/OFF
erneut.
Zwei kurze Rieptone sind zu horen, und
Q blinkl emeut.
Nach Ablauf der eingeslellten Zeitspanne
ertont der Alarmton, und das Display
blinkt.

Abspeichern einer

A larmti mer-Zeitspan ne
Aut den PRESET TIM ER-Tasten kfinnen Sie
bellebige Zeitspannen abspeichern.

1 Stellen Sie den Alarmtimer ein (Schritte
1 und 2 des Abschnittes ,,Verwendung
des Alarmtimers").

2 Halten Sie eine der PRESEI' TUNING]
PRESET TIM ER~Tasten gedriickt, bis
zwei kurze Fieptbne zu htiren sind.

Die angezeigte Alarmtimer-Zeitspanne
wird abgespelchert.

- Beim Abspeichern einer Alarmtimer-
Zeitspanne wird die Ilrsprungliche Belegung
der PRESET TIM ERTaste uherschricben. Beim
Auswecnseln der Batterien werden die
PRESET TIM ER-Tasten jedoch wieder aut die
werksseltlg Voreingestelllen Zeiten
Zuruclfgesetzl.

- Zum Uperpniten des momentan
empfangenen Senders drucken Sie leicnt auf
TUNE/TIM ER ADJUST + oder -. Der
Wellenbereicli und die Frequenz werden dann
einige Sekunden lang angezeigt.

Sonstige Merkmale
AUTO OFF-Funktion

Die AUTO OFF-Funklion schaltet das Radio
automatiscn naCh einer von lhnen vorgegebenen
Zeit aus.

1 Driicken Sie RADIO ON/AUTO OFF.

Beim ersten Drucken dieser Taste \vird das
Radio eingeschallet. Durcn wiederholtes
Drucken kann dann zwlschen folgenden
Einstellungen gewanlt werden:

or): -. Frequenzanzeige -$ o0 (Min)
L10l-20 47 30 (7 454-l

N ach Ablauf der eingestellten Zeit schaltet
sich das Radio automatisch aus.

I Durch Drunken Von OFF 'nnen Sie das Radio
vor Ablauf der AUTO OFF-Z911 ausschalten.

Verwendung der Schnur

(siehe Abb. E) (nur Modell fiir Nord-
und Siid-Amerika)

Verwenden Sie die Schnur, wle In der Abblldung
gezeigt.

I Die Schnur dient nur zum Aufhangen des
Radios. Tragen Sie das Radio nicht an der
Schnur.

Zur besonderen
Beachtung

- Betreiben Sie das Cerat nur mit drei R14/C-
Babyzellen (4,5 v Gleichspannung).

- Das Typenscnild mit Angabc der
Betriebsspannung usw. befindel srcn an der
Unterseite des Cerals.

- Stellen Sie das Gerat nicht in die Nane einer
Heizung, eines Warmluflauslasses oder einer
anderen warmequelle und aucn nicnt an
einen Platz, der dlreklem Sonnenllchl, starker
Staubenlwicklung, mechanischen Vlbrationen
oder StoBen ausgesetzt ist.

- Sollte Flussigkeit oder ein tester Cegenstand
in das Gerat gelangcn, nenmen Sie die
Batterien heraus und lassen Sie es Von
Fachpersonal uberpruten, bevor Sie es
weiterverwenden.

- Wenn das Genause verschmulzt ist, reinigen
Sre es mit einem weicnen, leicnt mit mildem
Haushallsreiniger angefeuchteten Tuch.
Seneuerrnittel und enemiscne Losungsmillel
dilrfen nient yerwendet werden, da diese
Materialien das Gehause angreifen.

NICHT IN WASSER EINTAUCHEN
Das Radio dart nichl in Wasser eingelaucht
werden Ilnd nicht langere Zeit mit Wasser in
Konlakt kommen.
- Offnen Sie den Batteriefachdeckel an einem
Ort, an dem keln Wasser in das Cerat
gelangen kann, Ilnd acnten Sie daraut, daB
lhre Hande Irocken sind.
Verwende Sie das Ceral nicht im Wasser.
Feuchtlgkeit schadet den Batterien. Nehmen
Sie die Batterien Von Zeit zu Zeit heraus,
trocknen Sie sie, Ilnd vergewissern Sie sich,
daG keine Rorrosionsscnaden vorhanden sind.
- Acnten Sie darauf, dal} das Ceral nicnt langere
Zeit mit warmem Wasser Von mehr als 70 Dc
(158 H in Beruhrung kommt.
- Wenn das Gerat naB geworden ist oder
y senentlien ins Wasser gefallen ist, wischen
ie es mit einem we nen Tuen ali.
- Fassen Sie das Cerat niCht an, wenn Sie lhre
Hande mit Seitenlaute angefeuchtel haben.

Bei weiterfiihrenden Fragen wenden Sie sich
bitte an den nachsten Sony Handler.

Technische Daten

Empfangshereich:
Modell fur Nord- und Sud-Amerika

Si dicniara Che l'apparecchio e stato fabbricaln in
Coniormila allarl. 2, Comma 1 del D.M. 28. 08.
1995 n. 548.

Prima di cominciare

Crazie per aver scelto una radio SonyI Vi offrira
numerose ore di tunzionamento affidabile e
pracere di aseolto.

Prima di usare la radio, leggere attentamente
quesle istruzioni e conseryarle per riferimenli
tuturi.

Queste istruzioni coprono i seguenti modelli:
[CF-S79, [CF-S791. e iCF-S79V.
Le loro differenze sono come segue.

Numero Ili modello Banda

[CF-S79 FM/AM
[CF-S791. FM/MW/LW
ICE-S79V TV/WEATHEK/FM/AM

Caratteristiche

- Resistente agli schizzi; e possibile ascoltare la
radio mentre si ta la doccia.

- Timer di conto alla royescia da 90 minuti con
Cinque preselezioni timer.

- Funzione AUTO OFF cne spegne
automalleamenle la radio dopo un tempo
predeterminato.

- Sintonizzatore sintetizzato PL]. (anello ad
agganclo di fase). 5 tasti di preselezione in
memoria per preselezionare le stazioni
preferite in modo da facililarne la
Sintonizzazione.

Inserimento delle
pile (vedere la Fig. I)

Eliminare tutte le gocce dacqua dalla radio.
Quindi aprire il copercnio sul retro della radio.
lnserire tre pile tipo R14 (formato C) (non in
dotazione) con la corretta polarita e Chiudere il
coperchio {mo a sentire unn scalto.

Durata delle pile
Usando pile alcaline Sony tipo R14 (formato Cl
(ore circa)
AM(MW)/LW FM TV/WEATHER

1 10 80 7
110 80 ~
1C1 S79V 110 80 65

Sostituzione delle pile

- Quando le pile si rndeboliscono, il suono
diventa debole e distorto e quindi m
lampeggla. Sostituire le pile con altre nuove.
Quando le pile sono completamente scariche
la radio e il timer si spengono e m rimane
visualizzato.

- Prima di sostituire le pile assrcurarsi Che la
radio sia spenta.

- Dopo aver sostituito le pile, premere RADIO
0N e m" scomparira.

- Sostituire le pile entro un minuto.

AltrimentI le memorie dellorologio e delle
stazioni preselezionate sono cancellate e AM
12:00 o 0:00" lampeggia sul display quando
si inseriscono le pile la Volta successiva .

- Per conservare le regolazioni di orario e
rnemoria, tenere pile non scaricne nella radio
ancne se non la si usa per un lungo periodo.
Sostituire le pile con altre nunve ogni anno
circa, perché le pile si scaricano anche in
queste condizioni.

Note sulle pile

- Non caricare le pile a secco.

- Non tenere le pile insieme a monete o altri
oggetti metallici. Iuo essere generalo calore se
i terminali positivo e negativo delle pile sono
aceidentalmente posli in contatlo da oggetti
metalliei.

- Non lasciare pile scaricne nella radio se non la
si usa per un lungo periodo. Estrarre le pile
per evitare danni dovuli a perdite di fluido
delle pile e corrosione.

Wellenbereich ICF-S79V Kanalraster

URw 87,5 7 108 MHZ 0,1 MHz RegOI azi one
AM 530 e 1 710 kHz 10 kHz I _
Tv Kama-13 e dell orologlo
WEATHER Ranal1 e 5 _

Modell fur andere Lander

Wellen- lCF-S79 lCF-S79L Kanal-
bereich rafler
UKW 8757108 MHZ 87 57108MHZ 0,05 MHZ
AM(MW) 531 » 1.602 kHz 531 r 1.602 kHz 9 kHz
LW # 153 » 27) kHz 9 kHz

~ Die Frequenzanzelge Im Displ ndert sicn In 0,1
MHZrScllrmen. So erschclnt beispiclswcisc sowohl bcl
dcr Emplangsirequcnz 825,00 MHz als auch bei der
Emptangstrequcnz 88,03 MHz Icwclls die Anzeigc
88 0 MHz.

Zeitanzeigesystem:
Modell fur Nord- und Sud-Amerika: 12-
Stunden-Systern
Model] fur andere Lander: 24-Slunden-
System

Lautsprecher:
7,7 cm, 8 Ohm

Ausgangsleistung:
220 mw (bei 10% Klirrgrad)

Stromversorgung:
4,5 v Glcichspannung, drei Bahyzellen
(1214/ Grofle C)

Abmessungen:
ca. 143,5 x 139 x 67 mm (B/H/T), einscnl.
vorspringender Teile und
Bedienungslemente

Gewicht: ca. 523 g, CinSChl. Batterien

M itgeliefeltes Zubehiir: Saugnapf (1),
Schnur (1)

Mndell fur Nordv Ilnd SIIdvAmcrlka

Anderungen, die dem lechnischen Fortschritt
dienen, bleiben vorbehalten.

"AM 1200 o 0:00" lampeggia sul display
quando le pile sono inserite per la prima Volta.
L'nrologin puo essere regolato a radio aecesa o
spenta.

1 Per far cessare i1 lampeggiamento del
display, premere CLOCK

2 Tenendo premuto CLOCK, premere
TIME AD] USI' +0 - lino a Che l'orario
Corretto appare sul display.
Quando si rilascia CLOCK, Inlzia a
lampeggiare e lorologio inizia a
funzlonare.

- ll sistema orario yaria a seconda del modello
acquistato.
Ciclo di 12 ore: AM 1200 = mezzanotte, PM
1200" = mezzogiorno.
Ciclo di 24 ore: 0:00" = mezzanotte, "12:00" =
mezzoginrno

- Per impostare rapidamente l'orario attuale
tenere premuIO ll Iasto + O - mentre SI tiene
premuto CLoCK.

- Per impostare lorario attuale da zero secondi,
al punto 2 rilasciare CLoCK
contemporaneamente ad un segnale orario.

Uso della radio

SIntonIa manuale

1 Premere RADIO ON per accendere la
radio.
La banda e la trequenza appaiono sul
display per aleuni secondi. Qulndi
lindicazione dellorario attuale riappare sul
display.
Premere ripetutamente BAND per
selezionare la banda desiderata.
Sono disponibili due hande per FM (FMl e
FMZ); e possibile ascoltare con una
qualsiasi delle due.

3 Sintonizzare una stazione premendo

TUNE/11MER AD] USI' +o -.
4 Regolare il volume usando VOL

- Per spegnere la radio premere OFF.
- Per migliorare la ricezione radio

TV/WEATH ER] FM (vedere Ia Fi I): Legare
l'antenna a filo FM alla yentosa. Estendere
e regolare lantenna. Fissare la ventosa alla
parete nel punto cne ortre la ricezione
migliore.

AM (MW)LW: Ruotare orizzontalmente
l'apparecchio per tmvare la ricezione
ottimale. Un'antenna a harra di ferrite e
incorporata nellappareccnio.

Per ascoltare la banda WEATHER
(solo modelli per I'America del Nord 2 del Sud)
1 Fremere RADIO ON per accendere la
radio.
2 Premere WEATHER per passare alla
banda WEATHER.
WEATHER" appare sul display. I canali
della handa Weather da 1 a 5 sono
preselezionati sul tasti PRESET TUNING da
1 a 5.
Scegliere la lrasmissione Che offre la
ricezione migliore.

Per tornare alla banda precedente, premere
BA N D.

Si ntonia preselezionata
E possibile preselezionare tino a 5 stazioni per
ciascuna handa: 10 stazioni per FM (5 per FMl e
5 per FMZ) e 5 stazioni per Mw e/o Lw.

Preselezone delle stazioni
Esempio: ler impostare AM 1250 kHz sul tasto
di memoria preselezione 2.

1 Fremere RADIO ON per accendere la
radio.

2 Sintonizzare AM 1260 kHz (vedere
Sintonia manuale).

3 Tenere premuto il tasto PRESET
TUNING/PRESET TIM ER desiderato
(in questo CaSO il 2) film ad udire due
brevi segnali aCustici.

La trequenza appare per alcuni secondi e
quindi il display torna a visualizzare
lorario attuale.

I Per cambiare una stazione preselezionata,
preselezionare una nuova stazinne sul taslo
desiderato. La stazione precedente Viene
cancellata da quella nuova.

Sintonia di una stazione

preselezionata

1 Fremere RADIO ON.

2 Fremere ripetutamente BAND per
selezionare la banda desiderata.

3 Fremere il tasto PRESEI'TUNING/
PRESEI' TIM ER desiderato.

4 Regolare il volume usando VOL
Dopo alcuni secondi la visualizzazione
torna all'orarin attuale ma l'indlcazione del
numero di preselezione rimane sul display.

Uso del timer di
conto alla rovescia

ll cicalino di allarme suona quando e trascorso il
tempo fissato per il conto alla rovescia. Usare il
timer come promemoria.

ll cicalino di allarme suona sia quandn la radio e
accesa sia quando e spenta.

ll tempo per il conto alla royescia puo essere
fissalo in sCaIli di 1 rninuln da 1 a 90 minuli.

1 Fremere TIM ER'SEr/ONIOFF.
"0 e " Q appare sul display.

2 Mentre " e visualizzato sul display,
premere TUNE/TIMER AD] USI' +0 -
fino a Che il tempo desiderato per il
Conto alla rovescia appare sul display.

3 Premere nMER-SEr/ONIOFF.

Si sentono due breyi segnali acustici e Q:-
inizia a lampegglare. ll timer e impostato.

Quando e trascorso il tempo del conto alla
rovescia, il cicalino suona e il display
lampeggia.

- Ier termare iI cicalino, premere TIM ER-SET/
ONIOFF. ll cicalino suona per 60 minuti se
non viene termato.

- Durante il conto alla rovescia, il display indica
il tempo rimanente. Per yisualrzzare lorario
attuale premere CLOCK. Per controllare la
slazlone Che si sta ascoltando, premere
leggermenle TUNE/TIM ER ADJUST + o -. La
banda e la frequenza appaiono per alcuni
secondi.

- Per disattivare il timer durante il conto alla
rovescia, premere TIM ER-SET/ON/OFF.

ll timer di canto alla rovescia Viene disallivam
e lorario attuale appare sul display.

Uso dei tasti PRESET
11M ER

E possibile usare il timer di conto alla rovescia

Con i tasti PRESET TIMER.

1 Fremere TIM ER'SEr/ONIOFF.

2 Fremere il tasto PRESET TUNING/
PRESEI' TIM ER desiderato.

Q7, il tempo di conto alla rovescia e il
numero del tasto di preselezione appaiono
sul display. ll tempo di conto alla rovescia
preimpostato per i tasti PRESET TIM ER da 1
a 5 e rlspettivamente 3 minuti, 10 minuti,
20 minuti, 411 minuli e 61] mlnuti.

3 Fremere di nuovo TIMER'SEI'ION/
OFF.

Si sentono due hrevi segnall acustici e Q;
Inizia a lampegglare

Quando il tempo di conto alla rovescia e
trascorso, ll cicalino suona e il display
lampeggia.

Preselezione di un
tempo di conto alla
rovescia

E ancne possibile assegnare un tempo di conto
alla rovescia desiderato a ciascuno dei Cinquc
tasti di preselezione.

1 Impostare il timer. (Vedere i punti 1 e 2
di Uso del timer di Conto alla
rovescia)

2 Tenere premuto iI tasto PRESET
TUNING/PRESET 11M ER desideralo
fino a sentire due brevi segnali acustici.

ll tempo di conto alla rovescia viene
memorizzalo come e visuallzzato.

- Quando si assegna un tempo di conto alla
rovescia ad un tasto di preselezione, 11 tempo
di conto alla rovescia preimpostato viene
cancellato dal nuovo tempo. Tuttavia i tempi
di conto alla rovescia preimpostati torna al
valnre originale quando si sostituiscono le
pile.

Per controllare la stazionc Che si sta
ascoltando, premere leggermente TUNE/

TIM ER ADJUST + o -. La banda e la trequenza
appaiono per alcuni secondi.

Altre caratteristiche
Funzione AUTO OFF

La funzione AUTO OFF spegne la radio dopo
Che e Irascorso un tempo fissalo.

1 Fremere RADIO ON/AUTO OFF.
La radio si accende alla prima pressione. A
ciascuna pressione successiva, il tempo
AUTO OFF Gambia come segue.

Indirazionedella
OFF -> frequenza -v 60(min.)
L1017 20 47 30 <7 454J
La radio rimane accesa per il tempo AUTO

01:1: selezionato e quindi si spegne.

- ler spegnere la radio prima cne sia trascorso il
tempo AUTO OFF selezionato, premere 0FF.

Uso della cinghia (vedere

la fig.E]) (solo madelli per I'Amerioa del

Nord 2 del Sud)
Usare la Clnghia Come mostrato nellillustrazione.

- La cinghia serve solo per appendere la radio;
non usarla per trasportarla

Precauzioni

- Alimentare l'apparecchin solo a 4,5 v CC con
tre pile tipo R14 (tormato C) (non in
dotazione).

- La piastrina indicante la Iensione, ecc. si troya
sul fondo dellapparecchlo

- Non laseiare lapparecchlo nei pressi dr fonti
di calore come caloriferi o condotti daria, o in
luoghi esposti alla luce solare diretta, polvere
ecc 'a, yibrazioni meccanicne o scosse.

- Se un llquido o un oggetto penetrano
nellappareccnio, estrarre le pile
dallapparecchio e farlo Controllare da
personale qualificaln prima di usarlo
ulteriormente.

- Quando il rivestilnento si sporca, pulirlo con
un panno morbido inumidito con una blanda
soluzione detergente. Non usare mai pulitori
abraslvi o solyenti Chimici cne possono
rovinare la finitura.

NON IM M ERGERE IN ACQUA
Questo prodotto non e stato realizzato per
l'immersione in acqua o per l'uso in continuo
contatlo con lacqua.

- Aprire il coperchio del comparto pile con le
mani asciutte dove acqua non possa penetrare
all'intemo dellappareccnio.

- Non usare lapparecchio in acqua.

Le pile stesse possono subire effetli negatlvi

da unesposizione prolungala allumidita. Si

consiglia quindi di estrarre, asciugare ed
ispezionare per segni di corrosione le pile
periodicamente.

- Non esporre lappareccnio ad acqua a
temperature superiori a 70°C (158°F) per
lungo tempo.

- Quando lapparecchio si bagna o cade
accidentalmente in acqua, asclugarlo con un
panno morhido.

- Non toccare l'appareccnio con le mani
insaponate.

In caso di interrogativi consultare iI proprio
rivenditore Sony.

Caratteristiche
tecniche

Campo di frequenza":

Modelli per lAmeriCa del Nord e del Sud
Banda lCF-519V Passo di canale

FM 87,5 7 108 MHz 0,1 Ml-lz
AM 5304.710 kHz 101(le
Tv Kanal2r13 7

WEATHER Kanal 1 r 5 7

Modelli per gli altri paesi

Banda ICF-STB ICF-S79L Passe di
canale
FM 87,5 7 108 MHZ 8757108 MHz 0,05 MHZ"

AM[MW) 531-1602 kHz 531- 1.602 kHz 9 kHz
LW g 1 27} kHz 9 kHz

Ii \dlcazlone della frequenz sale o scende In pass. d1
0.1 MHz Per cscmpm, sia 88.00 MHz Che 88,05 MHz
sono Indicate Come 88,0 MHZ",

Indicazioen dell'orarl
Modelli per lArncrlCa del Nord 9 del Sud:
Ciclo di 12 ore
Modelli per gli altri paesi: ciclo di 24 ore

Diffusore:

7,7 cm, 8 ohm

Uscita di potenza:

220 mW (a1 10% di distorsionc armonica)

Alimentazione:

4,5 v cc, tre pile tipo R14 (tormato C)

Dimensioni:

Circa 143,5 x 139 x 67 mm (l/a/p), inclusi
comandi e parti sporgenti

Massa:

Circa 523 g, incluse le pile

Accessori in dotazione: Ventosa (1),
Cinghia (1)2

1 Solo modelll per lAmcrICa del Nord e del Sud

Disegno e caratteristiehe tecniche soggetli a
modifiche senza preavviso.

Nota
BAN DE Dl FREQUENZA
1. Bande di frequenza:
FM: 87,5 MHz 4 108 MHz
OM: 531 kHz 7 1.602 kHz
2. Frequenza intermedia:
FM: 10,7 MHz
AM: 450 kHz
3. Oscillatore locale:
Frequenza oscillatore locale
superiore a quella del segnale

* di cui al par, 3 dellAllcgato A al D.M. 25 /06/
85 e al par. 3 dellAllegalo 1 al D.M. 27/08/87