Sansui CD X711 Service Manual

This is the 16 pages manual for Sansui CD X711 Service Manual.
Read or download the pdf for free. If you want to contribute, please mail your pdfs to info@audioservicemanuals.com.

Page: 1 / 16
left right
Sansui CD X711 Service Manual

Extracted text from Sansui CD X711 Service Manual (Ocr-read)


Page 1

CD-X711
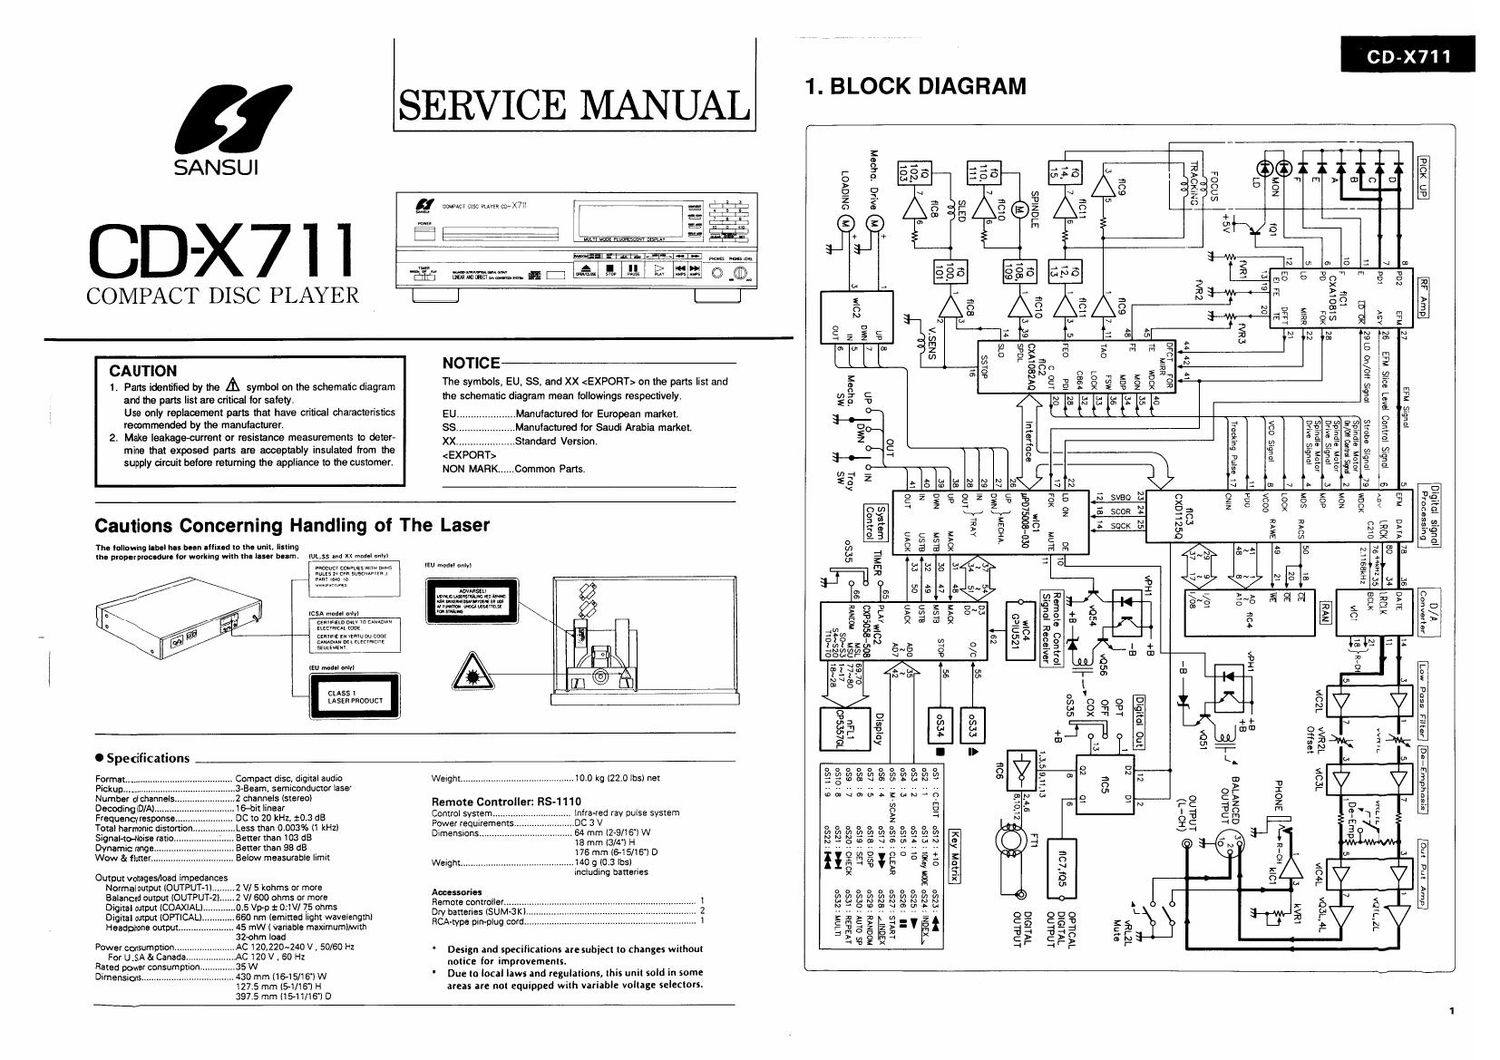
1. BLOCK DIAGRAM

SERVICE MANUAL


I
SANSUI r as, a s g
o o - A o
g H. 0" 3 ' 3 § 5 g 1t rrl > m o O x
77*,i7 g E? w 1 0 :35 C 2 %
g cowltctalscauvsncn»x7ll g 6-, g g D; g 0' c5 V _ _
_=__ m U :
m. g .7. R a, 1: 3 q
D 3 II II E gfl-ri r M, . g s + az =E < 3
-
, i a Jam 3
.99.. ._w_.,u.. A I II D m »l _- -- A - 4 - g a o- 6 : \. w
33:] mwmeMMfiE |_l_Lm nglgzl 983 883 up?) § A m s 1, s, m v 1,
a _ - - g - 3 m0 0 v Q 9 s an
COMPACT DISC PLAYER ¥l A a s S-w-s-a 22 "
v E, 3 o 3 (:3 N J o 9 .- >
N °" 3 :__° 3,..049. s 7.2 2|) m 3
N 04 (A 04 \l "I Yl Z O (I) W 1"
° a < M. 4 -+ m x x < ;
52§% in w w gear % axe 3s:
a u u m E e % 0 Fl ;: a a a f: U 5
CAUTION NOTICE l w 0 ° 2 Es ° ° :2 g g s
A 4 O 00 5 \ z
t a: 0 N n r m o
1, Parts identified by the A symbol on the schematic diagram The symbols, EU' 58' and XX (EXPORT) on the parts "5 and E t 5 E 3 § g g 5 E § § : i %
and the parts list are critical for saky_ the schematic diagram mean followings respectively. 2 2 c N 'N u M 1,. u 2 1 -§ : g
l. . . a o u: N 0. a: s o a 0
Use only replacement parts that have crltlcal characterlstlcs EU Manufactured for European market. + £ L L L L i gt
r°°°mmend°d by the WWW ss Manufactured for Saudi Arabia market. 3 o 5 a < 9 w a w 5 w 1' 3 3
2. Make leakage-current or reslstanoe measurements to deter- XX Standard Version § 3 3: 3 52' i; §§ é 2 _
mine that exposed pans are acceptably insulated from the ''''' ' c a 2' .é Lit: g% § % " (0:,
supply circuit before retlumin the a liance to the customer. §-0- 8 _ 'u 3 g i g i 3 3 g? .5-
9 pp NON MARK ,,,,, Common Parts m _. - E E "- 2* E 2' '6! 5' 5. a
2 a, s 1 a .
Se 2 S 6 E § 3 E § \l 3 3: 3 on \I > u N :24 a: u D
2 o c o E o c = "1 l- a SVBO N o n u < r- : z z > m '0 -~
oms§15§§%g_ :3 g g8883-g§323-
c . . . Q 5 H4 H-1 § i z m SCOR s 3 o x 7: 3 g
autlons Concernlng Handllng of The Laser 2. g a a ma : sucx 0 5w :2 z s g :2 t s.
g c x z < x ' " g n - o 50
The lullnwnu l-tnl rm tmn string to the unlt, lilting o 3 g g m 5 > g c c, o 3 "' 0 x ; m 3
the plapctpvocidunlmwotklng wltmmlambum, tUL,ssandxx mcdnluulyl 8 j x a 7 Fl l g~3 5 g m 51 g N _
W" " "M' a 0 g g u A 5] a 5 37
l . l m
mm: m i . 1 s, cm s a a; g g g u
7, o- m o to a at I a:
a. at (£50 I -- {A47 2..» a .S-d m E o n
lcsAmuunlonlyl g g 2 ,C, 5, a I) g~3 3g 3 8 9 D 0 5 g 3 Q a EU
-5?£ll'f-fi°$§-"" § 3 3 Q a 57 9 g s E % $ g A 3 9 x 3;}
mm st mm w m :m g (3 E 5 (i 3 A"
ggljltgngl'vststscmms afo to m g 01 p 0 S) __
2 all z: u- 3.3 A o B 1 = l + s
swaps \l o % E g a' m u: %
[EU mu only] _. _ \, o. 1 9_ .3 I _
3 i 72 me w m -.- 3 7 I4_ 5 5
N 4 on o i
m c. l u
V g a
3; n o o 9 A1 0 V 7 3
0 Lu 0 7| D to N m
1:: 9 & a u- x 'n a E + I 7
w - + s. =-
%e 2 a: a + BID 0 a w 9 < T « .~
,9 ~< m T. i 5 u. 37 § %\6§ 3 )thq -
0 Speclflcatlons I I} 2. u s a TL 2 l3 I F I 5"
a . . o. u-
. . , . , a o o o 0' o a I
Compact disc, digital audio Weight ..... .....,10.0 kg (22.01bs) net 9 9 3 g E é % fi 3% g 09 8 0 ° N a N '2: u: g S1
-Beam,samlconductorlaset .0 9 .. .. .. .. .. .t ., ., O > D u u
l _ (II o I l- :-
figggggezlml Remote Controller: RS-1110 ° " " j 2 m 9 2 ~ no :5 g _ < s. 3,
Control system... l Infra-red ray pulse system 0 9 '- C i 0 l"'l 5 I a?
DC to 20 kHz, :03 03 V » -t I q; c m a: s, r
Total harmonic distomo ass than 0.003% (1 kHz) PWe°qe"e5- DC 3V a a a a c c f a o D 2 c -. U m F
SignaFtpNoise ratio .Better than 103 dB Dmens'ms 4 mm 2'9/15') W S 3 fl Z 9 Q Q 9 a 9 g x V f 3
' 18mmt3/4)H N-OD \lmwun tn 3 - u v
alvnamlc range. .Bener than 98 dB 176 mm (61 5116) D .. .. .. ,. , ,. ~< - © 0 N r 2: ' 0
Owfitf er.. I | l' ' . " '
'm 39" 35 "7" Walght ........... 140 g (0.3 lbs) H; E % ¥ 3. ° ° 3 g E 3 g 0' V 5
Output voltages/load impedance: including mafia: 9 § § 5 '2 5 rs) <7 :7 cu
Normal nmput (OUTPUT-1). .2 V/ 5 kohms or more A . r" x 8 9 _T #3 "
Balanced output (OUTPUTQ ,2 V1600 arms or more "5: 3t 3t 3: 8| 3: 3v 3, 3) 3. 3. 4 >
Digital output (COAXIA .5 Vp-ptOflV/ 75 ohms Rem °9"°°' ---- t: E 6 B 8 3 g a 2 a L J: 5 V a 3
Digital output (OPTICAL .660 nm (emitted light wavelength) gabmanasSUMfik' 2 g ;, ; g " (/1 " " L o a 05 o L g u -. - ~
Headphone outputmu 45 mW ( Variable maximuml/wnh -type plnvplug cord 1 ,E Q E )z [2 i = ' z k a :52 § 5 3 i a, m - 3': {4
324mm load :I m 0 a D a, _. _t c I. r
Pcwerconsumptionm AC 120 220-240 v 50/60 Hz . A - - - - t 3 G 3 9 -« E C r): C r2 9 g 5
For U sA & Cat-lad 'AC 126V 60 Hz Destgn and speclllcatlons are when to changes without - -1 r- "'
Rated power consumptlon .35 W I 0 for improvements
Dimensions...m .430 mm (16-15/16') W Due to local laws and regulations, this unit sold in some
t27.5 mm l5-l/lS'l H areas are not equipped with variable voltage selectors.

397.5 mm (15-11(16') D

Page 2

2. ADJUSTMENT METHOD

0 Cautions
1. Turn the power OFF before removing the bonnet.

2. See Figure 2-1 for the locations where adjustments are to be carried

out.

3. Use the EIAJ test disc CDT

4. The following band pass filter (BPF) is used for adjustments.

lN M71

Band Pass Filter (BPF)

CD-X711

5. If the adjustment is unsatisfactory and playback is not possible.

adjust as follows:

1) Set NR1] NR2, NR} and NM to their mid points,
2) Adjust the VCO (fVRS) and select playback.

3) Carry out adjustment steps 2 to 5.
6. In executing steps 2 to 5, connect the probe after playing the disc.


~-0 0 U T
2 O K n O O l H F7
70k It I 0 O in F
Mmurlng Adjustment
Step "9m Mm" Low, Adlustmem Conditions and Notes
1 VCO adjustment Connecta NRstvco) 4.32MHuSOHz - Ground EFM of TP.
(carry OH! in frequency counter - Turn ON the power than wait at least 10
STOP state) to TP (V00). seconds beiore adjusting.
2 Tracking offset Connect an WRt - Ground T2 of TR
adjustment oscilloscope to - Playback the 8th tradt at 60-1.
TlotTP. «END!
Set the osmlloscope to the Dc range.
Adjust so that a and b have the same level.
3 Focus oflset Connect an NR2 Set to maximum. - Playback the 8th track or CD-t,
oscilloscope to the
HF 01 TP. 7 Wvév'v'év
etitttttii"
v rvv
\ttttwtttt t
v v .
Carry out adjustments to achieve a clean
overall pattern and so that the indicated ponion
is wide and symmetrical.
4 Output Connect DC volt- vVRt,..HvG OVith - Playback the 4th track (no signal) oi Cut,
Oilsel meter to output vvRZ...C-G
terminal oi F~6250
(H-G,C-G.H-C)t
5 Trackng gain Connect AC volt- NR3 AC vttitmom T 2 F 2 T I F I
adiUsImem metet to T1 at T?
via the EFF.
Connect AC volt- IN Oui /7
metettoTZotTP OG-t BPF o ?
via the BPF. Tp T y
L J» Audio OSC
800 H;
x t » it,
Lt, vflillt, ll 0 5)va
/7K - Playbmk the 4th tradt (no signal) at CD-t.
W our - Apply an Boon signal of 0.5Vp-p trom SG
0 BPF o ? toTZolTPviaaresistanoeotzzom.
w T 2 L J
Using the Indicated voltage at T1 ot TP as a LA NR3
tolerance, adjustmevoltage at T2 to -3.5dB. Adjust NR3 to the position shown in the
diagram it you do not have a BPF or it 45113
cannot be achieved.
6 Output Connect AC mVRl 2v? - Loading lmpedance...10kfl.
Level voltneter to - Playback the 1m track at CD-t.
OUTPUT -t.

CD-X711

Honouring Adjustment
Step Item I on Lawton Adjustment Condltlons and Notes
7 Focus gain Connect AC volt- NRA M: m WWW T 2 F 2 T 1 F1
adjustment meter to F1 of TP
via the EFF. 7"
ConnectACvolt- W W /7K
metertoFZOtTP OF BPF '
via the EFF. TP F 1 ?
220K
RC Vonmctc' 0 5Vp-p Audio OSC
800 Hz
/7§ :
LN Um / .
0-- 5 p ; 9 - Ptaybadt the 4m track the signal) of 00-1,
- Apply an BOOHz signal ot 0.5Vp-p item 56

TP F2 «1. .i.

Using the indicated voltage at Ft oi TP as a
reference, adjust the voltage at F2 to «2.5dB.

to F2 ot TP via a resistance at xoknt

@ WW

Adjust NR4 to position shoun in the Figwe
it you do not have a BPF or it <2.5d8 cannot

beaohieved.
Fig. 2-1 Adjustments points mVR1 C\ G H H\ G /C
/
[3:1le £5250 Elli!
L-ch R~ch
Output
Level l:l l:l
T T VVR2 vVRt vVRi vVR2
G) D)
N N
01 U1
-- 0
TP
/-VCO
fIC3 ./
F-6247 TP
EFM
6
4p VCO
Oo- fVR5
BPiRED) T
TP 3,
RF E '3; fICZ fVR4
->Cl m
c ncr 2P tVR3
GP
G F0 F6 C54:
NR, ,OTO E- llll TP
T2 F2 Tl F1
|
fVR2

>Z