Revox G 36 60Hz Service Manual

This is the 1 pages manual for Revox G 36 60Hz Service Manual.
Read or download the pdf for free. If you want to contribute, please mail your pdfs to info@audioservicemanuals.com.

Page: 1 / 1
left
Revox G 36 60Hz Service Manual

Extracted text from Revox G 36 60Hz Service Manual (Ocr-read)


Page 1

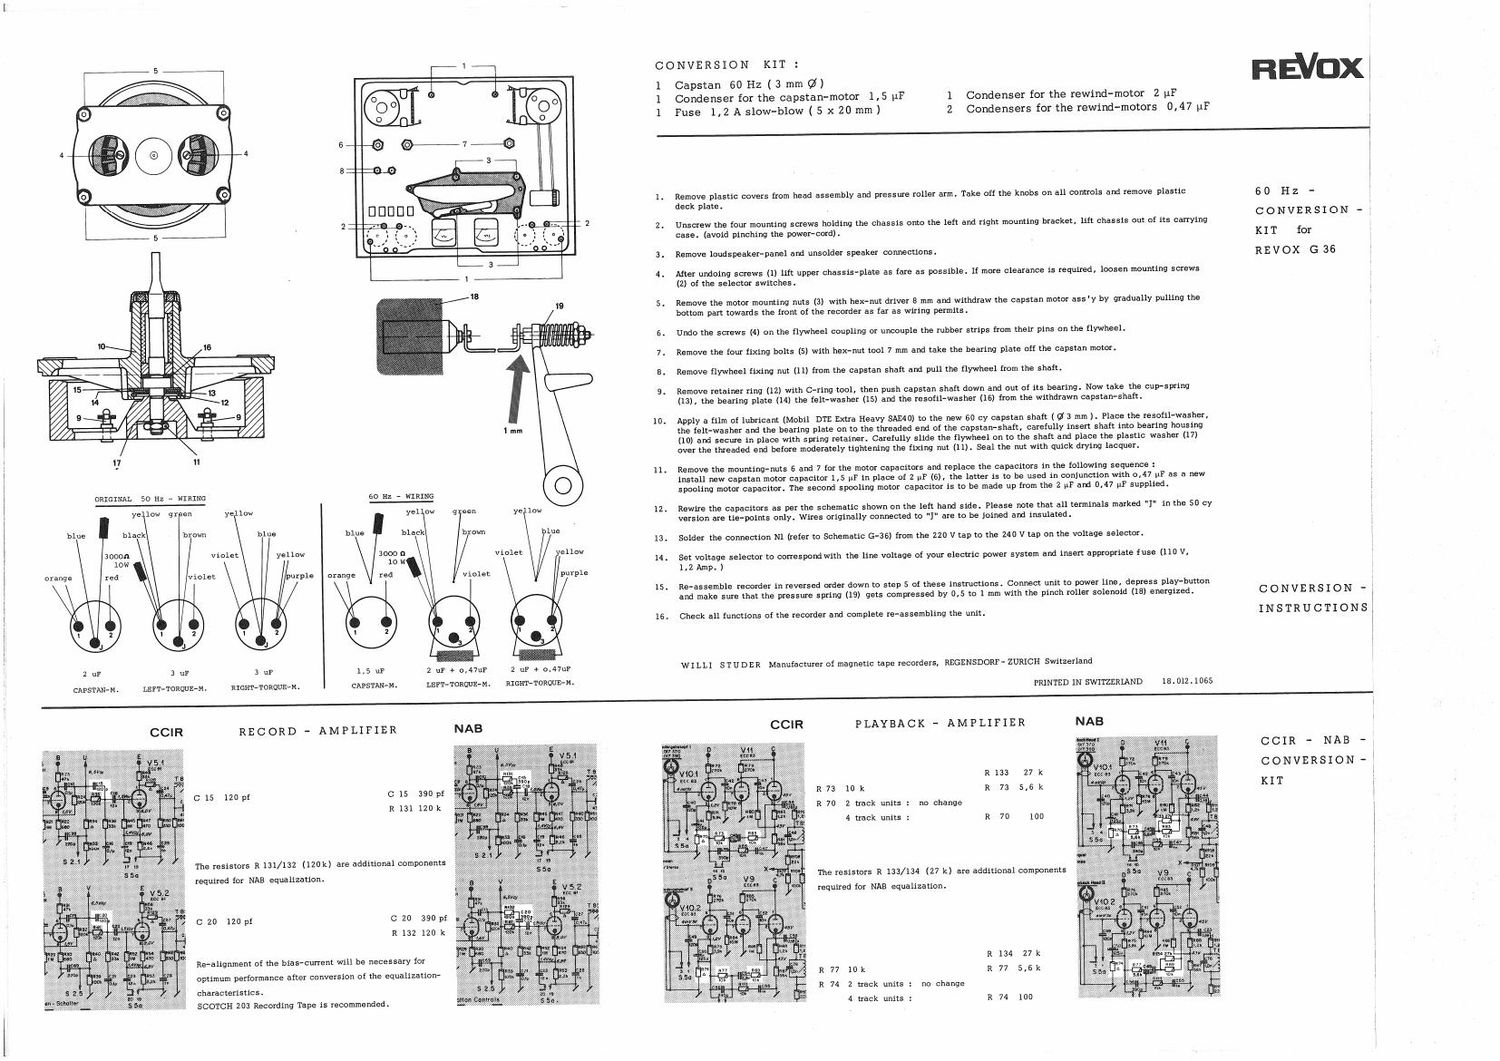
CONVERSION KIT :
REVox:

1 Capstan 60 Hz (3 mm (2)
1 Condenser for the capstan-motor 1,5 pF 1 Condenser for the rewind-motor 2 pF
1 Fuse 1, 2 A slow-blow ( 5 x 20 mm) 2 Condensers for the rewind-motors 0,47 111-"
l
l
l
l
l
1. Remove plastic covers from head assembly and pressure roller arm. Take off the knobs on all controls and remove plastic 5 0 H z _
deck plate.
C O N V E R S I O N -
z. Unscrew the four mounting screws holding the chassis onto the left and right mounting bracket, lift chassis out of its carrying
case. (avoid pinching the power-cord) . KIT for
3 . Remove loudspeaker-panel and unsolder speaker connections. R E V O X G 3 5 1
4. After undoing screws (1) lift upper chassis-plate as fare as possible. if more clearance is required, loosen mounting screws
(2) of the selector switches.
5. Remove the motor mounting nuts (3) with hex-nut driver 8 mm and withdraw the capstan motor ass-y by gradually pulling the
bottom part towards the front or the recorder as far as wiring permits.
a. Undo the screws (4) on the flywheel coupling or uncouple the rubber strips from their pins on the flywheel.
7. Remove the four flxing bolts (5) with hex-nut tool 7 mm and take the bearing plate off the capstan motori
3. Remove tlywheel fixing nut (11) from the capstan shaft and pull the flywheel from the shaft.
9. Remove retainer ring (12) with C-ring tool, then push capstan shaft down and out of its hearing. Now take the cup-spring
(13), the hearing plate (14) the felt-washer (15) and the resofil-washer (16) from the withdrawn capstan-shaft.
9 9
10. Apply a film of lubricant (Mobil DTE Extra Heavy SAE4 0) to the new so cy capstan shaft ( at 3 mm ). Place the resofil-washer, .
the felt-washer and the bearing plate on to the threaded end of the capstan-shaft, carefully insert shaft into bearing housing
(10) and secure in place with spring retainer. Careiully slide the flywheel on to the shaft and place the plastic washer (17)
1 11 over the threaded end before moderately tightening the fixing nut (11) . Seal the nut with quick drying lacquer.
11. Remove the mounting-nuts a and 7 for the motor capacitors and replace the capacitors in the following sequence : 3
O install new capstan motor capacitor 1,5 in in place of 2 pr (6), the Letter is to be used In conjunction with 0,47 pr as a new
ORIGINAL 50 Hz _ mama 60 HZ _ wrnmc spoolinq motor capacitor. The second spooling motor capacitor is to be made up from the 2 or and 11,47 or supplied. 3
yellow gr en yei ow g sen ye low 12. Rewire the capacitors as per the schematic shown on the left hand side. Please note that all terminals marked - in the so cy j
version are tie-points only. Wires originally connected to "I" are to be joined and insulated.
blue black brown lue
13. Solder the connection N1 (refer to Schematic (3-36) from the 220 v tap to the 240 v tap on the voltage selector.
3000 n violet yellow 1
10 w 14 . Set voltage selector to correspond with the line voltage of your electric power system and insert appropriate {use (110 v. .
orange red violet purple 1'2 Amp' )
15. lie-assemble recorder in reversed order down to step 5 of these instructions . Connect unit to power line, depress play-button
1 and make sure that the pressure spring (19) gets compressed by 0,5 to 1 mm with the pinch roller solenoid (13) energized. C O NVE R S I O N -
1 16. Check all iunctions of the recorder and complete re-assembiing the unit. IN S TR U C TI 0 N S ,
l
r
i
2 up 3 up 3 up 1,5 up 2 up + comp 2 up + 0,47 WILLI STUDER Manufacturer of magnetic tape recorders, REGENSDORF-ZURICH Switzerland
e e A A - . >M. L TJIOR UE»M. RIGHTJIOR E-M.
CAPSTAN M. LEFT TORQUE M. RIGHT TORQUE M CAPSTAN BF O W PRINTED IN SWITZERIAND 18.012.1065
CCIR RECORD - AMPLIFIER PLAYBACK - AMPLIFIER .
C C I R - NA B -
CONVERSION -
R 133 27 k 1
C15 lzopi Cls 390pf R73 10k )1 73 5,5)( KIT r
R 131 120 k R 70 2 track units : no change
4 track units : R 70 100

The resistors R 131/132 (120k) are additional components

The resistors R 133/134 (27 k) are addltional Components

required for NAB equalization.

required for NAB equalization.

C 20 120 pf C 20 390 pf
R 132 120 k

Re-alignment of the bias-current will be necessary for R 134 27 k l

optimum performance after conversion of the equalization- R 77 10 k R 77 5,6 k 1

characteristics. R 74 2 track units : no change I

SCOTCH 203 Recording Tape ls recommended. 4 track units : R 74 100