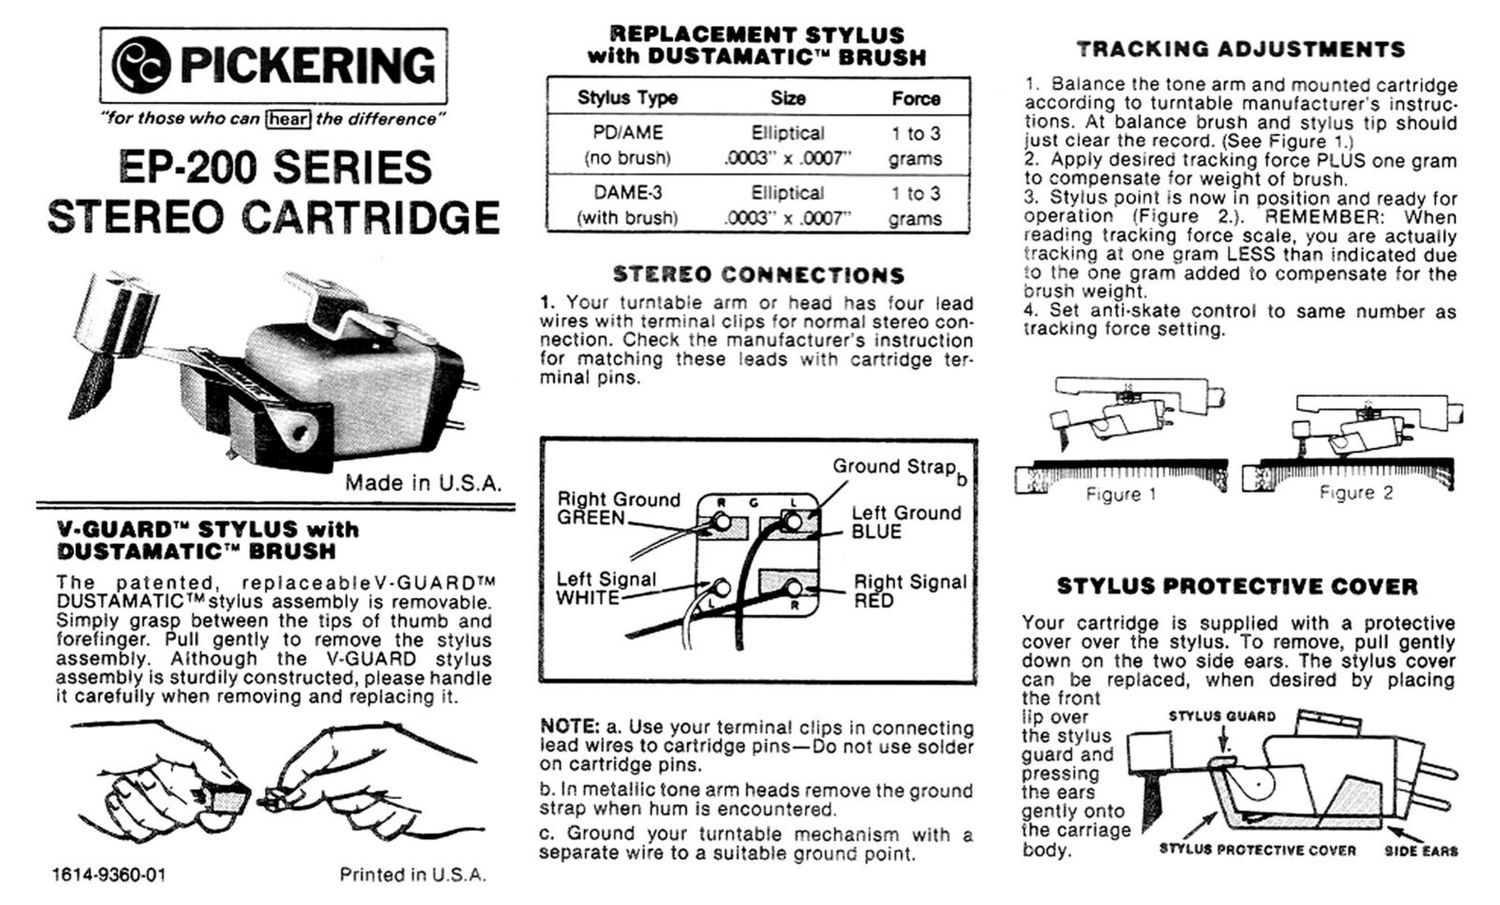
Pickering EP 200 Owners Manual

This is the 2 pages manual for Pickering EP 200 Owners Manual.
Read or download the pdf for free. If you want to contribute, please mail your pdfs to info@audioservicemanuals.com.

Page: 1 / 2
left right
Pickering EP 200 Owners Manual

Extracted text from Pickering EP 200 Owners Manual (Ocr-read)


Page 1

l® PICKERING

"for those who can hear the difference

EP-200 SERIES
STEREO CARTRIDGE

m

Made in USA.

V-CUARD' STYLUS with
OUSTAMATIC' BRUSH

The patented, replaceableV-GUARDW
DUSTAMATICW stylus assembly is removable.
Simply grasp between the tips of thumb and
forefinger. Pull gently to remove the stylus
assembly. Although the V-GUARD stylus
assembly is sturdily constructed. please handle
it carefully when removing and replacing it.

\

1614-9360-01 Printed in USA.

REPLACEMENT STYLUS
with DUSTAMATIC' BRUSH

Stylus Type Size Force
PO/AME Elliptical 1 to 3
(no brush) £1303" x .ooor' grams
DAME-3 Elliptical 1 to 3
(with brush) .0003 x .(XDT grams

STEREO CONNECTIONS

1. YOur turntable arm or head has four lead
wires with terminal clips for normal stereo con-
nection. Check the manufacturer's instruction
for matching these leads with cartridge ter-
minal pins.

Ground Strapb

Right Ground
G

. Left Ground
EEN ~ BLUE

Left Signal /
WHITE 0

NOTE: a. Use your terminal clips in connecting
lead wlres to cartridge pins-Do not use solder
on cartridge pins.

b. In metalilc tone arm heads remove the ground
strap when hum is encountered.

c. Ground your turntable mechanism with a
separate wire to a suitable ground point.

Ri ht Signal

TRACKING ADJUSTHENTS

1. Balance the tone arm and m0unted cartridge
according to turntable manufacturer's instruc-
tions. At balance brush and stylus tip should
just clear the record. (See Figure 1.)

2. Apply desired tracking force PLUS one gram
to compensate for weight of brush.

3. Stylus point is now in position and ready for
operation (Figure 2.). REMEMBER: When
reading tracking force scale. you are actually
tracking at one gram LESS than indicated due
to the one gram added to compensate for the
brush weight.

4. Set anti-skate control to same number as
tracking force setting.

STYLUS PROTECTIVE COVER

Your cartridge is supplied with a protective
cover over the stylus. To remove, pull gently
down on the two side ears. The stylus cover
can be replaced. when desired by placing
the front
lip over

the stylus
guard and
pressing
the ears
gently onto
the carriage
body.

STYLUS PROTECTIVE COVER

SIDE EARS

Page 2

CARTRIDGE MOUNTIRG WITH SCREWS

Select from the hardware kit the two screws and
the plastic screwhotder you will need to mount
the cartridge. Check the record player manufac-
turer's instructions to help you in you selec-
tion. The kit with this cartridge contains the
following:

a. 2 short brass screws (13-48 x 3/16")

D. 2 small chrome screws (82-56 x 1/4")

c. Two different plastic screw holders-
BLUE and BLACK (Pair)

if the tone arm requires the cartridge to be
mounted by screws from underneath. screwing
into threaded holes in the tone arm, then use
the BLUE plastic piece. You will probably need
to use the 3-48 brass screws.

Choose the BLUE piece in tone arm heads re-
quiring no spacing between cartridge bracket
and mounting surface. Simply insert the re-
quired screws into
holes in the plastic
with the cartridge
bracket between
screw heads and
plastic. This allows
easy holdin and posi-
tioning 0 screws
while tightening.

If your tone arm requires cartridges to be
mounted by screws from the top. use the two (2)
BLACK pieces and the 2-56 chrome screws:

Simply slip the pieces
onto the wings of the
cartridge and insert
the screws from ab0ve
the tone arm head. The
screws will form their
own threads in the
plastic so that no nuts
are necessary.

When tightenin the screws. never tighten one
all the way wit the other still loose. Always
alternate a few turns at a time as the cartridge
begins to tighten into position. Before the car-
tridge is finally tightened. check the turntable
manufacturers instructions to insure the car-
tridge is in the correct position.

This cartridge is covered by the following US.
Patents: 3.146.319; 3.297.831; 3.572.725. as well
as corresponding patents or pending applica-
tions in the leading industrial nations
throughout the world.

Only PICKERING AND COMPANY lNC.
manufactures the genuine V-GUARD' stylus
assemblies used in stereo FLUX-VALVE car.
tr 99.

FULL ONE YEAR WARRANTY

Pickering & Company, lnc., of 101 Sun-
nyside Blvd., Plainview, New York 11803,
hereby warrants to the owner of this car-
tridge that the cartridge and stylus
originally purchased in the United States
with this warranty shall be free from
defects in material and workmanship for
a period of one year from the date of
original purchase. Proof of date of
original purchase must be retained by
you. In the event of any defect covered by
this warranty. the cartridge should be
carefully packed and sent prepaid with
proof of date of original purchase to
Pickering & Company. Inc. at the above
address and the cartridge will then be
repaired or replaced without charge and
promptly returned to you prepaid. If it
cannot be repaired. or replaced in a
reasonable period of time. you may elect
to receive a product of equal value. or a
refund.

Consequential damages are excluded
from this warranty. The warranty shall
not extend to stylus wear nor to damage
resulting from abuse or misuse of the
cartridge or stylus.

Some states do not allow the exclu-
sion or limitation of incidental or conse-
quential damages. so the above limita-
tion or exclusion may not apply to you.

This warranty gives you specific legal
rights, and you may also have other
rights which vary from state to state.

This warranty applies to products pur-
chased by the consumer in the United

StateS- PICKERING 3. COMPANY. INC.
Sunnyslde Boulevard
Plalnvlew, New York 11803