Philips ah 380 owners manual

This is the 3 pages manual for philips ah 380 owners manual.
Read or download the pdf for free. If you want to contribute, please mail your pdfs to info@audioservicemanuals.com.

Page: 1 / 3
left right
philips ah 380 owners manual

Extracted text from philips ah 380 owners manual (Ocr-read)


Page 2

size and furnishings cf the room. it is impossible
to state herejust where the enclosures should be
placed. The best positions can be gound only by
trial and error. The following notes should be of
help to you:

0 Try to keep the distance between the enclos-
ures about the same as the distance of each to
the listener.

0 Bass response is accentuated if the enclosures
are situated in corners or on the floor. If the
response then is not desired, try to improve mat-
ters by placing the enclosures somewhat higher
and farther from the corners.

O Reproduction of treble is adversely affected if
the enclosures are positioned behind furniture.
curtains etc.

0 Keep the loudspeaker set-up as symmetrical as
possible. The effect of a certain asymmetry can
be offset by means of the level controls © and
(see chapter: 'Adjusting the level controls)

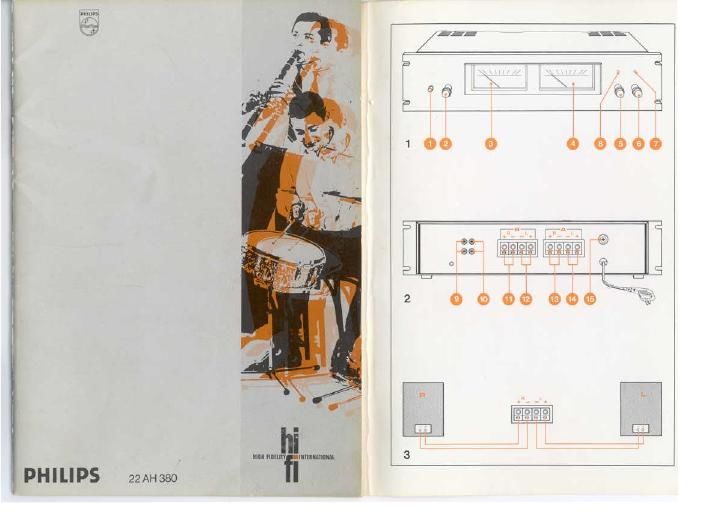
Operation

Before putting the amplifier in general use the
level controls 6) and @ should be set to the
correct position.

For that set them to position '0' (minimum) and
then operate as follows: .
0 Switch on the amplifier with mains switch 6)
The power meters will be illuminated.

I Set loudspeaker system selector (2) to the
desired position: 'A. B or 'A + B for reproduc-
tion through the system A. B or A + B respec-
tively. ls only one pair of speakers connected
reproduction can. of course. also be achieved by
setting selector @to 'A + 8' position.

With selector © In 'OFF' position both systems
are switched off.

0 Switch on the preamplifier.

Adjusting the level controls (a) and ®

0 Set the volume control of the ore-amplifier
(driver unit) in about its centre position The
balance control is set to the neutral position.

0 While playing a familiar record or tape (prefer-
ably mono or a well balanced stereo) turn both
level controls ® and clockwise until you reach
an average listening level and a correct channel
balance. which means that reproduction via left
and right channel is at on equal level.

0 With this setting the sound level of other
sources (tuner. recorder, record player. elect-
ronic organ. etc) are checked and, if necessary.
adjusted by means of the controls of the sound
source itself.

0 Listening levels should be adjusted up or down

with the preamplifiers volume control.

The level controls © and © will not require any
readjustment unless your listening set-up is
changed.

After having adjusted the level controls operation
is simply as follows:

0 Select your sound source and switch it on.

0 Switch on the preamplifier and set its source
selector to the correct position

0 Switch on the amplifier with (D.

0 Adjust tone. volume. balance, etc, with the
controls on your preamplifier (driver unit).

0 The power meters © and (9 indicate the in-
stantaneous peak power that is supplied to the
loudspeakers. For that the scale is calibrated in
dB and Watts. The calibration is based upon a
loudspeaker impedance of 8 Ohms.

Warning lights PROTECTION'

The built loudspeakers from the amplifier should abnormal
DC voltages occur at the loudspeaker outputs.
When this happens DC' indicator (D will light,

In that case, switch off the amplifierr When using
the DC inputs change them over to the
NORMAL inputs (9 If indicator .t It indicator
® should keep on burning switch off the amplifi-
er and contact your dealert

Lighting of HEAT indicator and interruption
of reproduction may be caused by a temporary
overload of the amplifiert After eliminating the
cause of overload. for instance, a too high setting
of the volume control of the driver unit. the circuit
will reset itself and the speakers will be activated
after the output transistors have cooled.

In case of lighting of 'HEAT indicator also
make sure that cooling of the top of the amplifier
can take place in a unhindered way and thatthere
is no short-circuit of the speaker connections.

If HEAT' indicator keeps on burning for in-
explicable reasons. switch off the set and contact
your dealer.

Fuse

If the fuse. fitted in holder @. fails. remove the
blown fuse and replace it with a same type fuse of
the same rating. Any trouble in the power supply
circuit will cause the fuse to blow again. In such a
case. consult your dealert

Technical data
(subject to modification)

0 Power output acc. to FTC:

100 W continuous sine wave per channel. both
channels simultaneously driven. at 8 ohm load
impedance. power bandwidth 20-20000 Hz and
total harmonic distortion 0.05%.

0 Power bandwidth (D <0.1%): 10-100.000 Hz
(acc. to IHF).

O Distortion:

harmonic distortion at 70 W: 0.01%.
intermodulation at 70 W: 0.01%.

0 Frequency response:

AC input 'NORMAL: 5-200000 Hz. -3 dB,

DC input 'DIRECT: 0-200.000 Hz, -3 dB.

0 Input sensitivity: 1 V.

0 Stereo separation: 75 dB at 1000 Hz.

0 Signal to noise ratio: 100 dB,

0 Load impedance: 4-16 Ohmsr

O Damping factor: 85 at 8 Ohm load.

Nedenands
Bedieningselementen, etc. (fig. 1)

i netschakelaar

.1 keuzeschakelaarluidsprekersysteem
J vermogensindicator. Iinkerkanaal

: . vermcgensindicator. rechterkanaal

g i uitgangsniveauregelaar, Iinkerkanaal

& i uitgangsniveauregelaar. rechterkanaal
5 waarschuwingslampje DC
'ii waarschuwingslampje 'HEAT'

Ingangen. uitgangen. etc. (fig. 2)

ingangen voor voorversterker. 'NORMAL

. ingangen voor voorversterker. 'DIRECT'

@ uitgangen voor luidsprekersysteem B. rech-
terkanaal

@ uitgangen voor luidsprekersysteem B. linker-
kanaal

@ uitgangen voor luidsprekersysteem A, rech-
terkanaal

@ uitgangen voor luidsprekersysteem A. linker-
kanaal

@ zekeringhouder

Netspanningscontrole

Kijk, alvorens het apparaat met het net te verbin-
den. op het typeplaatje aan de achterzijde van het
apparaat of de vermelde bedrijfsspanning over-
eenkomt met die van het plaatselijke net. ls dit
niet het geval, raadpleeg dan uw handelaar.

Aansluitingen

Voorversterker

Het linker» en rechterkanaal van een voorver-
sterker kan worden verbonden met de bussen
'LEFT' en 'RIGHT' van de ingangen @ of . De
capacitieve AC-ingang ©. aangeduid met 'NOR-
MAL'. kan hiervoor worden gebruikt.

Gebruik de DC-ingang .indien u een weerga-
vekarakteristiek verlangt welke bij '0' begint (zie
Technische gegevens').

Luidsprekerboxen

Op de uitgangen @. ®, ® en ® kunnen twee
stel luidsprekers (impedantie 4-16 Ohm). systeem
B en systeem A. worden aangesloten. lndien u
slechts één paar luidsprekers gebruikt dan dient
de impedantie bijvoorkeur 8 Ohm te zijn. Verbind
de linkerluidsprekers met de uitgangen, gemerkt
LEFT en de rechter met de uitgangen gemerkt
'RIGHT" De + 'draad van de luidspreker meet

5