Philips 830 a service manual

This is the 1 pages manual for philips 830 a service manual.
Read or download the pdf for free. If you want to contribute, please mail your pdfs to info@audioservicemanuals.com.

Page: 1 / 1
left
philips 830 a service manual

Extracted text from philips 830 a service manual (Ocr-read)


Page 1

Radio Marketing Service Engineer

iv

liuly, 1942

PHILIPS
830A

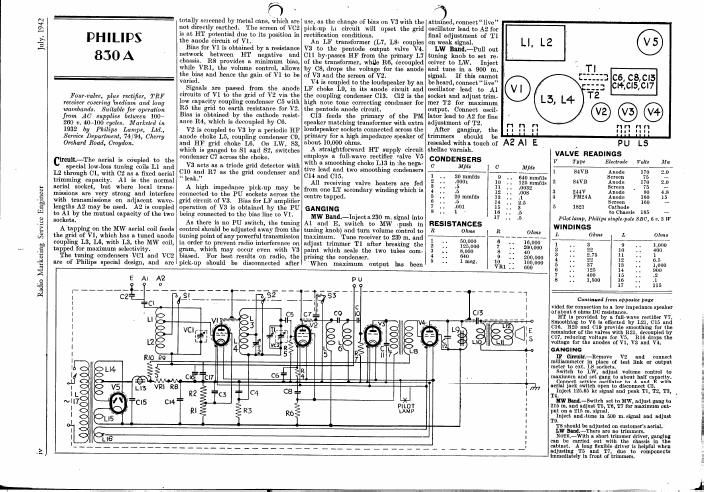
Four-valve, plus rectifier, I'RF
receiver covering imedium and long
wooebamis. Suitable for operation
fmm A0 supplies between 100-
260 v. 40-100 cycles. Marketed in
1932 by Philips Lamps, LId.,
Service Department, 74/ 94, Cherry
Orchard Road, Croydon.

innit-The aerial is coupled to the
special low-loss tuning coils Ll and
L2 through Cl, with 02 as a fixed aerial
trimming capacity. A1 is the normal
aerial socket, but where local trans-
missions are very strong and interfere
with transmissions on adjacent wave»
lengths A2 may be used. A2 is coupled
to Al by the mutual capacity of the two
sockets.

A tapping on the MW aerial coil feeds
the grid of V], which has a tuned anode
coupling L3, L4, with L3, the MW coil,
tapped for maximum selectivity.

The tuning condensers VGl and V02
are of Philips special design, and are

Cl5 CI4

Ll3 VRI RB

(fix) A
totally screened by metal cans, Which are
not directly earthed. The screen of V02
is at HT potential due to its position in
the anode circuit of VI.

Bias for V1 is obtained by a resistance
network between HT negative and
chassis. R8 provides a minimum bias,
while VRl, the volume control, allows
the bias and hence the gain of V1 to be
varied.

Signals are passed from the anode
circuits of VI to the grid of V2 via the
low capacity coupling condenser C5 with
R5 the grid to earth resistance for Vfl.
Bias is obtained by the cathode resist-
ance R4, which is decoupled by CG.

V2 is coupled to V3 by a periodic HF
anode choke L5, coupling condenser 09,
and HF grid choke L6. 011 LW, S3,
which is ganged to SI and S2, switches
condenser C7 across the choke.

V3 acts as a triode grid detector with
010 and R7 as the grid condenser and
leak.

A high impedance pick-up may be
connected to the PU sockets across the
grid circuit of V3. Bias for LF amplifier
operation of V3 is obtained by the PU
being connected to the bias line to V1.

As there is no PU switch, the tuning
control should be adjusted away from the
tuning point of any powerful transmission
in order to prevent radio interference on
gram, which may occur even with V3
biased. For best results on radio, the
pick-up should be disconnected after


use, as the change of bias on V3 with the
pick-up in circuit will upset the grid
rectification conditions.

An LF transformer (L7, L8) couples
V3 to the pentode output valve V4.
011 by-passes HF from the primary L7
of the transformer, while R6, decoupled
by CS, drops the voltage for the anode
of V3 and the screen of V2.

V4 is coupled to the loudspeaker by an
LF choke L9, in its anode circuit and
the coupling condenser 013. C12 is the
high note tone correcting condenser for
the pentode anode circuit.

013 feeds the primary of the PM
speaker matching transformer with extra
loudspeaker sockets connected across the
primary for a high impedance speaker of
about 10,000 ohms.

A straightforward HT supply circuit
employs a full-wave rectifier valve V5
with a smoothing choke L13 in the nega-
tive lead and two smoothing condensers
014 and C15.

All receiving valve heaters are fed
from one LT secondary winding which is
centre tapped.

GANGING

MW Band.-Injecta 230 on. signal into
A1 and E, switch to MW (push in
tuning knob) and turn volume control to
maximum. Tune receiver to 230 m. and
adjust trimmer T1 after breaking the
paint which seals the two tubes com-
prising the condenser.

'When maximum output has been

attained, connect live
oscillator lead to A2 for
final adjustment of TI
on weak signal.

LW Band-Pull out
tuning knob to set re-
oeivcr to LW.
and tune in a 900 in.
signal. If this cannot
be heard, connect live
oscillator lead to Al
socket and adjust trim-

mer T2 for maximum ,

output. Connect oscil-
lator lead to A2 for fine
adjustment of T2.

After gauging, the
trimmers should be
resealed witha touch of
shellac varnish.

CONDENSERS
c Mm

20 mmfds
.2001

.5
250 mmlds
3001
1 .

ESISTANOES

a x mlQOUi-WIO-

mpaNn-Il
o
o
a

Ll, L2

Inject [ I

Ohms R

C6. -8.05
CI+,CI5,CI7
"I f1 f1 f1
I I I n I r
. r r u . .
_ P u Ls
VALVE READINGS
V Type Electrode Volt: Mn
1 SAVE Anode 170 2.
Screen 75 -~
2 34V]; Anode 170
Screen , 75 -
3 244V Anode 80 4.8
4 PMZIA Anode 160 15
Screen 160 --
5 1821 Cathode
to Chassls 165 -
Pilot lamp, Philips single-pole SEC, 6 v, 3 W
WINDINGS
_ _ _h°l":_ L ohm L Ohms
. 13,000 _ "

1,000


Continued ham opposite page

vided for connection to a low impedance speaker
or about 8 ohms DC resistance.

HT is provided by a full-wave rectifier V7.
Smoothing in V6 is effected by L21, 015 and
015. R20 and CH) provide smoothing for the
remainder of the valves with R21. decoupled by
017, reducing voltage for V5. B16 drops the
Voltage for the anodes of V1, V3 and V4.
GANGING

IF cumin-Remove V2 and connect
milllsmmeter in place of test link or output
meter to ext. LS sockets.

Switch to LW, adjust volume control to
nlaxlrmlm and set gang to about half ca city.
Connect service osclllntor to A and with
Aerial jack switch open to disconnect 03.
TAInject 125.65 kc signal and peak T1, T2, T3,

luw Bani-Switch not to MW, adjust gang to
215 m. and adjust T5, T6, T7 for maximum out~
put on n 215 m. signal.

T Inject nnd.tune In 500 unusual and adjust

9.

TB should be adjusted on customers aerial.
14W Bud.~-There are no trimmers.
Norm-With a short trimmer driver, gauging
can be carried out with the chassis In the
cabinet. A long flexible driver is helpful when

adjusting T5 and T7, due to components
Immediately In front of trimmers.