Peavey roadmaster SS Manual Schematics

This is the 10 pages manual for Peavey roadmaster SS Manual Schematics.
Read or download the pdf for free. If you want to contribute, please mail your pdfs to info@audioservicemanuals.com.

Page: 1 / 10
left right
Peavey roadmaster SS Manual Schematics

Extracted text from Peavey roadmaster SS Manual Schematics (Ocr-read)


Page 1

ROADMAS'I'ER

OWNER'S MANUAL

Your new Headmaster amplltler represents the "state oi the art" in tube type equipment. Many recent ad-
vances In circuitry have been incorporated Into this unit to provide you with long and trouble free opera-
tion. The flexibility of the tone control circuitry and patching facilities found on the Headmaster are un-
matched by any amplitler commercially available.

You have made an investment In purchasing this advanced audio system. To properly take advantage oi
this investment, you must thoroughly familiarize yourself with the many features oi this amplifier. Below.
we will explain the concept, applications. and the tonal variations available from your Roadmaster system,
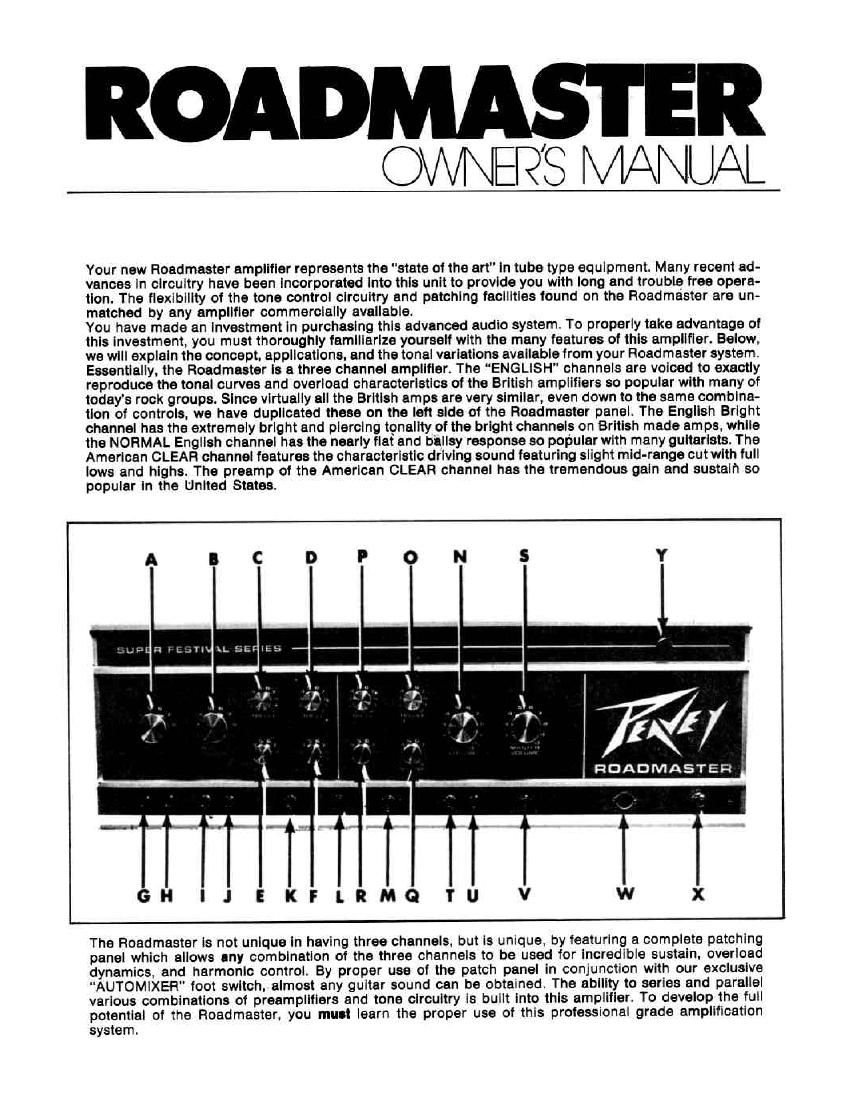
Essentially, the Roadmaster is a three channel amplifier. The ENGLISH" channels are voiced to exactly
reproduce the tonal curves and overload characteristics of the British ampiiiiers so popular with many of
today's rock groups. Since virtually all the British amps are very similar, even down to the same combine-
tlon of controls. we have duplicated these on the left side of the Roadmaster panel. The English Bright
channel has the extremely bright and piercing tonallty of the bright channels on British made amps. while
the NORMAL English channel has the nearly flat and b'ailsy response so popular with many guitarists. The
American CLEAR channel features the characteristic driving sound featuring slight mid-range cut with full
lows and highs. The preamp of the American CLEAR channel has the tremendous gain and sustain so
popular in the United States.

.71»! .

1 W71 :

RDADMASTER


G

W

IJEKFLRMGTU V

X

The Hoadmaster is not unique in having three channels. but is unique. by featuring a complete patching
panel which allows any combination of the three channels to be used for incredible sustain. overload
dynamics. and harmonic control. 8y proper use of the patch panel In conjunction with our exclusive
AUTOMiXER foot switch, almost any guitar sound can be obtained. The ability to series and parallel
various combinations of preamplifiers and tone circuitry is built into this amplifier. To develop the full
potential of the Roadmaster. you must learn the proper use at this professional grade amplification
system.

Page 2

CAUTION!

LEARN THE SOUNDS AVAILABLE FROM THE VARIOUS INPUT JACKS BEFORE YOU ATTEMPT TO
USE THE ROADMASTER IN CONCERTIllIIIIllIllIIlIIIIllllllilllllllllll

ENGLISH BRIGHT CHANNEL

This channel's Input lacks are located Just below the BRIGHT VOLUME" (A). The number one input (G)
has exactly twice the gain as Input number two (H) and should be used in all cases where the signal from
your Instrument does not overload the Input stage of the Bright channel preamp. It the instrument signal
seems to "break up the amp when In number one. then the number two jack should be used. If two in-
struments are used then both Inputs have the same gain. The level of the bright channel ls controlled by
the Bright volume. You may control the sustain and dynamics of this channel by using the bright volume in
conjunction with the master volume control(s). The overall tcnality is altered with the bass. treble. middle
and presence controls shared with the ENGLISH NORMAL channel. Reverb ls available on this channel by
simply turning up the reverb level control (R) to achieve the desired reverb blend.

ENGLISH NORMAL CHANNEL

The dual Input Jacks tor this channel are placed lust below the NORMAL VOLUME (8). The number one
Input (I) has twice the gain oi number two (J) and should be used whenever possible. The operation of this
channel Is essentially Identical to the BRIGHT channel except that It does not have the extreme high fre-
quency boost built Into the bright inputs. This channel should be tried first by those seeking to simulate
the "British" sound used on many recordings today and in "Acid Rock" material oi several years ago. The
extremely list response. coupled with tremendous gain and sustain make for smooth overload
characteristics and punchy midrange necessary for that "fat and ballsy" sound sought by many guitarists.
Additional sustain and eitects can be obtained by using the Normal volume control In conlunction with the
Master volume control(s). Generally. It is best to run the individual channels volume almost Iully
clockwise with the Master volume set on the lower settings to allow the preamp to overload. allowing both
sustain. as well as, harmonic generation from the overdriven Input stages. Fieverb Is available on this
channel by turning up the reverb level control to the desired blend.

PARALLEL INPUT

By plugging your Instrument into the parallel lack (K). the switching jack automatically places the signal
from your Instrument Into both "ENGLISH" channels. Plugging Into this parallel Jack Is the same as using
a patch cord to bridge Into both bright and normal channels. except that the internal circuitry automatical-
ly performs the patching function. When plugged Into the parallel jack. both bright and normal volume
controls are active and the desired blend 01 each can be found by varying the level of each. relative to the
other. As with each Individual channel. the common set of tone controls sets the overall tonal balance and
should be adjusted according to personal taste. The Master volume control(s) may be used for even more
control of dynamics and overload harmonics.

FUNCTIONAL DIAGRAM 0F PARALLEL INPUT

amiss
MIGHT
PARALLEL
WI "WE ms was
(LI WW voume AMP I 5 E m
->
FWI'SWITUI
sevens was

IN PARALLEL MODE. FOOTSWITCH IS OPERATIONAL DNLV FOR REVERE.