Nakamichi ZX 9 Service Manual

This is the 49 pages manual for Nakamichi ZX 9 Service Manual.
Read or download the pdf for free. If you want to contribute, please mail your pdfs to info@audioservicemanuals.com.

Page: 1 / 49
left right
Nakamichi ZX 9 Service Manual

Extracted text from Nakamichi ZX 9 Service Manual (Ocr-read)


Page 1

1. GENERAL

1.1. Voltage Selector

Voltage selector is installed on the rear panel for other version of the Nakamichi ZX-B.
This voltage selector can select either 120 V or 220-240 V at custOmcrs disposal.

1.2. Parts List for Carton and Packing

Part N 0. Description Qty
OF03671A Inner Carton 1
0F03672A Outer CartOn 1
0F03629A Packing 2

2. MECHANICAL ADJUSTMENTS

2.1. Mechanism Control Cam Adjustment
Before adjustment. remove the Front Panel Assy and the Cover
Plate.

(1) Offset Adjustment of Control Motor Driver

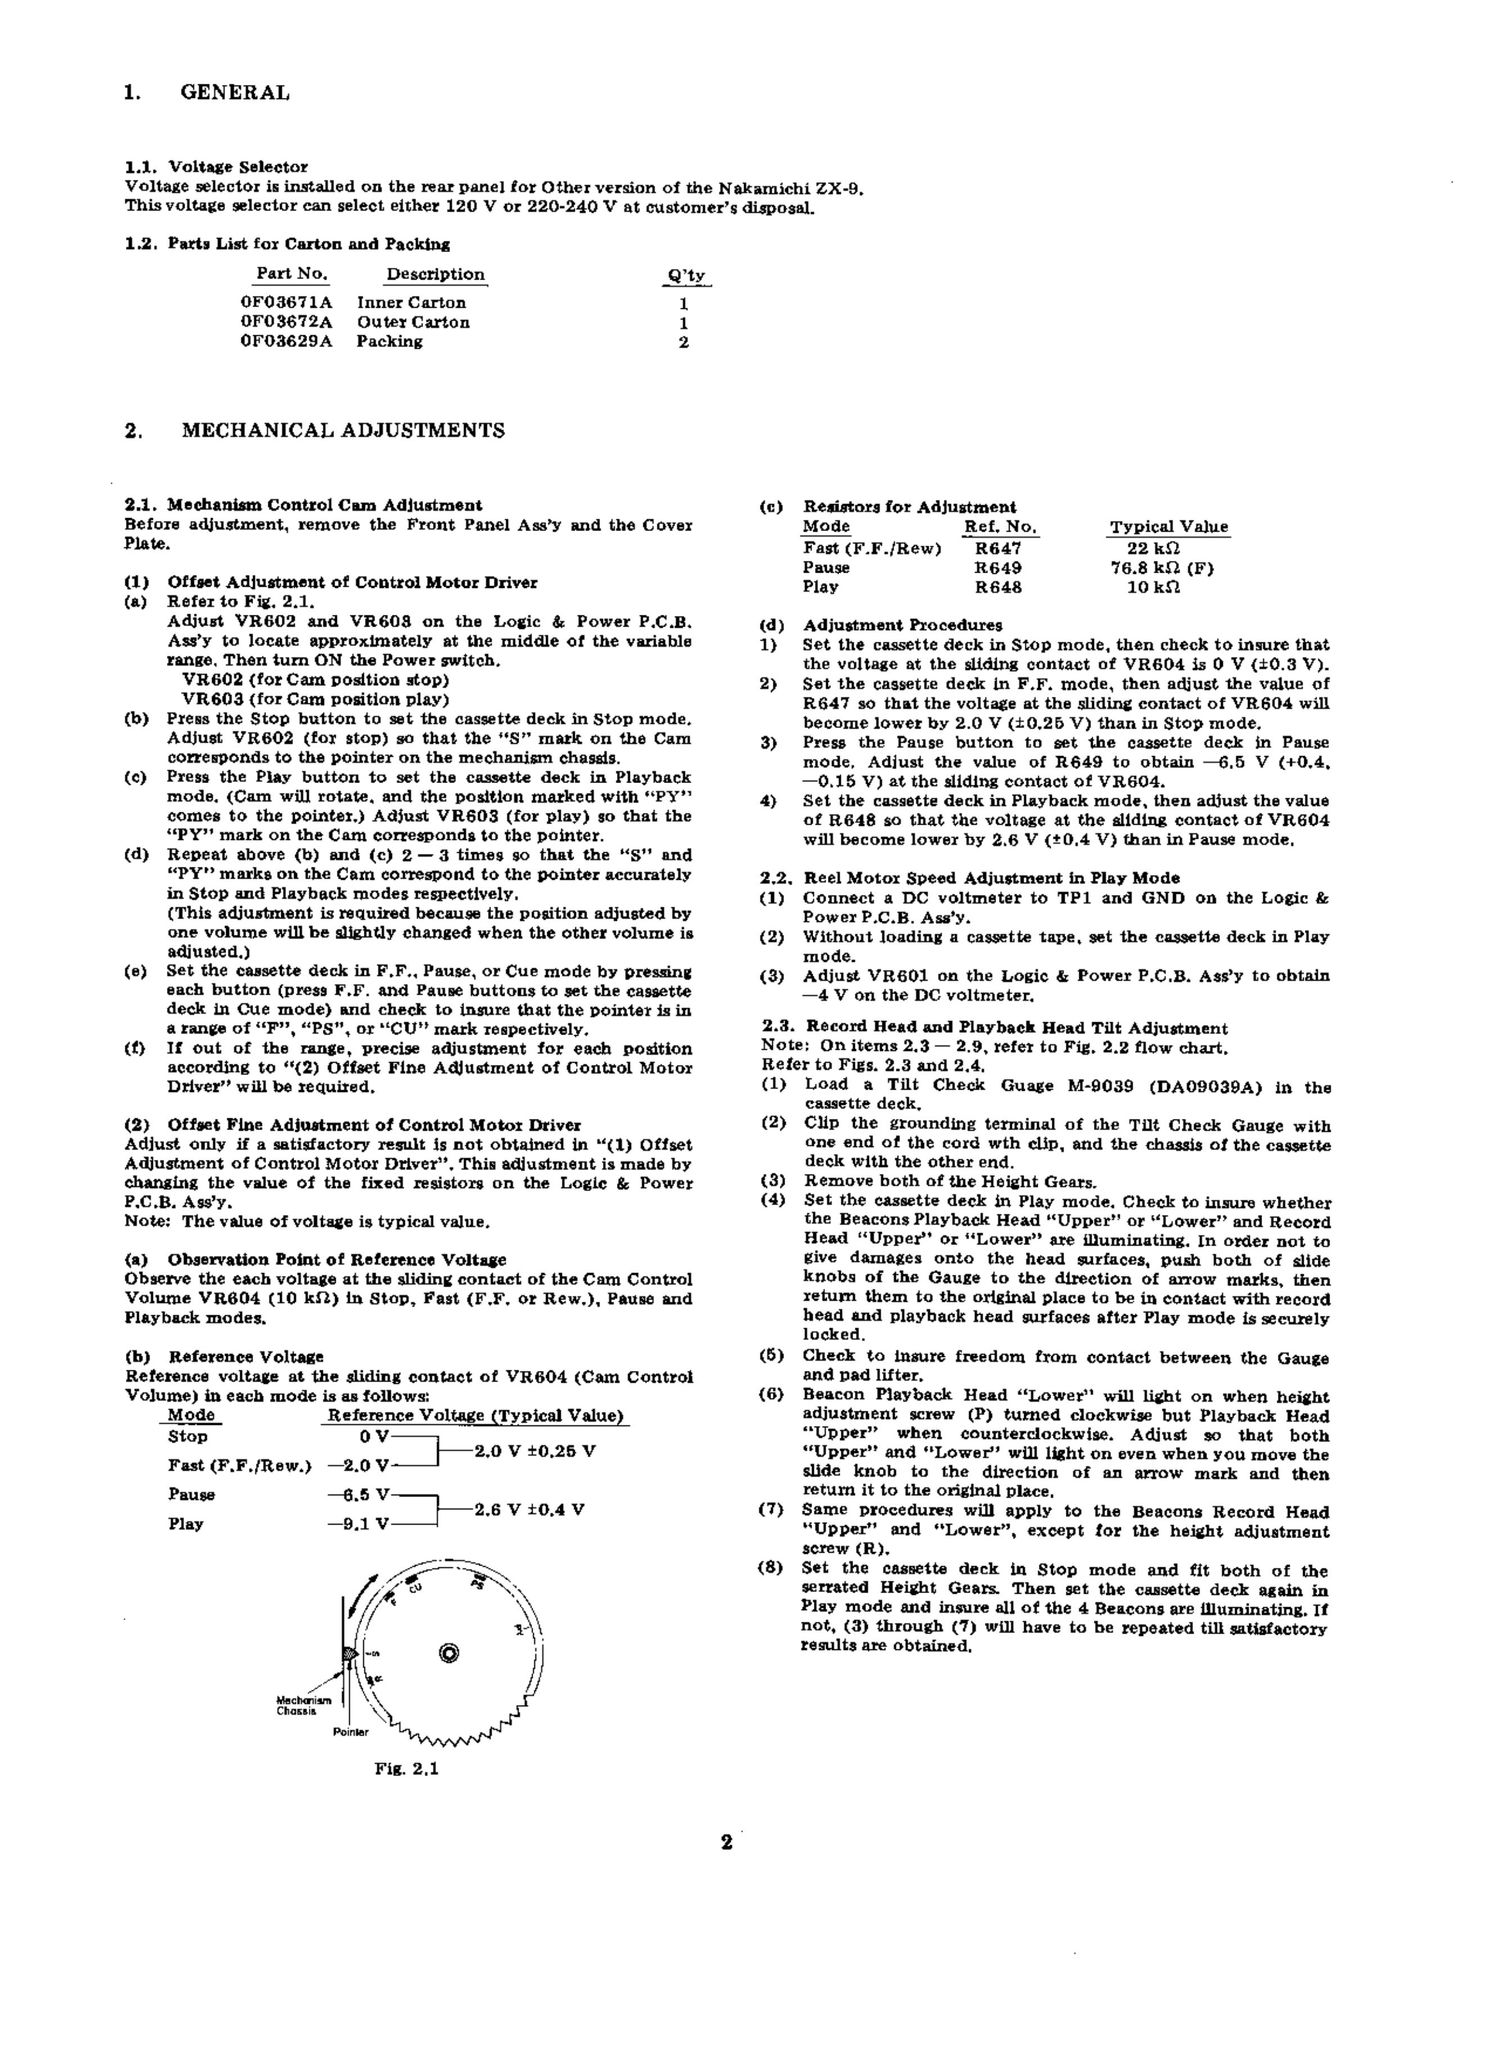
(a) Refer to Fig. 2.1.

AdiUst VR602 and VR608 on the Logic 8: Power P.C.B.
Aasy to locate approximately at the middle or the variable
range. Then turn ON the Power switch.

VR602 (for Cam Dasition stop)

VR603 (for Cam position play)

(b) Press the Stop button to set the cassette deck in Stop mode.
Adjust VR602 (for stop) so that the S" mark on the Cam
corresponds to the pointer on the mechanism chassis.

(0) Press the Play button to set the cassette deck in Playback
mode. (Cara will rotate. and the position marked with PY
comes to the pointer.) Adjust VR603 (for play) so that the
PY mark on the 0m corresponds to the pointer.

(d) Repeat above (1:) and (c) 2-3 times so that the S" and
FY" marks on the Cam correspond to the pointer accurately
in Stop and Playback modes respectively.

(This adjustment is required because the position adjusted by
one volume will be slightly changed when the other volume is
adjusted.)

(e) Set the cassette deck in F.F.. Pause. or Cue mode by pressing
each button (press ER and Pause buttons to set the cassette
deck in Cue mode) and check to insure that the pointer is in
a range of F. PS", or "CU mark respectively.

(t) It out of the range, precise adiustment for each position
according to (2) Offset Fine Adjustment of Control Motor
Driver will be required.

(2) Offset Fine Adiustment of Control Motor Driver

Adjust only if a satisfactory result is not obtained in "(1) Offset
Adjustment of Control Motor Driver". This adlustment is made by
changing the value of the fixed resistors on the Logic 8; Power
P.C.B. AssY.

Note: The value of voltage is typical value.

(a) Observation Point of Reference Voltage

Observe the each voltage at the sliding contact of the Gun Control
Volume VR804 (10 1:0) in Stop, Fast (F.F. or Rem). Pause and
Playback modes.

(b) Reference Voltage
Reference voltage at the sliding contact of VR604 (Cam Control
Volume) in each mode is as follows:

Mode Reference Voltage (Typical Value)
Stop 0 V

-2.0 V 10.26 V
Fast (RFJRewJ -2.0 v-
Pause -3.5 V--

-2.6 V tOA V
Play -9.1 V-

(c)

(d)
1)

2)
3)

4)

2.2.
(1)
(2)
(3)

Resistors for Adjustment

Mode Ref. No. Typical Value
Fast (RFJRew) R647 22 k9.
Pause R649 76.8 k9. (F)
Play R648 10 k9.

Adjustment Procedures

Set the cassette deck in Stop mode. then check to insure that
the voltage at the sliding contact of VR604 is 0 V ($0.3 V).
Set the cassette deck in F.F. mode. then adjust the value of
R647 so that the voltage at the sliding contact of VR604 will
become lower by 2.0 V (1:025 V) than in Stop mode.

Press the Pause button to set the cassette deck in Pause
mode. Adlust the value of 3649 to obtain -6.5 V (+0.4.
-0.15 V) at the sliding contact of VR604.

Set the cassette deck in Playback mode. then adjust the value
of R648 so that the voltage at the sliding contact of VR604
will become lower by 2.6 V (20.4 V) than in Pause mode.

Reel Motor Speed Adjustment in Play Mode

Coanect a DC voltmeter to TPl and GND on the Logic 8:
Power P.C.B. Assy.

Without loading a cassette tape. set the cassette deck in Play
mode.

Adjust VRBOI on the Logic a; Power P.C.B. Assy to obtain
-4 V on the DC voltmeter.

2.3. Record Head and Playback Head Tilt Adjustment
Note: On items 2.3 - 2.9. refer to Fig. 2.2 flow chart.
Refer to Figs. 2.3 and 2.4.

(1)
(2)

(3)
(4)

(5)
(6)

(7)

(3)

Load a Tilt Check Guage lid-9039 (DAOQOSBA) in the
cassette deck.

Clip the grounding terminal of the Tilt Check Gauge with
one end of the cord wth clip. and the chassis of the cassette
deck with the other end.

Remove both of the Height Gears.

Set the cassette deck in Play mode. Check to insure whether
the Beacons Playback Head Upper" or Lower and Record
Head Upper" or Lower are illuminating. In order not to
give damages onto the head surfaces. push both of slide
knobs of the Gauze to the directiOn of arrow marks. then
return them to the original place to be in contact with record
head and playback head surfaces after Play mode is securely
locked.

Check to insure freedom from contact between the Gauze
and pad lifter.

Beacon Playback Head Lower" will light on when height
adjustment screw (P) turned clockwise but Playback Head
"Upper when counterclockwise. Adjust so that both
Upper" and "Lower" will light on even when you mave the
slide knob to the directioa of an arrow mark and then
return it to the original place.

Same procedures will apply to the Beacons Record Head
"Upper" and Lower, except for the height adjustment
screw (B).

Set the cassette deck in Stop mode and fit both of the
serrated Height Gears. Then set the cassette deck again in
Play mode and insure all of the 4 Beacons are illuminating. If
not. (3) through (7) will have to be repeated till satisfactory
results are obtained.

Page 2

Record Head and Playback
Head Tilt Adjustment

T111; Check Gauge
M-9039

Stroke Check Gauge

Head Ease Stroke Adjustment 4057

Record Head G

S troke Check

Remove Head No on:

Base ASB'Y Base Aas'y

ReMVe Head How-at

Erase Head Stroke Adjustment EH 8 troke Check Gauge

Record Head 5 troke

Record Head
Mounting Gauge


and Tape Guide Height Check 14305] Adjustment M-9048
Erase Head Height and EH Til: Check Gauze Assemble Head Mount Helqny a, WK '
Tilt Adjustment 14-9040 Base Assy won. a... 5......" Wu}
Height M; Scraua {PHI
Assemble Read Mount fix" Hug Gear mm
Base Ass'y 55;" /«Mm Gear sroour mm
/ HeiVl' dj Screws (RN)
Tension Am Adjustment Cassette 14-9056
Back Tension Adjustment Back Tension Gauge -9055
Record Head! 1: Ga
Playback Head £333?! use
T11: Check
Fig. 2.3
Read Base Stroke Check Gauge
Stroke Check 14-9047 . N _.
O r row-1
: E Record Hem: Playback Hood
Low loner Loser U ec
Playback Head Height 3 0 0
Adjustment and .
Azimuth Alignment O .@ ©
- 9 0 0
Record Head Height
Adjustment and ' U U WU
Azimuth Alignment 0 © El F
O L ' "
END .___| L Jill: Illa J -_jj{éuu:--
Hc-ahl no: Screw in) Height Ad. Screw IPI
Fig. 2.2 Fir. 2.4
2.4. Head Base Stroke Adjustment (f) It the record head stroke is noted to be misaligned, adjust.

Refer to Fis. 2.5.
Note: Before yOu conduct this adjustment. adjust with a Tilt

(1}
(8)

(b)

(c)

(d)

(8)

Check Games to insure freedom from tilt 0n the playback
head and record head.

Head Base Stroke Adjustment in Play Mode

Load a Stroke Check Gauge M43047 (DA0904TB) in the
cassette deck.

Move Record Head Indicator and Playback Head Indicato: to
the direction of arrow mark A with your finger tip and
then set the cassette deck in Play mode.

Then slowly release the Indicators and insure whether each of
the Indicators is in contact with record and playback heads.
Check to insure whether the P" pointer on the Playback
Head Indicator Incates between the 2 lines on the Indicator
Plate.

It the playback head stroke is noted to be misaligned.
adiustment can be made by moving the stroke adjuster
assembled in the head base assembly (either iorwardly or
backwardly).

Check to insure whether the P pointer on the Playback
Head Indicator locates between the 2 lines on the Record

Head Indicator, thus check can be made on record head
stroke.

(2)
(B)

(b)

(a)

(d)

(0)

ment can be made with a Record Head Mounting Gauge
M-9048 (DA09048A).

Head Base Stroke Adjustment in One Mode

Load a Stroke Check Gauge lid-9047 (DA09047B) in the
cassette deck.

Move Record Head Indicator and Playback Head Indicator to
the direction of arrow mark A with your finger tip and
then set the cassette deck in One (F.F. and Pause) mode.
Then slowly release the Indicators and insure whether each of
the Indicators is in contact with record and playback heads.
Check to insure whether the C pointer on the Playback
Head Indicator locates between the 2 lines on the Indicator
Plate.

II the playback head stroke is noted to be misaligned. adiust
V3610 on the Logic 3; Power P.C.B. Ass'y till satisfactory
results are obtained.

After completion of the Head Bass Stroke Adjustment. check
to insure accuracy or the Head Base Stroke Adjustment in
Play mode.

I! the above are inaccurate. items (1) and (2) will have to be
repeated till satisfactory results are obtained.

Page 10

STEP

ITEM

SIGNAL
SOURCE

OUTPUT

CONNECTION

MODE

ADJUST-
MENT

REMARKS

14 (c

ontinu ed)

10.

11.
12.

13.

Press the Record and Play buttons, then
press the Level Calibration Start button to
Oscillate 400 Hz.

Adiust Sensitivity Controls VRIOG (VB-
206), VR105 (VR205) and VR104 (VR-
204) to obtain 0 dB on the level meters.
Press the Bias Calibratioa Start button to
oscillate 15 kHz.

Adiust Bias Controls VRIOl (VR201),
VR102 (VR202) and VR103 (VRZOB) to
obtain 0 dB on the level meters.

Repeat 6 to 9 as above two or three times to
obtain optimum performance.

Set the Dolby NR switch to B-TypelOFF.
Feed in 10 kHz (-20 dB) and 20 kHz (-20
(13), then record and play it back. Check to
insure that the levels are within -20 dB
12 dB against the levels in Dolby NR
C-Type.

Check to insure whether the total harmonic
distortiOn is less than 0.8% for ZX tape and
1.0% for SK and EXII tapes.

15

Overall
Frequency
Response
Adjustment

400 Hz (0 dB)
and 20 Hz to

20 kHz.
(-20 dB) to
Input Jacks

VTVM to
Output Jacks

Record. Playback
Manitm: SW-w Source!
Tape
Tape sw - zXISXIEX
En. SW - 70 Ms
(ZXISX)
120 p.3{EXJ
Dolby NR SW - OFF
MPX SW - OUT

Main P.C.B.
L101.L201

Perform the Azimuth Alignment operation

as follows:

a. Press the Record and Play buttons.

b. Press the Azimuth Alignment Start
button to ON.

0. Turn the Azimuth Alignment Knob so
that the red indicator in the middle of
the Azimuth Indicator is lit up.

d. After above adjustment. press the
Azimuth Alignment Start button to
OFF.

Set the Monitor switch to Source.

Feed in 400 H7. (0 dB) and adjust the Input

Level controls to obtain 0 dB on the level

meters.

. Switch the Generator Output level to -20

dB.

Set the Monitor switch to Tape. then record
and play it back.

Faed in 20 Hz to 20 kHz (-20 dB), and
check to insure whether the output levels
are within -20 dB :3 dB.

If above is not sufficient, adiust L101
(L201) to obtain approx. -20 dB on the
VTVM at 20 kHz.

Conduct step 14 "Record Level Calibration
and Recording Bias Current Adjustment".
If above is not sufficient. precise rte-adjust-
ment of step 8 Playback Frequency
Response. replacement of Playback Head
or Record Head, check on item 2.10 Tape
Travelling Adjustment or frequency re-
sponse adjustment according to item 4.2
will be required.

16

Crosstalk
Measure-
ment

1 kHz to
Input Jacks

1 kHz Band Pass
Filter and VTVM
to Output Jacks

Record and Playback
Manitor SW - Tape
Tape SW - ZX

Eq. SW - 70 1.15
Dolby NE SW - OFF

EON

2

. Perform the Azimuth Alignment operation

referring to step 15-1.

Erase a reference ZX tape with bulk eraser.
Adjust the Input Level controls to obtain
0 dB on the level meters. and record the
signals 0n the reference tape.

Turn the cassette tape the other way round
and play it back.

Measure the difference between 3 and 4.

17

Channel
Separation
Measure-
ment

1 kHz to
Input J acks

Same as above

Same as above

Perform the Azimuth Alignment operation
referring to step 15-1.

Erase a reference zx tape with bulk eraser.
Adiust the L ch (R ch) Input Level control
to obtain 0 dB on the level meters. and
close the R ch (L ch) Input Level control.
Record and play it back. then measure the
R ch (L ch) level.

18

Erasure
Measure-
ment

1 kHz to
Input Jacks

Same as above

Same as above

Perform the Azimuth Alignment operation
referring to step 15-1.

Erase a reference ZX tape with bulk eraser.
Adjust the Input Level controls to obtain
0 an on the level meters. and record the
signals on the reference tape.

Rewind the tape then close the Input Level
controls.

5. Record and play it back, then measure the

difference between 3 and 4.

11

Page 13

5. MECHANISM ASSY AND PARTS LIST

5.1. Synthesis
~~l
I
I
I
Fig. 5.1
sfiffifgfc Part No. Deuaiption any Sfigfi'fific Pm No. Description Qtv
HA04315A Synthesis (Japan) 1 16 OJ 04550A Top Cover Cushion 6
HA04319A SYnthelis (U£.A. & Canada) 1 17 0M043? 7A Cautiou Label (U.S.A. & Canada) 2
HA04318A Synthesis (220V Class 2) 1 18 0H040650 Control Volume Cap 6
HA04314A Synthesis (UK) 1 L01 0E00915A BT M4x8 @Bindinx 4
HA04317A Synthesis (Australia) 1 (Black Chromate)
HA04316A Synthesis (Others) 1 L02 OEOOT 36A Washer 4mm (Black Chromate) 4
Serial No.: A12501001 - L03 0E00857A BT M3x6 @Bindinz 9
L04 0E00865A BT M3x10 6 Binding 4
01 0H04010A T09 Cover 1 L05 0120092 1A BT M3x8 e Bindinl 5
02 0.10447 7A Bottom cover 1 (Black Chromate)
03 0J03564A Leg T-H 4 L06 0E00950A BT M3x14 QPan 2
04 0H04097A Central Volume Knob 3 (Black Chromate)
05 HA04093A Calibration Volume Knob 12
06 HA04096A Function Knob 5
07 0H04083A Azimuth Alignment Knob 1
08 HA04821A Cassette Case Assy 1
09 HA04320A Front Panel Ass'y 1
10 0008311A Azimuth Wire 1
11 HA04091A Power Switch Knob 1
12 0J044903 Power Switch J oint 1
13 HAo4329A Cover Plate Assy l
14 JA03938A Symhesia Mechanism Asuy 1
(Japan)
JA03942A Synthesis Mechanism Assy 1
(U.S.A. 8: Canada)
JA03941A Synthesis Mechanism Assy 1
(220v Class 2)
JA03937A Synthesis Mechanism Assy (UK) 1
JA03940A Synthesis Mechanism ASSV 1
(Australia)
JA03939A Synthesis Mechanism AW}? 1
(Others)
15 0.1040801! Top Cover Hintelon 3

14