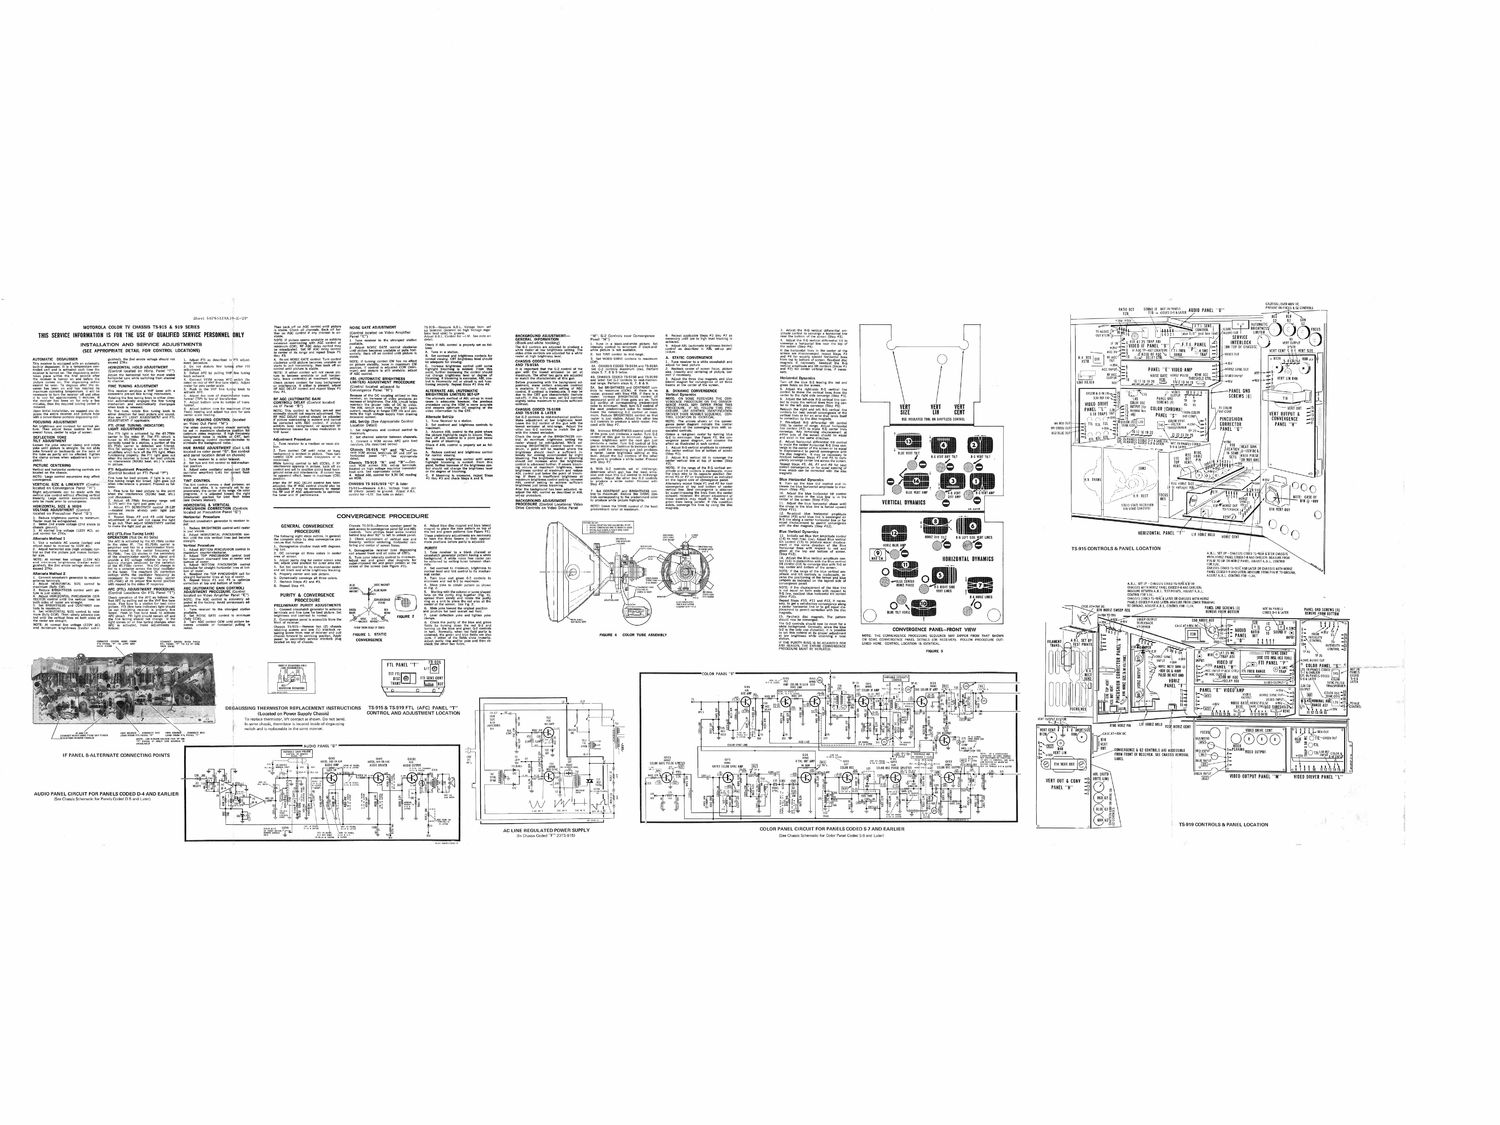
Motorola ts 915 d service manual

This is the 2 pages manual for motorola ts 915 d service manual.
Read or download the pdf for free. If you want to contribute, please mail your pdfs to info@audioservicemanuals.com.

Page: 1 / 2
left right
motorola ts 915 d service manual

Extracted text from motorola ts 915 d service manual (Ocr-read)


Page 1

CAUTION: OVER 600V DC

RATIU flEl SOUND IF NOTINPANELS AUDIU PANEL Ivar PRESENTONFOCUSC.GZCDNTROLS

. m] Ill] .. coon) D~5 HATER
h 68136512 A . - P RED Bi.
5 eat 9 39 E U +35v +95V J / . c (:2 c2 EIIIIIN
- . i _ ._ o o ..
MOTOROLA COLOR TV CHASSIS T3315 81 919 SERIES . Then back off on AGC control until picture NOISE GATE ADJUSTMENT TS-919-Measure A.B.L, Voltage from set /.___ \fl H F.T.l. SENS I ggIEII'fiIEIS
7 is stable Cheek 8" Cha"°'s- 58° 9" 'r . -- Up terminal (located on high Voltage reEU- 3. Adjust the R-G vertical differential am- I0 AUDIO ( CONTROL I 45MB l FOCUS
THIS SERVICE INFORMATION '5 FOR THE SE OF QUALIFIED SERVICE PERSUNNEL UNI-Y filo" AGO control if any channel '5 un- éConIrolElgcated on Video Amplifier Iator Staging t? gIroundI IV S t BACKGROUND ADJUSTMENT M" 62 Controls near Convergence 8 Repeat applicable Steps #3 thru #7 as plltuuteh chIntrol to :onverge a horizontal line 54 3 21 [Use j/li" insl Ilex thulj AUDIO OUT MIL \
I. so e. I . ane ' Adqust . . . on ro or-. . ee noeon - ; I- I - . . . near e ottom o the screen (Step #3). - L l I E r
3 NOTE. PM"? items 5115,ng zg'fzmb': 1. Tune receiver to the strongest station dealh EEEINEIEALOINIE?RII:TN92) Pane' A H U goalileesvseadry um low to '1 level mums '5 4. Adjust the Re vertical differential tilt to B lilli 47 25 TRAP Alli ( 1 lNIUNLIJDK A VERTUUTPUT 3
. excessive overoa ing WI available. . . . ac -an -w Ie C In 1. Tune in a black.and.whije icture. 3,31 ' , 4 . . converge a horizontal line near the to of -
INSTALLATION AND SERVICE ADJUSTMENTS 5 rninlmuml(CW). RF AGC delay control may 2, Adjust NOISE GATE control clockwise $553k If ABL control Is Properly set as fol The 6-2 controls are adjusted to produce a intensity control to minimum if) black-and» 9_ tAdIIIst A%L(al"éordnat'lc bAntlrjtnests limiter) the screen (Step #4). P -7VIUEO II: PANEL flail II(-)FI'[I|II RANEL {-4 [ON TOP OF CHASSIS] X'STR
(SEE APPROPR'ATE DETA'L FOR CONTROL LOCAT'ONS) l: gliiglf'fl' rfféeR§n§$§p§§la§l§$ 351' "Mil Picture will "Mia? 339%": "W. A rm... n. a 5...... white Easier uiIlPIW brlshéhestsdsgitlng- me while picture is not available. 233;; 35 95°" 6 l" 5" 9 P if the horizontal lines in the center of the K W IN 3 IFAGC TP-i-ALT LOCATION mum Pgasmc -3 VERT CENT c a s VERT SIZE
ii . El it ff contra un ic ure Is ' ' VI ao rive Con ros are a us e or a w e . _ screen . d. _ i
. thru #3. A flit," 3 ° " p a. Set contrast and brightness controls for 5...... ...g.. ham... .4... 2. Set TINT control to mid range. I A some CONVERGENCE and Maj;lgasgghfsrggcadreggggoggfsnni: _m éthliELlIfIIIIEDo tiling TM? :12! more our
AUTOMATIC DEGAUSSER guished). the 2nd anode voltage should "at 1. Adjust FTI as described iniFTI adjust. 4. Re-set NOISE GATE control. Turn control normal viewing. CRT brightness level should a. Set VIDEO DRIVE controls to maXImum - _ from top to bottom of screen. Readjust disc __...._ '
' d th 1: t' C99" 27K merit rocedure i clockwise until picture becomes unstable or NOTE: If turning WMWI 9w Pasha effeCt be adequate for viewing. CHASSIS CODED T5915 (CW). 1. Tune receiver to a white crosshatch and magnets if necessary Read'ust the Rc _ +35V
{Ulilficggggufsggums avllemggliflfilgmca": HORIZONTAL HOLD ADJUSTMENT 2- Drip not disturb fine lunin after Fl'l Starts 0 PP" ll°llz°"a"yl the" WC 3 °" ° Pietu'fiIsmh'ImI Ieihe-U'S'Ierégfiu'PmfinV, C. Increase brightness control until some AND T5919 4A, CHASSIS CODED TS-915A end TS-919A: will 0' be Pic'm- vertical amplitude and tilt contl'ols (Steps #1 5 -SA
trolled unit and is activated each time the (Comm Iocated on Hem PaneI up.) adjustment. 5 control until Picture is stable: fnflfnénd flu"; I: still unsIabIe Ins, highlight :Iooming is evIlIIdent. FrIImIIIthIIs It Is imgortIlIintIthat tthe 6.2 contbrol ofttht: Set o2 controls maximum (cw). perform 2, Rfcheckt centgr ofIscIrecn IfOcIui. picture and #2) for center vertical lines. if neces- 7 PANEL "E vao AMP -4 /HORlz SYNC OUT
t d .Th de aussin action , , 3. D f t AFC b ll VHFlf t NOTE: If either control will not cause pic- ' polnt. urt or increasing t c contro s and gun wit t e owes emission e se 3 steps 5. 7, 8 & 9 below, SllE,I lnearl y an cen erlng o pll: ure, corr sary. 3A
Ifififigegficeu'xfihifi"Imam? secongd after Adjust the horizontal hold for most stable knob ifigward, y pu mg 3 me unlng (mg to become unstable or pull horizon. IF AGC control. not change brightness level or degree of maximum. The other two guns are adjusted 48 CHASSlS CODED 1.59155 a d 1.59193 "5C? ll necessary. . . g NUISE GATE HORIZ PULSE R24E AGE _ _--VIDEO INPUT
re i er is turned on and before the h°llz°nlal sync Will'e "0 "3' ha"e' . . tall leave controls at maximum setting. ABL AUTOMATIC BRIGHTNESS blooming. If blooming Is excessive, ABL con- to match the characteristic of this gun. . , ". ' 3, Ad'ust the (hrs.3 dis; II... nets and blue Horizontal Dynamics THRESHOLD CTRL
the cev to channel 4. Connect VTVM across AFC swrtch (lo Yr ) t I . . tl f: . lt' otf and later Set 6-2 controls to mid-mechanr l f g f III III 1718l920 RISE 121 - +95V
pieture comes on. The deESHSSlHE aCtion ' t d r fVHF f'ne t he " ft. Ad ust Ch k ' ture content for bus back round LIMITER ADJUSTMENT PROCEDURE .'° .'5 "0" Y 5" 0" °"'° '5 " ""5 Before proceeding with the background ad. - ' lateral magnet 0" convergence 0 all three Tum 0 the blue G-Z leavin the red d Q 3 I415 \
cannot be seen. To degauss after the re- FINE TUNING ADJUSTMENT fisfcrjgrriirocoentcr goal: SUE ) l or figtenlecrence. If either Is pryesent gadjust ) . honing properly. Repeat Steps #1 thru #4. justmont, make certain adequate contrast :3! range. Perform Step5 6' 7' 8 8 9' beams at the center of the screen. green fields on the screen. g an ""'""" J -r---- 9
ceiver has been on and has reached its . , 5 Push in the VHF fine tuning knob to RF AGC DELAY control and repeat Steps #1 (Control located adeIacIeInt to is available. If not. check setting of AGC 5" Set BRIGHTNESS and CONTRAST. °°" 5. Adjust the right-side R-G vertical l' \
maximum operating temperature, it will be This receiver employs a VHF tuner With a activate Ape, thru #4, convergence Panel H ) ALTERNATE ABL (AUTOMATIC control. if contrast Is inadequate. it may be trols 0 minimum (CCW)- If there '5. "0 B. IDYNAMIC CONVERGENCE control to make the vertical lines from IE: COLORUB W 13 7PT.: t3: VIDEO ll] 9 B 7 [i . PANEL "0
necessary to turn theIreceiver off and allow concentric PIBISEt fine tuning Imathamern. 6. Adjust top core of discrlmi ator trans Because of the Dc coupling utilized in this BRIGHTNESS LIMITER) SET-UP due to the CRT gun characteristic (remote :55:Err, Pfceel W'gRfigfilPrfiggs- Emir-'50? Venical Dynamics center to the right side converge (step *5). IN L 4 E55 / OUTPUT .-.._- ' SCREWS IBI
IItIIIItoIIIcIIeIlIIIIerorh:sllnlgglélIlIneItIelymf $3"?er Ughatarllgtf:rrrl:tllttna(llyuglrl1ggsa 323:; aggleiutfllfics former (TIP) to top of transforer. RF AGC (AUTOMATIC GAIN receiver. aInhlnchrease ofhvideo produces an The alternaae methodIIof ABL sefiup In irIiost :fiéggg-JeflgwsrgxffififiiDefectigfsfigfiilcfilgr': nzsccfssar'nyrItSiI all three guns are Oh°Tum NOTE: ON SOME RECEIVERS THE CON- 5. Adjust the leggside R4; vera, II"e can. L48 PANEL END II, TIP
. - - , - , . . 7. Ad" t b it t b tt' ftr - increase 0 rig tness. T e ABL circuit helps cases is a equate: owever, e prev ous , . ' VERGENCE PROCEDURE ON THE CONVER- troj t k th ~ - . SCR
m'- the 3 requ'le °°°""g em" '5 mm .and m"at'cal'y P'senfiages former.us ° W we 0 ° 9'" ° ans gglrg'gghlflghgy (0°"tm' mated maintain the proper ratio of DC to video. procedure using the VOM ls more accurate contrast. Sofafife"3.I..I?!,fi°h:sx§°23IfigGP2'°§o%'IflfiaQI GENCE PANEL MAY DIFFER FROM THIS tor t: trl'i': lift Silli'é'éri'va'lgisfsm U159) Ge" ] 33%; use EWS [iii 45 35
educed' 9 km" '5 'e'eased' 3. Adjust bottom core for maximum (First . . The ABL circuit also limits the CRT beam and assures optimum DC coupling of the CHASSIS CODED 1.5.9155 II... he... predominam 'mIor to minImum PROCEDURE. IF so, FOLLOW THIS PRO- Remuch Ihe II ht d I II RG . ' . 12 IUT "or GUI-[Ill [CHROMA m COLOR .va I
Upon initial installation. we suggest you de- To fine tune, rotate fine tuning knob in Peak) .eadrng and adjust mp .50... r... 19... NOTE: This control is factory pre-sct and current. resulting In longer CRT life and pro- video Information to the CRT. AND Ts 9193 & LATER Leave the mmaInIng c-z comm at maij CEDURE. USE CONTROL IDENTIFICATION controls for bait oilgralleconver vemca'f It? 3 ""9" "9 IFROM COLOR lNT CONT .-l4
guass the entire receiver and picture tube either direction for best picture and sound. center scale reading. .' normally should not require adjustment. The tools the high voltage supply from drawing ' mum Reduce BRIGHTNESS control so that RATHER THAN NUMBER SEQUENCE. CON- vertical lines or for an rr th gel: 0 e 3 PANEL "8" VERT INPUT 8i -III
with a conventional portable degaussing coll. Also see Frj LIGHT ADJUSTMENT and FTL RF AGC DELAY control should be adjusted excesswe current. Alternate Set-Up Set 6-2 controls to mid-mechanical position. ' . - - - - TROL LOCATION IS IDENTlCAL. . .E or a en 5 59" INT CONT
. . . VIDEO PEAKING CONTROL I ated 'r' . I I ad. . e .d I and cannot . . raster is just Visible. Adjust the other rm to correction by the disc magnets. us: insumtn mot 0N sllmuss cumin 5 I 5 PlNCUSHlflN CONVERGENCE 12
Focusmc ADJUSTMENT ADJUSMENT " "PPCE'b'B- . I, I "Mn (c Lsp'fo'rrrsctl'iiervlith'"§éé cgnil'ol if picture ABL Sewn (See Appropriate Control 1- me MW 3 5mm Ina ENE? {"I'°2.:".."°5..II°(§" (52 controls to Produce a white raster. Pro- NOTE The arrows shown on the conver- 7. Pre-adlust the differential tilt cont I COLORSVNC .. .. 11 '
Set brl mess and contrast for normal ic- FTI (FINE TUNING INDICATOR) on Video OutI ane ) C exhibits busy background or aippamm RF Location Detail) 2. Sat contrast and brightness controls to Iaavct eI '. contnrn'gr e gagdlflllt I: ceed with Step #7. gence panel diagram Indicate the normal (#8) to center of range Adjust horizonlgi FILTER +35V\:4 CONNECTOR PANEL H
ture. Tghan adjust focus control for bpast LIGHT ADJUSTMENT $29524??? agiwmfigflgflwfl:ugsflfgrfilg interference caused by cross modulation in 1 Set brightness and contrast control to gnaxlirgum. ABL t It th I t b (31:: till? stis-IgncSntroI's thaanfrlatch Itll; gun SB Increase ERIGHTNESS control until one $2?§{2§"§03I.§I'5° converging ""65 wm' 35 line controlA(#7) to make RAG center lines TRANSFORMER TP 15;; PANEL U
. . . . . , I - . ' ' , ' COIIVEI e. ' ' ' I
overall few; center 0 edge at screen. The. FTI, "3th lsdamvllitelhby PEI]: JEN!" gptlfiflum yd. 59°"E32IJ'I' '5 chIeIguenfiy VHF tuner maXImumII I l b tw h l the pigtllrlgehighligchtrs Inoeglr? toeblgorrll. Trig? 33h IthIehlowes; emISLIIon-BRIGHTNESS con of theIguhs Iqust produces a raster. Turn (5-2 Obtain a red-green raster by turning blue either gside g; thimsac'pegfi Shgalladcelgge'egugl 2] 22 23 24 25 ":1
DEFLECTI N YOKE carrier "1 9 V' 3° - e CllClII '5 ac 3'0" . "7' '5 "'5' 9 9, r " " . 2. Set c anne so actor a con c annes. b k ff ABL t I t , t . t bai at e {an e 0 e . - con ro o t is gun to minimum. Again in- 52 to minimum. Use Figure #5, the con. and exist in th dj , '- iu-l-'- .
TILT ADJUSTMENT lzuorllfgctIE/Dtdllidlftr; Sr\lalfIlilgIrIl ghgogiegfiligefrthl: :IgflTnaphzaLllglggbanllglIgUlHEOTIUIEEQIDCRWISO to 1A(I|iII.Istment IProctedure d' k 3. Connect a V 0M across ARC gate load (Iii: pgint of blggmricllg.° a Dom lus ow :;?t,erAtShg:lIndlmg;n eIizrIlIginIJIISeIIsésIII seIIIIttIIIrIlIg g: Clea brightnetss urntil giez nextt gunf jIlIlIst vggetnce IfianIel tdIiIIiIngam, hand tobIserve the 8. Adjust horizeu::arrediff;;crtlltfi:ll.filt control PANEL? ESBEB SsngLEAlIRELIER. NOT IN PAN - +70V
Loosen the yoke retainer clamp and rotate 45 75Mc carrier is detected and filtered. _ "I. I .- "5 559 0 a me "1 0| W93 518- resistors. (As described below) Check if ABL control is properly set as (0|. vencin BRIGHTNESS control toward max- 9 ° 5. a. 5 er. 1'" ' 9° "° ° . '5_ a BC .35 ' 5 3 e. a 3 can re ~ to make the center horizontal R-G lines cori- ,_ as _ u R _ ELS CODED RUG -
yoke until picture '5 strelght. D0 "0 Slide This DC voltage is used to turn on the FTI "5 RANGE ADJUSTMENT ~(COII L43 Emil. t I CW tl . b Chassis 75.915 "A" and B-Con- IOWSZ imum,ga point will be reached where the $23..nmtllTil:"1313:3223;"iciirftaspergcllrgc'lts tlll Admit R-Grtverltlcflal amtplIlItutrtle t° °I.°"V°'Ke verge I the center 0 "9, screen Dl be equal 5 8&LATER LOCATIUNIHT SINK
iizidmnationalized: 'iiéiitén uuhus wuuu or ru wuu logged ohcugr Page; .8 ege urge honoring. .iii er .. .. uuuu uuuuuu unsung .uu ruu . urgu. ig- . .. r... cider; .. n. ° °" ° ill. assisting: limit guuuce rm rm nu m m inn ii 5an non in.
j . . functionln ro erly. the FTI li ht 035 out an ane oca ion e al on t: assls . . . ' g . h ' j i. n - for normal viewin . tensity or vewing accompanie y sig t , . . . ' . . ~ 6y e necessary 0
32...? screws when adjustment '5 com- when 5 gregeiye is tuned "7" EPESPE picture; 1 TUne receiver to a color telécast. (IEI-Iuimxlzécw um "Olse dlsappeah or [S aggzifinta and F - See appropriate 3. Increase brighfiness control until some 220°7th ThIe MENU: 'eVeI'I °rbbl°fimm8 miflgulllglNitplgzugezacxlqlfglfafiferlhlgngggd Eénéglzsfingfi Ivelglcil It"; I cgnvergeISIIhe legljrséoliltelgglefililsiirl? and #riat to com. RAG VERT I" TILT 5 BDT Hgmz U 5 SETS %%0U0U[UEIIE 4.
' "0 Interference (920Kc beat. etc.) 15 visible 2- Set hue and tint control to rhid msohan ' '- - TS-919 A" and B"-Conr hi hli ht bloomln ls evident From this 5 0 0t "3355 W en t a '58 "355 with Ste #7 e '" a ° ° 5 fee" ep "355 escreen. TOP VERl l 4321 - \
. - While turning control to left (CCW), If RF ChaSSIs . E 3 3 : t |' (1 df rth r u bl m- p Re eat St #5 # # 98 +9
PICTURE CENTERING I" picture. ical position interference appears in ' nect VOM acmSS ABL Set-UP terminals point further Increase of the brightness con- 9"" "° '5 ii vance ," e. . 59 9° F EDS r 6. 7 and #8 for best ll] [HIIH
. picture. back off on . . i . . , - . . over ll . x "
Vertical and horizontal centering controls are FTI Adjustment Procedure 3. Adjust color oscillator output coll (3.53 control and set to position giving least back- located 0" '3 mega regulator transistor "0' 510" 0 change the bl'lEhIllBSS IGVEI gihfiggs cggtgfflrfigfl:{Lfitgfsds'rggfiég 6. With 6-2 controls set at mid-range. NOTE- If '5 range 9f the R G VETNCE" am linesa wfiikveé'agfifigl gri'fggteeguvgiltlfpafengjgg [fl +EI/I' . .

located on the chassis.

NOTE: Large control excursions may affect ._

Convergence.

VERTICAL SIZE 5. LINEARITV (Control;

located on Convergence Panel H")
Slight adjustments can be made with the

vertical size control without affecting vertical . . . . set-up procedure. . , outward However the proper ad'ustmant of t'l h . . . . .
- . just disappears. (clockwse) position for best flesh tones . trois corresponding to the predominant color - r 1 ill l e droop in the blue line Is In the NOTE. CASE OF
gflffrfigmgflggghgf".Hoflggeshflgf should 2. AdjustI 45. 7§Mc Ifrequency range coil (see OWNBTS Manual). BACKGROUND ADJUSTMENT to produce Whie picture highlights. 2:: UgggroUiinmgaUa:lslgl.t llfntlgll: czarlidililg: (Enter of the screen (Step #10). . VERTIEBL DYNAMICS 51F SYNC 1 UIII @ UV
(L-lP)Iuntll the light just goes out . HORIZONTAL & VERTICAL PROCEDURE (Control Locations: Video , exists. converge the lines by using the disc ' Adm. the blue horizontal phase "tl SOLID STATE RECTIFIER (HORI IN 2
HORIZONTAL SIZE 3. HIGH 3, Adm. Ffl SENSITIVITY conImI (R-12P D C t i V d D . P I NOTE. Leave the DRIVE control of the least I the droop in the blue line is forced upward EZF Z OUT I j /
VOLTAGE ADJUSTMENT (Control _loccted inside shield) until light just f'NEUdSH'oIE °°$IPE°IJ°NI lfglgtm's ' 5 °" 5 °" ' 5° "V3 ane predominant color at maximum. maenesi (Step #11). UN SOME CHASSISl roeraththllI lllll VL'Iii our
located on Pincushion Panel "G") comes on. 053 e 0 "mus '°" 3"" 12- Re-adlust blue horizontal amplitude '
1. Reduce brightness mm, ID mInImum 4, Repeat steps #2 and #3 until further Horizontal Procedure CONVERGENCE PROCEDURE contrel (#9) until blue line is converged on RZIF I
adjustment of coil will not cause the light Connect crosshatch generator to receiver lnr R-G line along a center horizontal line or for

Raster must be extinguished.

2. Meter 2nd anode voltage (2nd anode to
chassis ground).

3. At normal line voltage (122V AC). ad-
just control for 27Kv.

Alternate Method 1

1. Use a variable AC source (variac) and
adjust input to receiver to 102V AC.

2. Adjust horizontal size (high voltage) con-
trol so that the picture just makes horizon-
tal slze.

NOTE: At normal line voltage (122V AC)
and minimum brightness (raster extim
gulshed), the 2nd anode voltage should not
exceed 27KV,

Alternate Method 2

1. Connect crosshatch generator to receiver
antenna terminals.

(Control located on FTI Panel "P)
Fine tune for best picture. If light is on. or

', finetllning range too broad, lightgoes out

when Interference is present. Proceed as fol-
lows:

1. Fine tune for best picture to the point
when the interference (920Kc beat. etc.)

to go out. Then adjust SENSITIVITY control
to make the light just go out.

AFC (FT L-Fine Tuning Lock)
OPERATION (Not On All Sets)

The AFC is activated by the 45.75Mc carrier
in the video IF. The 45.75Mc carrier is
amplified and fed to a discriminator trans-
former tuned to the center frequency of
45.75Mc, Two (2) diodes in the secondary
of the discriminator rectify this signal and
provide a DC voltage relative to any fre-
quency changes produced by the variation
of the 45.75Mc carrier. This DC change is
fed to a varactor across the local oscillator
in the tuner. The resultant DC correction
voltage shifts the oscillator frequency as
necessary to maintain the video carrier
(45.75Mc) at its proper fine tuned position

oscillator amplifier) L-4S for cprrect flash
tones. »

, TINT,CONTROL Z

The tint control serves a dual purpose; on
black and White, it is normally set to ap-
proximately the center of its range. On color
prdgrams, It Is adjusted toward the right

put.

1. Reduce BRIGHTNESS control llntll roster
is just visible.

2. Adjust HORIZONTAL PINCUSHION con
trol until the side vertical lines just become
straight.

Vertical Procedure

1. Adjust BOTTOM PINCUSHION control to
maximum counterclockwise.

2. Adjust TOP PINCUSHION control (coll
for maximum downward bow atycenter and
bottom of raster. .

3. Adjust BOTTOM PINCUSHIDN control
clockwise for straight horizontal lines at bot-
tom of raster, .

4. Readjusf the TOP PINCUSHION call for
straight horizontal lines at top of raster. I
5. Repeat Steps #3 and #4 to optimize

ground noise and interference. If control has
no apparent effect, leave in maximum (CW)
Dosition.

After the RF AGO DELAY control has been
adjusted. the IF AGC control should also be
re-adiusted. It may be necessary to repeat
the RF and IF AGC adjustments to optimize
the tuner and IF performance.

heat sink. See appropriate detail.
4. Adjust ABL control for 3.3V DC reading
on VOM.

CHASSIS TS 915/919 "C" (it later

TS-915-Measure A.B.L, Voltage from pin
8F (Horiz. panel) to ground. Adjust A.B.L,
control for -l.lV. See note on detail.

or the degree of blooming.

C. If blooming Is excessive. repeat Steps
#1 thru #3 and check Steps A and B.

GENERAL CONVERGENCE
PROCEDURE

The following eight steps outline. in general.
the complete step by step convergence pro-
cedure that follows:

1. Demagnetize shadow mask with degauss-
ing coil.

2. DC converge all three colors in center
area of screen.

3. Adjust purity ring for center screen area
red. adjust yoke position for outer area red.
4. Set tint control to its mechanical center
and set black and white brightness tracking.
Properly center and size picture.
Dynamically converge all three colors.
Recheck Steps #2 and #3.

SPF?!"

Chassis TS-919-Remove speaker panel to
gain access to convergence panel 62 and ABL
controls. Turn phillips head screw located
behind trap door 90_ to left to unlock panel.
3. Check adjustment of vertical size and
linearity. vertical centering. horizontal cen-
tering and center of screen focus.

4. Demagnetize receiver (use degausslng
coil around front and all sides of CRT).

5. Turn color Intensity control to minimum.
Adjust red and green disc magnets for
super-imposed red and green pattern at the
center of the screen (see Figure #1).

6. Adjust blue disc magnet and blue lateral
magnet to place the blue pattern on top of
the red and green patterns (see Figure #1).
These preliminary adjustments are necessary
to have the three beams ill their approxi-
mate positions before purlty is adjusted.

PURITY

1. Tune receiver to a blank channel or
crosshatch generator pattern having a white
background. A white noise free raster can
beI obtained by setting tuner between chan-
ne 5.

2. Set contrast to minimum. brightness to
normal level and tint control to its mechan-
ical center.

3. Turn blue and green 6-2 controls to
minimum and red 8-2 to maximum.

ABL control just below the point of bloom-
ing. If there is insufficient brightness at
maximum brightness control setting. increase
ABL control setting to achieve sufficient
brightness just below bloomlng.

After the background has been adjusted, re-
adjust the ABL control as described in ABL

determine which gun has the least emis-
sion and leave this 6-2 control in mid-range
position. Adjust the other two G-2 controls
to produce a white raster. Proceed with
Step #7.

7. Set CONTRAST and BRIGHTNESS con-
trol to maximum. Reduce the DRIVE con-


ASSEMBIM {2th
I. mSlALL DEFKCIIDN vokr AGAINSI cm of cm
2. INSTALL couvrhcmcr voxt AS Show In lhstnr
s. luerlLl BLUE LATERAL a PUlIIrV hlhc AsstM
AGAINST nmvrncthct vclxt

ntrlrcvioli
voxtlirllllll inc

BLUEIATERAL

om RADIAL
smic ccfiv
nisc MAGNET

out: RADIAL I
smlc cullv
Illsc mom .

plituda and tilt controls is inadequate. move
the black wire to its opposite position (ter-
minal #6 or #7 an transformer) as Indicated
on the legend side of convergence panel.

Alternately repeat Stepsi#1 and #2 for best
convergence at top and bottom of center
vertical line. Best convergence is obtained
by super-imposing the lines from the center

SPRING

magnets.

Blue Horizontal Dynamics

9. Turn up the blue G-Z control and in-
crease tha blue horizontal amplitude to max-
Imum (Step #9).

10. Adjust the blue horizontal tilt control

equal displacement to permit convergence
With the disc magnets (Step #12).

Blue Vertical Dynamics

13. initially set Blue Vert Amplitude control
(14) to near max. (cw). Adjust Blue vertical
tilt control (13) to produce equal displace-
ment In the same direction of the Blue
horizontital tIlIines with drespect to red and
green 8 e 0 an bottom of .
(Step #13). p screen
14. Adjust the Blue vertical amplitude con-
trol (14) In conjunction with the Blue vertical
tilt control (13) to converge blue with R-G at
top. center and bottom of the screen.

NOTE: If the range of the blue vertical am~
plltude and tilt controls ls inadequate, re-
verse the positioning of the brown and blue
jumpers as indicated on the legend side of

Ill-nlll' I
BLUE VENT AMP


NURIZ lef TILT

llllllIZ BLUE A P

TS-915 CONTROLS 8t PANEL LOCATION

ilfllflll!
united!

«BLUE CENTER

. .\ I.
o @i
c . Gist-ii
RUG HURIZ SIZE-4--

HURIZUNTAL PANEL F" Lil Hilllll liLILD

HURIZ CENT

A.B.L. SET UP - CHASSIS CODED Ts-915lt'ltrla"0lt CHASSIS
WITH HORIZ PANEL CODED r-s AND EARLIER: MEASURE FROM
PIN at io 10F 0N HORIZ PANEL. ADJUST A.E.L. CONTROL

FOR 3.3V.

CHASSIS CODED TS-91§U'AND LATER OR CHASSIS WITH HORIZ
PANEL CODED F-9 AND LATER: MEASURE FROM PIN UP TO GROUND.
ADJUST A.B. L. CONTROL FOR -I.lV.

A.B.L. SET UP - CHASSIS CODED Ts-919'i'i" &"B"0R


2. Adjust HORIZONTAL SIZE control to with respect to the video IF response. correction at lop and bottom attest # BLUE DISC MAGNEI 4 Move yoke m obIaIn pattern as shown convergence panel.
maximum (fully CW). . AGC (AUTOMATIC GAIN CONTROL) Repeat Step 4. mm if; Fig. 2. covvtiisthctrort. NOTE: If the displacement 0f the blue line CHASSIS WITH HORIZ PANEL CODED H! AND EARLIER.
El. Reducet BIRILIISHTNESS control untll plc- (ggnéglzoQgIJOUnSSTgIENgTI-ngfigDUTRIE ADJUSTMENT PROCEDURE (Control WEN /BLUE BEAM 5. Starting with the colored same shaped :NUNIIUUNINSIRI mmm is not equal on both ends with i-Iespact to MEASURE BETWEEN A.B.L. TEST POINTS. ADJUSTA.B.L.
4urc istus VISI e. located on Video Amplifier Panel E") PURITY & CONVERGENCE '49 tabs on the purity ring together (Fig. 4), "WWW F; "5" 31 blue mum "It mm CONTROL FOR 33"-
RECU'UIN HORIZONTAL P'NCU-SH'Q" COR' Check operation of the AFC as fellows: De- - . spread them slowly and rotate the purity huh "CMW (39 #10) '5 0m 5 CHASSIS CODED TS-919IZ"& LATER on cmssls WITH HORIZ
control until the vertical lines on - h VHF f' t NOTE: The AGC control Is accurately ad- PROCEDURE CONVERGENCE . , l R tSt #10 #1 # -
both sides of raster are istrai ht feat For P""'"g ° °- 6 me e . t d t the facto Avoid unnecessary ad- ring as a unit to place the red area at the hithcohniittihr epea eps I, 1 and 12, if neces- PANELS CODED P9 AND LATER- MEASURE FROM LOWER TERMINAL
g ' knob. Fina tune to a station for best color jus e a ry. POINT center of the screen. See Fig. 2. VDKIIHIBLLIEIAIERAL sari/i 0 get a 53157301on convergence along '
5. ISet BRIOHTNESS and CONTRAST con- picture. FII (fine tune indicator) light should justment. I PRELIMINARY PURITY ADJUSTMENTS I... 6 Sl'd k t d h l l l I ASSEMBLYWITHIINIZ a center horizontal line or to get equal dls- \ s 4 \ CASE AT+76V DC T0 GROUND. ADJUSTA.B.L. CONTROL FOR -1.lV. PANEL GNU SCREWS l3]
gosst: ESNIIZ'UIVTAL SIZE l . . be out indicating receiver is properlyIfine 1. Tune receiver to the strongest statlon 1. Connect crosshatch generator to antenna GREEN RED and Uriah f ovIlIfart t iIeIOII'Ig n: I '5de on placement to permit correction with the disc W Hill HURIZ SWEEP REG 2 REMUV NOT IN PANELS PANEL GNU SCREWS [GI
e contra "3 mm" tuned. Push in fine tune knob to activate available. . terminals and fine tune for best picture, Set BEAM .. BEAM P s on orI es ov ra re I la . magnets. BLUE TILT IlDIIIZ \ E "NM BOTTOM CODED 53'1 REMOVE FNUM BUTTUM
mum (fully CCW)'.Ther." slowly 3". °°"' AFC circuit. FTI light should remain off and 2. Set NOISE GATE control to minimum brightness and contrast to normal. FIGURE 2 7. Level deflection yoke and tighten Y°k9 A 15. Raucheck disc magnets The page". HOV To 95"
10' until the vertical lines on both 155 °f the fine tuning should not change. If the (fully COW). I. 2~ Convergence panel is accessible from the DISC DISC clamps. / Mmtsiiiuli should now be converged . I SWEEP OUTPUT UUU AUDIO III"
I e raster are straight. light comes on or fine tuning changes when 3. Turn AGC control COW until picture her front of receiver. MAGNET MAGNET 8. check the purity of the blue and. green Ihnroiimsnsj The (52 t I h Id ' T0 FLYBACK ° TZI) IC \TIU o o" 5 4 3 2 l\0
NOTE: IAtI normal Iline voltage (122V AC) AFC is activated, make adjustments as comes unstable or horizontal pulling ls Chassis TS-915-Remove two (2) chassis l fieIds by turning down the red (5.2 and white baffgnrorflnstC-yeuneraqff sifictilitefglu: X'FORMER CASE AT+88V DC 10" LEI T, I l I I I
and minimum brightness (raster extin- follows: noted. Mam. screws and m (1) Inter... .9_ WWW RFAROFTUBE' turning up the blue and greenIG-Z controIs 92 .5 II... my 0;... dISmIBE'dI II Is possIbIe CONVERGENCE PANEL-FRONT VIEW __ .9- AUDIO I O I4-5M9 li- // I
talnins screw from rear of receiver and Pull I" 1"!"- N°"3Yr Wile" 1 lie P"Y '5 to set this control at its proper adjustment 2 i ii- RAT' in 50W "" ® 7- +35V 1
chassis forward so servicing positifnkknlnly F'GURE 1- STAT": 23:ffrefairglfreghaengeflgfiS'IIIEDgSIggufi'ts; FIGURE 4 COLOR TUBE ASSEMBLY a: tlow brightness while observing a locaj NOTE: THE CONVERGENCE PROCEDURE SEQUENCE MAY DIFFER FROM THAT SHOWN ; I ,1- PANEL BET INPUT 3.. iNTFEINJSUTv 15 '%3
power to secon an! service interoc pus CONVERGENCE . . . . / d h , 55 i0"- ON SOME CONVERGENCE PANEL DETAlLS (0N RECEIVER). FOLLOW PROCEDURE OUT- u: [5- "D" I I I I I 9- CONTROL '-
CDNNE REF" W'RE ml" CONNECT Grits" wms rlwui located on top of chassis. 811 Willy ""3 and. W We a" l e" '5' IF THE PURITY RING Is RE-ADJUSTED FOR I) rlLAMEllT 1 --- 0 5 3 2 1 To 23
Inlékwlgfs'hl P To .27PF cIM aIgKvaIthLII 1 To I.o PF GIM- check the other two fields. ANY REASON, THE ENTIRE CONVERGENCE LINE HERE' CONTROL LOCATION '8 'DENTICAL TRANS : o IU' INTENSITY '22
PROCEDURE MUST BE REPEATED. FIGURE 5 l 5: '; FRO; 0 a n, 45 CONTROL -21
IU\ ill 25 MC I FTI SENS CUNT
3- -. NIB TP 35
... HORIZ svch G) TRAP Mil [USE sm lllSL fo TUDL
9: a +35v l
' INPUT INPUT 4.5MC AUDIO our
FTI colL = .5 . v VIDEO IF " "
SMIIIFIIISEIGJINIIIIUGETIHM FTI. PANEL T LIT I. .- E E \ rNDTE: NEATSIIIK @ - 5 :BSV PANEL "B" ' - r F PANELIHIMD 4 o COLOR PAN
. l ' _ \ ' . A
III I .. .. I lg: 35 +auv III: l. W I use lNPurlPLiLsr coiLI FTI FREl] lllllllii @TRAP '4 giINEIIlI'IEELIi co, r45 / PANELS
F L COLOR PANEL 5 IS VARIMMNW - c: z PULSE Dolliof END 9_/"F"°C ONIIII RF m -~-----=. '3 L25 IN PANELS CODED CODED
. Disc FTI SENS coin m m/oss ocs ._ u a . HIIJRIZ 10- © '2 S~B& LATER COLOR 5'8 2.
5-7 . ut'rcn Pm well I.) .5 . 025 = z N 0 EU" I VIDEO OUTPUT o '1 SYNC FILTER WE"
TRANS liliT collili L ~ 015 g T945 w a -- r. r.
DEUIIIJSSIIIG Tlltrlllllsmll o 045 AMP R245 ISUllf LE" OUT 5 '2 385 Willill 3:2 A S M4341 W15 125 5 : l; E E PANEL F o 358 CW TRANSFORMER
c licoAILllp iiif§.§lhrcn h... 5 Team" III. is}? chiefs? @ ZNII clILlili If AMP .le "if"- i or... _ E g g g ii 5-PANEL "EH VIDEO AMP +35V\~0-5 OUTPUT COLOR osc II?"
.. I ITTLI mg m . ms IZK lfl g £3852 "our-"M gauge ;I:cus I 5: E ® 3 E g = I; 7- OUPIEUJT HORIIfIsgIIIVCNlIJIUITT\_4 up MM 12
~ ~ 3 . . 3 . 27 Fr a a --fl _ .r3 * -
I 12 J15 .5 , I l3 R r. E. cm I mm m gjfi g 2 =- . g_ 4, av lllJISE liIlT IllggégluLLSE +95v§sc2 s NINUIAIID'IHE L55 dggo HUE
DEGAUSSING TH ERMISTOR REPLACEMENT INSTRUCTIONS TS-915 & TS-919 FTL (AFC) PANEL T" g s still m V '- flit s 0 T an i i 1. "IIEL- o 'a FT 1 . . . . 5% . . ,1? WIIIEE l 535 i r . .(urasv o cm i
(Located 0.. FOWEISUpply Chassis) CONTROL AND ADJUSTMENT LOCATION legit s_9z_< I} /L g g g giIei E ll - us ,__. \ o lilililezo oli llillailir %o / " '3 -i
To replace thermistor, lift contact as shown, Do not bend. E310 """" ___ - pl z i / g § § 1 3 § c155 VERT OUEPUTBXIsEmR It. I '
. . . . . . e: 21 z 7.
in some chasms, thermistor IS located ln5lde of degausslng UNEISERED iii E 1! 5 2T /§ I § L: I -_ is I M35 O 5 4? 0 R168 IIDRIZ PIN Ljr NURIZ lllJLI] R23I; HURIZ GENT
I SWItCh and IS replaceable In the same manner. 3+ REG numhj 2 IXZCCU - 5: I T 0A3)? VERT CENT l l PIVERTSIZE I ' VIDEO DRIVE CONT o 05 4 3 2 LRE 0
IF AGC LP, rasv saunas . CONNECT neo rat-v sauna: . CONNECT eeo ; s on g: e 4.1x IN egg. | n CPI OUTPUT R12" CASE AT+80V Dc .5 E- I I D OUT
coNNecr WHITE WIRE FROM VHF TUNER LEAD FROM FTI PANEL "P LEAD FROM FTL PANEL "r" 'Sl RECT Pum- s»i g: 35 I 835 G nv 52 n _ IIIIII _/ I \ /D \P I
(LOCATIDNINSOME PANELsi more: usE EITHE: syuac: 233$; 0': TZlJi :F T ll Mill T 35V 35V T I V a; T E75 gfiglifigfinéns - I UIII I 0 ® BLUE E on GREEN OUT
"r" PANEL IF 0 L ° ACC LINE or either. as CPI . i our on
"'E AUDIO PANEL "D XEIIN NE E CULORSYNCUNE L' H mm Eggs 5 W / (I- ® IIIT I 30m 0
3 ms NIH I CONVERGENCE Rt 82 CUNT I
. VARIABLE GAIN VOLUME _ ,t 55" 3"\ VERT Llll "- ROI-S A ANCESSIBLE VIDEO OUTPUT % T2958 REF
IF PANEL B-ALTERNATE CONNECTING POINTS This is W W _ .0 I '2 I 0.... 3.2.5. ii... Phil-F- ' n n... hum ill: W $32me OF RECEIVER. SEE CHASSIS REMOVAL +35V '50 '"PUTa9vlLliIr i
. J2~9 Z M4342 Q75 . . TP 55 avé avg Into Efi . re doc to maven. min little I '7
- M4733, ME OR A3K M4732 AAA 0R ASK 1 32 XML Bill MP W Oils T l m ous - = : 0125 . . M AND hcvthe A5 sum or _ in e
mg . 95v mum BATE PULSE llMlTEll MAUI , h... s... .. wen rune {\rumixru... u) C 35/ Dlzr'l'En liner. Vi fill VERT T (7 ' "
Pureé first??? 3 .cr 3 in "333?" 3539.32? ""u I'VE lun'fil'gPlPflcmmIaIm FILTERED M4842 of irrigation. GAIED cliLlill still: llMP II!" R 1W 2 W illicit IJSC m com DSCIIUISE 8mm magma? cnloltAIsEElnilfrllfp" 39° tor n. PANELS H c on... 6/ (Ill 6 i o 0 ll 7 I II II" 1I1 II2 la 14 15 z. .
1 Arm-e K PLi-ji) R 5" " T HZ m 6285 lPF 2 4 W a: {ma TEE-I -/ J " o o
. g a fllml .22 v on our .42 _ - . \I I GREEN INPUT =-
, (ij 1K rev .3 . :5 5ch 3 s 9 C205 .1 czasllza I 052518: a e3? VIUEU UUTPUT PANEL M VlUEU DRIVER PANEL "L"
. .. ,. N. z 3- in :1 . _: ,. hf _ 2
I. . / g X... £12 c m -ll- ,2 142- £15 no : VERT our & cullv 5
.I. . l1 him till: = rifle u x is: 1 l = E '14
llT le - E I l! .15 'c40_i)5 ii ii .43
II §" 5% {higher iii-'lrilti'ériohn 3: 2 PE 333115.? ... .... .. gigvl ---il nth-Emits 27K PANEL H -lZ 5
AUDIO PANEL CIRCUIT FOR PANELS CODED D-4 AND EARLIER a gIl g 553 x 2.5 El? I 21 r g a e L: UT . 8.5.33 . s: :MTEL Inualflgzc? II -n E
(See Chassis Schematic for Panels Coded D-5 and Later) E j g /In_§ E :5§ c: "5 S s é a; 3": I: FCIEIIfl :- :2: fi: 165 2 3 5. RE/IJGZ g
e c. a ct c" I. E R m r E: H cats 22 Kl v' 5: o S m z
/u as 3-: res =5 W W LJL F 5 § A P PIE 5 P P O
K >- 2 ac '2' .__ 0 u s (AISuJ a >
15 m 21) E a __I i-sv P? V 25" F" V 30" P V oov rt- v12 -.l.- E; m-_- = " _- -_~ \. BLUE EZ§§ .
fair... 33 j I i sits: xiii: 5E
. $539333? I 5M7... I AGSSDESIEMIH-A mm 525%
EZBVB in.» In Mm 'nor rn PANEL m u more 0 o 40 TS-919 CONTROLS 8t PANEL LOCATION
tearful/L" "1qu A r s AC LINE REGULATED POWER SUPPLY COLOR PANEL CIRCUIT FOR PANELS CODED 3-7 AND EARLIER
7' T .,.;,_..(°; ":31 I'UT'ERD (In Chassis Coded "F" 23TS-915) (See Chassis Schematic for Color Panel Coded 8-8 and Later)

nlnr. nanoaiainzI-u _ . ._._