Kenwood KSW 6200 Service Manual

This is the 24 pages manual for Kenwood KSW 6200 Service Manual.
Read or download the pdf for free. If you want to contribute, please mail your pdfs to info@audioservicemanuals.com.

Page: 1 / 24
left right
Kenwood KSW 6200 Service Manual

Extracted text from Kenwood KSW 6200 Service Manual (Ocr-read)


Page 1

DVR76200(K)iut1p 038281432 «3? 1

DVD / AV RECEIVER

DVR-6200
KSW-6200

KENWOOD

SERVICE MANUAL

(DVT-6200)

© 2003-8 PRINTED IN KOREA
B51-5872-00 (K/K) 1679

I L

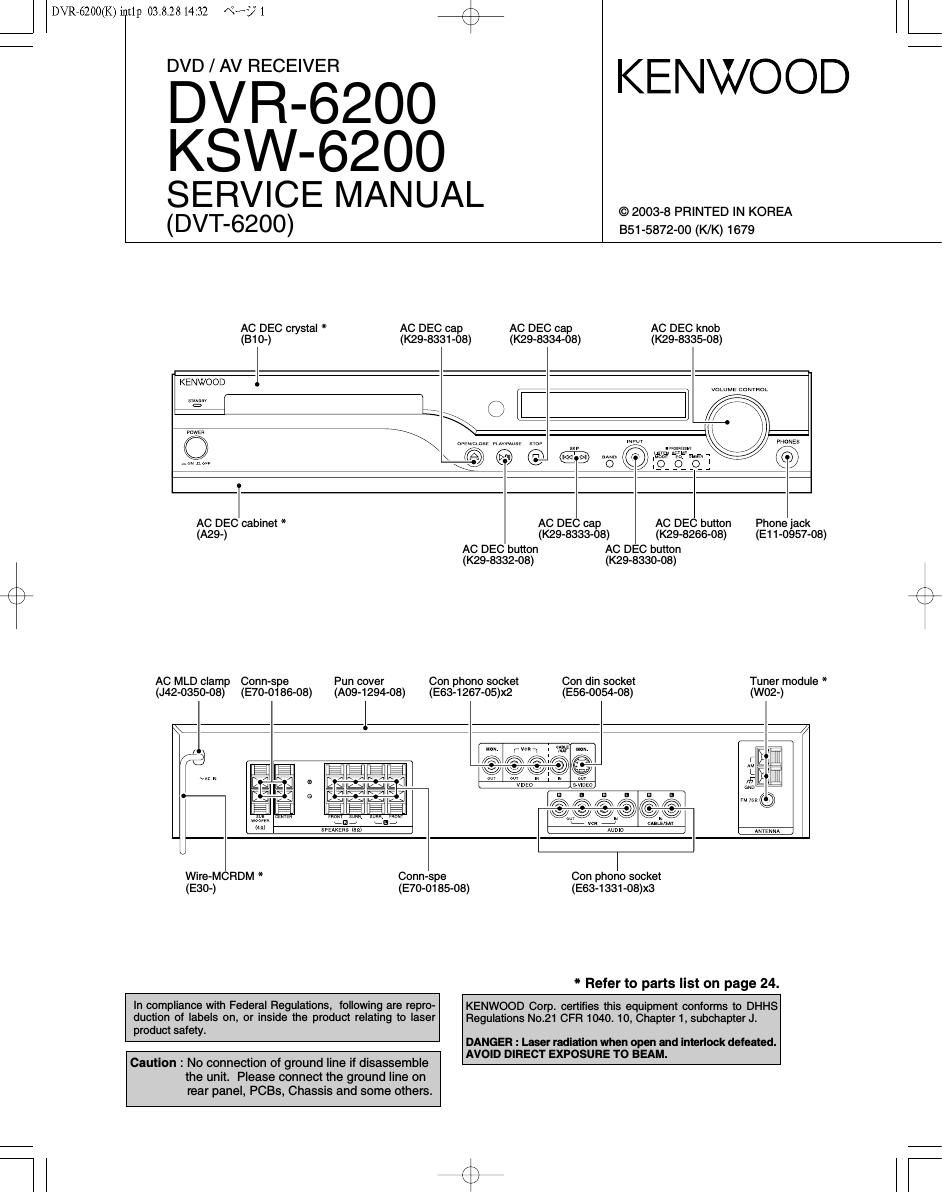
AC DEC crystal *

AC DEC cap
(310-) (K29-8331-08)

Ac DEc knob
(K29-8335-08)

AC DEC cap
(K29-8334-08)

KENWOOD I


pom ~\_

Q

us

AC DEC cabinet *
(A29-)

Pun cover
(A09-1294-08)

AC MLD clamp
(J42-0350-08)

Conn-spe
(E70-0186-08)

Con phono socket
(E63-1267-05)x2

AC DEC cap AC DEC button

(K29-8333-08) (K29-8266-08)
AC DEC button
(K29-8330-08)

Phone jack
(E11-0957-08)
AC DEC button
(K29-8332-08)

Tuner module *
(w02-)

Con din socket
(E56-0054-08)

spams (an)

is. fins 5% r5 (:9 f3
M w @ x/mv/

(_ m. 4 mum

Ammm

Wire-MCRDM * Conn-spe

(E30-) (E70-0185-08)

Con phono socket
(E63-1331-08)x3

* Refer to parts list on page 24.

In compliance with Federal Regulations, following are repro-
duction of labels on, or inside the product relating to laser
product safety.

Caution : No connection of ground line if disassemble
the unit. Please connect the ground line on
rear panel, PCBs, Chassis and some others.

KENWOOD Corp. certifies this equipment conforms to DHHS
Regulations No.21 CFR 1040. 10, Chapter 1, subchapter J.

DANGER : Laser radiation when open and interlock defeated.
AVOID DIRECT EXPOSURE TO BEAM.

Page 2

DVR76200(K)iut1p 03.8.2215:04 NV? 2 (N

ACCESSORIES / CAUTIONS

Accessories
FM indoor antenna (1) Loop antenna (1) Video cord (1) Speaker cords (6)
(T90-0882-08): MEX (T90-0896-08) (E30-1427-05) (E30-5480-08): RD

(T90-0907-08): K (E30-5962-08): WH

(E30-7005-05): VT
(E30-5482-08): GN
(E30-5483-08): GY
(E30-5963-08): BL

Remote COHII'OI UHII (1) SCART plug adaptor (1) Batteries (RS/AA) (2)
(A70-1647-08): KXM (Europe only)
(A70-1648-08): E (E69-0012-05)

SYSTEM CONFIGURATION

SYSTEM MAIN UNIT SPEAKER
DVT-6200 DVR-6200 KSW-6200

Cautions
Speaker model names

System Speakers

DVRaozoo szrszoo (Lelt speaker, right speaker. center speaker. surround speakers and subwooferl

Mile related Ir; bane/7171131127 andmmz/nen/

Beiore transporling or moving this unit. carry out the

far/lion M tn/rr/e/rsal/on
Condensation (ol dew) may oocurioside the unit vmen there isagreat

lollowing operations.
LSet the POWER ON/DFF switch Io theON
wilhout loading a disc.
2. Wait a lew seconds and verity that the display
shown appears.

3. Set the POWER ON/OFF swiich to OFF.

dtifsmnoe in temperature oetween this unit andths outside. Thisumt
may not Iuncfion properly lI eomlensetion oocurs. In tilts case, leave

fion has dried up.

Be spaciallycautious againsteonoensation inthe lollowing circum~
stances:

When this umt is caniedlrom one pleoe to anotheraerossalarge
dinerence in temperature, when the humidity in the mom where
this unit is installed increases, etc.

the unit in! arew hours and restart the operation aller the oondensa»

D I G I T A L
Manufactured under license from Dolby Laboratories.
DOLBY, Pro Logic" and the double-D symbol are
trademarks of Dolby Laboratories.

DIGITAL

SURROUND

DTS and DTS Digital Surround" are trademarks of
Digital TheaterSystems, lnc.

The marking of products using laser
(For counlnes other than U.S.A. and U.S.-Mill'tary)

CLASS 1
LASER PRoDucr

The marking this product has been slassrhed as class 1. it
means that there is no danger or hazardousradiation oulside
the product

Location, Back panel

CAUTION

VISIBLE AND INVISIBLE LASER RADIATlON
WHEN OPEN. DO Nor srARE lNro THE BEAM on
VIEW DIRECTLVWITH OPDCAL lNSTRUMENTS.

DO NOT PRESSON THIS SURFACE

Inside this laser proouet, a laser diode classified as classa laser radia-
tion is contalned as alerted by the internal caution label shown above. Do
not stare into beam or View directly with opueal instruments.

Location DVD laser pielr-up unit cover inside this produc|

Operation to reset

The microprocessormay fall into malfunction (impos-
sibility to operate erroneous display, etc.) when the
power cord is unplugged while power is ON or clue to
an external factor.

In this case, switch offthe power, wait for severalseo-
anus, and then switch the power on so in.

Return to the factory defaults by resetting the micropro-
cessoris done as shown as follows.

o Press the MENU key on the remote to enter SETUP

MENU.

6 Select the PREFERENCEthen press the ENTER key.

9 Select DEEAqus, press the Cutsoe light l>l key to
select RESET.

0 Press the numeric keys as shown below.

PressE . E ,El .then press the ENTER key.
When resetting is done according to this method, all set-
tings, tncluding the settings tor password and parental level,
will be reset to the rectory delaults .

i