Kenwood DPX 9010 Service Manual

This is the 57 pages manual for Kenwood DPX 9010 Service Manual.
Read or download the pdf for free. If you want to contribute, please mail your pdfs to info@audioservicemanuals.com.

Page: 1 / 57
left right
Kenwood DPX 9010 Service Manual

Extracted text from Kenwood DPX 9010 Service Manual (Ocr-read)


Page 1

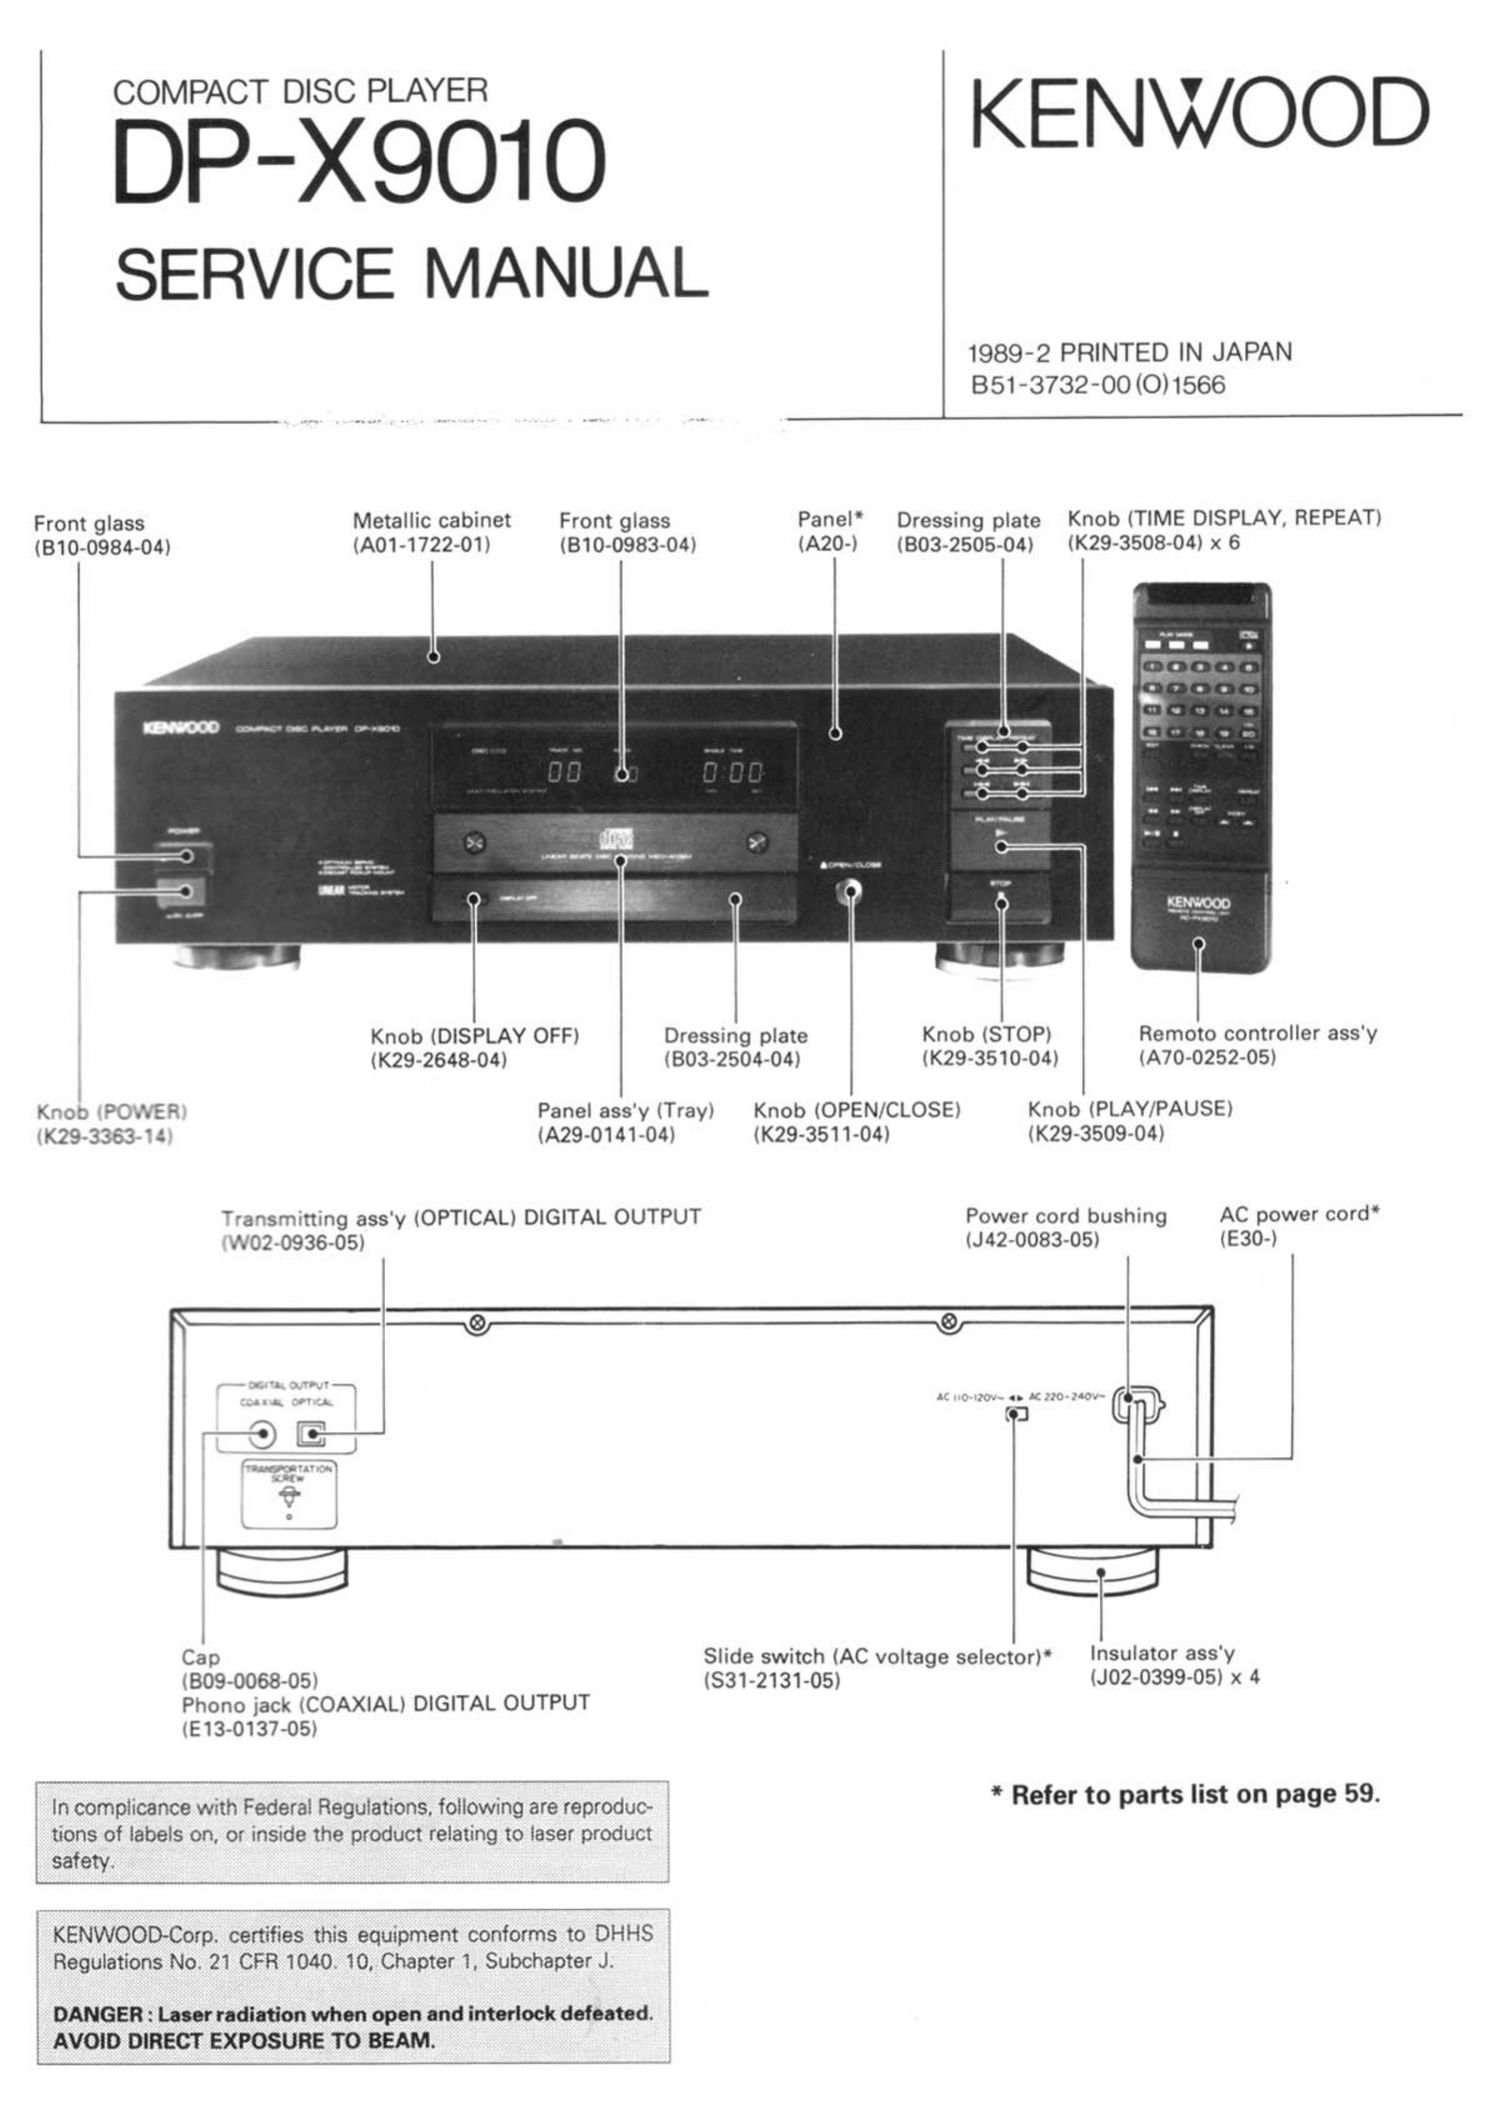
COMPACT DISC PLAYER

DP-X901 O

Metallic cabinet
(A01-1722-01)

Front glass
(810-0984-04)

Knob (DISPLAY OFF)
(K29-2648-04)

Knob POWER
tK29-3363 14

Front glass
(B10~0983-04)

Panel ass'y (Tray)
IA29-0141-04)

SERVICE MANUAL

KENWOOD

1989-2 PRINTED IN JAPAN
851-3732-00 (0)1566

Dressing plate
(803250404)

Transmitting ass'y (OPTICAL) DIGITAL OUTPUT

W02-0936-05)

Panel
(A20-l

Dressing plate
(803-2505-04)

Knob (STOP)
lK29-3510-04)

Knob (OPEN/CLOSE)
(K29-3511-04I

Knob (TIME DISPLAY, REPEAT)
(K29-3508-04) x 6

Remoto controller ass'y
(A70-0252-05)

Knob (PLAY/PAUSE)
(K29-3509-04)

AC power cord
(530-)

Power cord bushing
(J42-0083-05)

Cap

(809-0068-05l

Phono jack (COAXlAL) DIGITAL OUTPUT
(E13-0137-05)

tions of labels on, or inside the product relating to laser product
safety.

In complicance with Federal Regulations, following are reproduc-

Slide switch (AC voltage selector)

(531-2131-05)

Regulations No. 21 CFR 1040. 10. Chapter 1, Subchapter J.

DANGER : Laser radiation when open and interlock defeated.
AVOID DIRECT EXPOSURE TO BEAM.

Insulator ass'y
(J02-0399-05) x 4

* Refer to parts list on page 59.

Page 2

CONTENTS/BEFORE OPERATION

Contents
BEFORE OPERATION .............................................. 2
CONTROLS AND INDICATORS .............................. 3
SYSTEM CONNECTIONS ........................................ 4
DISASSEMBLY FOR REPAIR
1. Removing the mechanism ........................... 6
2. Removing the front panel and the boards.. 7
3. Replacement procedure of laser pickup ..... 8
4. Replacement procedure of yoke ass'y ...... 10
5. Removing the sub chassis and
the insulators ............................................... 1 1
6. Replacing the disc motor ........................... 11
7. Removal and replacement procedure
of tray ass'y ................................................. 12
BLOCK DIAGRAM .................................................. 13
CIRCUIT DESCRIPTION
1. Description of components ........................ 15
2. CD player unit (X32-1310-00) ..................... 17
3. Set mode flowchart .................................... 18
4. Test mode .................................................... 19

Befor operation

. Transportation screw

5. Microprocessor pPD75212ACW-051
(X32-1310-00 : IC14) .................................... 24
6. RF AMP. CXA1081S (X29-1960-00 : IC1).... 26

7. Servo control CXA1244$
(X32-1310-00 : lC8) ...................................... 28
8. Signal processor CXD112502
(X32-1310-00 : ICIO) .................................... 31
MECHANISM OPERATION DESCRIPTION .......... 34
1. Tray OPEN operation .................................. 35
ADJUSTMENT ....................................................... 39
REGLAGE ............................................................... 40
ABGLElCl-l .............................................................. 41
PC BOARD (COMPONENT SIDE VIEW) ............... 45
PC BOARD (FOIL SIDE VIEW) ............................... 49
SCHEMATIC DIAGRAM ......................................... 53
EXPLODED VIEW (MECHANISM) ................ ........ 57
EXPLODED VIEW (UNIT) ...................................... 58
PARTS LIST ............................................................ 59
SPECIFICATIONS ................................ BACK COVER

Remove the screw using a coin or screwdriver. etc.

screw to its Original position as indicated below.

"ON". Then turn "OFF" Disc - the power.

3. Firmly tighten the transportation screw.

Before operation. remove the red-headed screw attached to the
bottom of the unit used during transportation from the factory.

0 After removing. retain the screw at the rear of the unit.
0 When the unit is to be tranSported again, be sure to place the

1. Turn ON the power switch when no disc is loaded.

2. Wait a few seconds until the disc OUT indicator-comes

Unit securing hole
for transportation


Transportation screw

Transportation screw
access hole l

Page 10

DISASSEMBLY FOR REPAIR

4. Replacement procedure of yoke ass'y

1 . In the sequence exposed in "3. Replacement proce-
d3e of laser pickup", disconnect the flexible cord
( ).
2. As shown on the right, remove the two screws (0 l
of the acryl plate fixing the flexible cord.
Note: In this case, be sure to make a solder bridge to
prevent the static breakdown.

3. Unsolder thoroughly at four points the left and right
yoke assies of the flexible board supplied as an ac-
cgsory to the laser pickup by a solder absorber
( ).

Note: If any pin of yoke ass'y is heated for an
extended period of time or is subject to the
application of an excessive force, it may be
broken or come off.

4. Remove the four screws (9 ) fixing the laser pickup

holder and yoke assi'es.

5. Remove the four screws ( G ) at the sensor section
yoke assy and drive section yoke ass'y.

Note: In each yoke ass'y. a coil magnet is incorpo-

rated. lf disassembled, a load can be applied
in the sliding action or unwanted matter
(screw, lead cutting dusts, etc.) can adhere to
the magnet.
Moreover, after completion of repair, also
check whether or not unwanted matters such
as screw, lead cutting dusts, etc. adhere to
the magnet.

Solder absorber

10

Page 24

5-2. Explanation of terminals

CIRCUIT DESCRIPTION

Pin No. Pia llama llO Function
1~4 Pd~Pa 0 FL segment control pins (also for key scan signal).
5 SENSE I Signal processing, detection of SENSE from servo IC.
6 WFCK | Q-data read clock pulse input pin.
7 SUBO | O-data input pin.
8 w | Sled limit switch (At innermost : "L").
9 RCI l Remote control input pin.
10 SCOR I Sub-code frame sync detection signal input pin (Input from CXD112502).
11 FOK l RF amplifier FOK signal input pin (At the RF signal is sufficient value : "H").
12 GFS | Frame sync signal input pin (In frame sync : "H").
13.14 - - Unused.
15 DIRC O Servo IC DIRC pin (Output to CXA12448).
16 MUTG 0 Signal processing IC MUTE pin (Active "H").
17.18 - - Unused.
19 W | Tray open switch (Open : "L").
20 W I Tray close switch (Close : "L").
21 ~24 K1 ~K4 I Key matrix key return input pins.
25 DATA 0 Signal processing. servo IC control output pin (Control data signal).
26 XLT 0 Signal processing, servo IC control output pin (Control data latch signal).
27 CLK 0 Signal processing, servo IC control output pin (Control data send clock signal).
28 m. 0 Laser ON/OFF signal output pin (Active "L").
29 - - Unused.
30 X1 l System clock pulse input pin.
31 - - Unused.
32 ______\_/SS - GND.
33,34 - - Unused.
35 OPNM O Tray open/close motor drive signal output pins.
Normally ........... OPNM : "",L CLS.M : "L"
36 CLS.M 0 At open ............ OPNM : H" CLS.M : "L"
At close ............ OPNM : "L CLS.M : "H
37.38 - - Unused.
39 R-ESfi | Reset input pin (Active "L").
40~51 GllTO)~G12(T11;NC) 0 FL digit control pins.
52 T12 0 FL digit control pin. j
53,54 - - Unused.
55 Pk 0 FL segment control pin (also for key scan signal).
56 VLOAD | FL driver negative power supply (-30V).
57 VREF l FL predriver negative power supply (-5V).
58~63 Pj~Pe 0 FL segment control pins (also for key scan signal).
64 V00 - Power supply (+5V).

25

Page 32

Termhal

CIRCUIT DESCRIPTION

Tarmhd

No. name . IIO Function
1 44 RA07 0 Address output of external RAM ADDRO7
45 RA08 0 Address output of external RAM ADORO8
46 RA09 0 Address output of external RAM. ADDROQ
_ 47 RAID 0 Address output at external RAM ADORIO
48 RM 1 0 Address output of external RAM ADOR11 IMSBl
49 RAWE 0 Write Enable signal output to external RAM (Active at "l."l
50 RACS 0 Chip select Signal Output toexternal RAM lActive at "L"l !
51 C4M 0 Crystal divrdtng Output f= 4 2336 MHz.
52 V55 - GND (O V).
53 XTAI I Crystal oscillator input. f: 8 4672 MHz or 16 9344 MHz depending on the mode selected
54 XTAO 0 Crystal oscillator output. f= 8 4672 MHz or 16 9344 MHz depending on the mode selected
55 M01 I Mode select input 1.
56 M02 I Mode select input 2.
57 M03 I Mode select input 3
58 SLOB I Audio data output code select input 2's complement output when ".L" offset binary Output when "H"
59 PSSL I Audio data Output mode select input Serial output when L parallel Output when "H"
60 APTR 0 Aperture compensation control output "H" when R-ch.
61 APTL 0 Aperture compensation control Output. "H" when L»ch.
62 0A01 O 0A01 (parallel audio data LSBI output when PSSL = "H CIF. output when PSSL= "L"
63 0A02 0 0A02 output when PSSL= "H C1F2 output when PSSL= "L"
64 0A03 O 0A03 output when PSSL = H" C2F1 output when PSSL = "L"
65 0A04 O DA04 output when PSSL= ""H C2F2 output when PSSL= L"
66 0A05 O DAOS Output when PSSL = "H CZFL Output when PSSL = "L"
67 DA06 O DA06 Output when PSSL = ",H C2PO output when PSSL = "L
68 DA07 0 DAO7 output when PSSL = 'H, RFCK output when PSSL = "L
69 DA08 O DA08 Output when PSSL = "H, WFCK output when PSSL = L"
70 0A09 o 0A09 output when PSSL = "",H Flo-Koutout when PSSL= "L"
71 DAlO O DA10 output when PSSL = "H', UGFS output when PSSL = "L"
72 0A1 I O 0A1] output when PSSL= H" GTOP output when PSSL= "L"
73 V00 - Power supply I + 5 VI.
74 DA12 O 0A1 2 output when PSSL = ',"H RAOV output when PSSL = "L"
75 DA13 O 0Al3 output when PSSL = "H C4LR output when PSSL = "L"
76 0A14 O DA14 output when PSSL = ",H CETG output when PSSL = "L"
77 0A15 0 ONE) output when PSSL= "H, C210 output when PSSL= "L'.
78 0A16 O 0A16 (parallel audio data MSBl Output when l:SSL = ",H DATA output when PSSL = "L"
79 WDCK O Strobe signal Output. 1764 kHz when 0F is ON, 88 2 kHz with CX011250 or when CF is OFF
80 LRCK O L Strobe signal output 88.2 kHz when 0F is ON, 44 1 kHz With CX011250 or when OP is OFF _ d
Not:
2: E; 3 Error correction status monitor output for C1 decode. UGFS : Non-protected frame sync pattern output.
C 2F1 : . . GTOP : Frame sync'protect statue draplay output.
C2F2 J Error correction status monitor output for C2 decode. RAOV: :BLLrarxtutter aboorptron RAM overflow end underflow
cm. C°"°°"°" m? "9" 6° "W WM" h" °"°""V can : Strob: «$7 352.8 m: when or is ON, 176.4 m:
°°"°.°d co m 6' '.m' b' °°"°°.°" with cxor 1250 or when or: is OFF.
C2PO 2 C2 pornter sognal. Synchronized to the audto data output. 571-5 : C210 invert output.
"c : 25:4'33: °'°°" "9"" 735 H "M" '°°"°" ° "° c210 : Bit clock output. 4.2336 MHz when or is ON.
wrcx: Write mime clock output. 7.35 MHz when locked to the 0 AT A: :01 6:22:33: 3:21:33 °' "h F " OFF'
_ crystal line.
PLCK : VCOIZ output. f-4.3218 MHz when locked to the EFM

signal.

Page 37

MECHANISM OPERATION DESCRIPTION

Subsequently, 81 (clamper UP switch) turns ON by Loadino DC mowrlM2l
the groove at the upper side of the main gear, and the
loading DC motor (M2) rotates in the direction of an
arrow (0) to pull the wire via the belt (Figure 10).

As shown in Figure 1 1, a foot is given under the tray
bearing by which the tray is installed to the rod. This foot
works to turn ON/OFF S4 (tray OPEN switch). The
loading DC motor (M2) rotates until 84 is turned ON by
this foot to open the tray.

Note: The tray CLOSE operation is reverse to the ,
tray OPEN operation in respect to the opera-
tional sequence. Therefore, the description
of the tray CLOSE operation is here omitted.

Pully B2

PuIIey BI

4,

_

Tray OPEN switchlS4I

Fig. 11 Tray OPEN operation (4)

Page 42

ADJUSTMENT/REG LAGE/ABGLEICH

i CH1 RF
1.0V/div

\\\)};i....'.j:l.'

CH2 E.Spot
0.1V/div

CH2 only

(Photo. 4)
(Photo. 4)
(Foto. 4)

(2usec/div) L PrOiection
PYOJBCIIOH

Hervorstehung


CH1 RF
1.0V/div
0(V)
CH2 T.Error
2.0V/div
<--O(V)
. (Photo. 5)
(20msec/dw) (Photo. 5)
(Foto. 5)
,u-.~o°.""'-"
\\ vvvvv.v."'g"'fi'a'h'l
' I ' RF signal
A 6 ..4 0.0.A.. . a 4 A 4
\s'474'6?4'o.'c . A" .37..
. (Photo. 6)
(0.5m/dw) (Photo. 6)
(Foto. 6)

AC coupling for

RF signal and E.Spot signal in test mode (PLAY).

If the diffraction grating has been adjusted properly,
the influence of triggering is observed on the E.Spot
waveform of approx. 12us after RF signal, in the form
of a projection.

0 Signal RF et signal E.Spot en mode detest (PLAY)

Si le réseau de diffraction a été ajusté correctement,
linfluence du déclenchement s'observe sur la forme
d'onde E.Spot d'environ 12us apres le signal RF, sous
la forme d'une projection.

RF-Signal und E.Spot-Signal im Testmodus (PLAY).
Wenn das Diffraktionsgitter richtig eingestellt wurde,
wird der EinfluB des Triggers in der E.SpotAWellenform
etwa 12115 nach dem RF-Signal in der Form einer
Hervorstehung beobachtet.

Couplage CA pour canal 2 seulernent
AC-Kopplung nur fUr Kanal 2

RF signal and T.Error signal, in test mode (Focusing
ON). (Disc type 4)

Adjust T.Error so that the waveform is symmetrical
above and below 0V. (VRl of X29-1960)

Signal RF et signal T.Error, en mode test (mise au
point ON). (Disque de type 4)

Ajuster T.Error pour que la forme d'onde soit symétri-
que en-dessus et au-dessous de CV. (VRl de X29
1960)

RF-Signal und T.Error-Signal; im Testmodus (Fokus-
sierung eingeschaltet). (Disc-Typ 4)

T.Error so einstellen, dalS die Wellenform dber und
unter OV symmetrisch ist. (VRl von X29-1960)

RF signal in test mode (PLAY).

Perform the tangential and focusing offset adjustments
so that each of the center cross points are focused into
one point on the display. The crossing points above
and below the center shall also be displayed clearly.
Signal RF en mode detest (PLAY)

Effectuer les ajustements d'offset tangentiel et de mise
au point pour que chacun des points de croisement
central soit mis au point sur un point de l'affichage.
Les points de croisement au-dessus et en-dessous du
centre doivent aussi étre affichés clairement.

RF-Signal im Testmodus (PLAY).

Die Tangential- und Fokusversatz-Einstellungen so
durcthhren, dalS jeder der mittleren Kreuzungs~

punkte in einem Punkt auf dem Display fokussiert wird.
Auch die Kreuzungspunkte Uber und unter der Mitte
mUssen klar angezeigt werden.

43