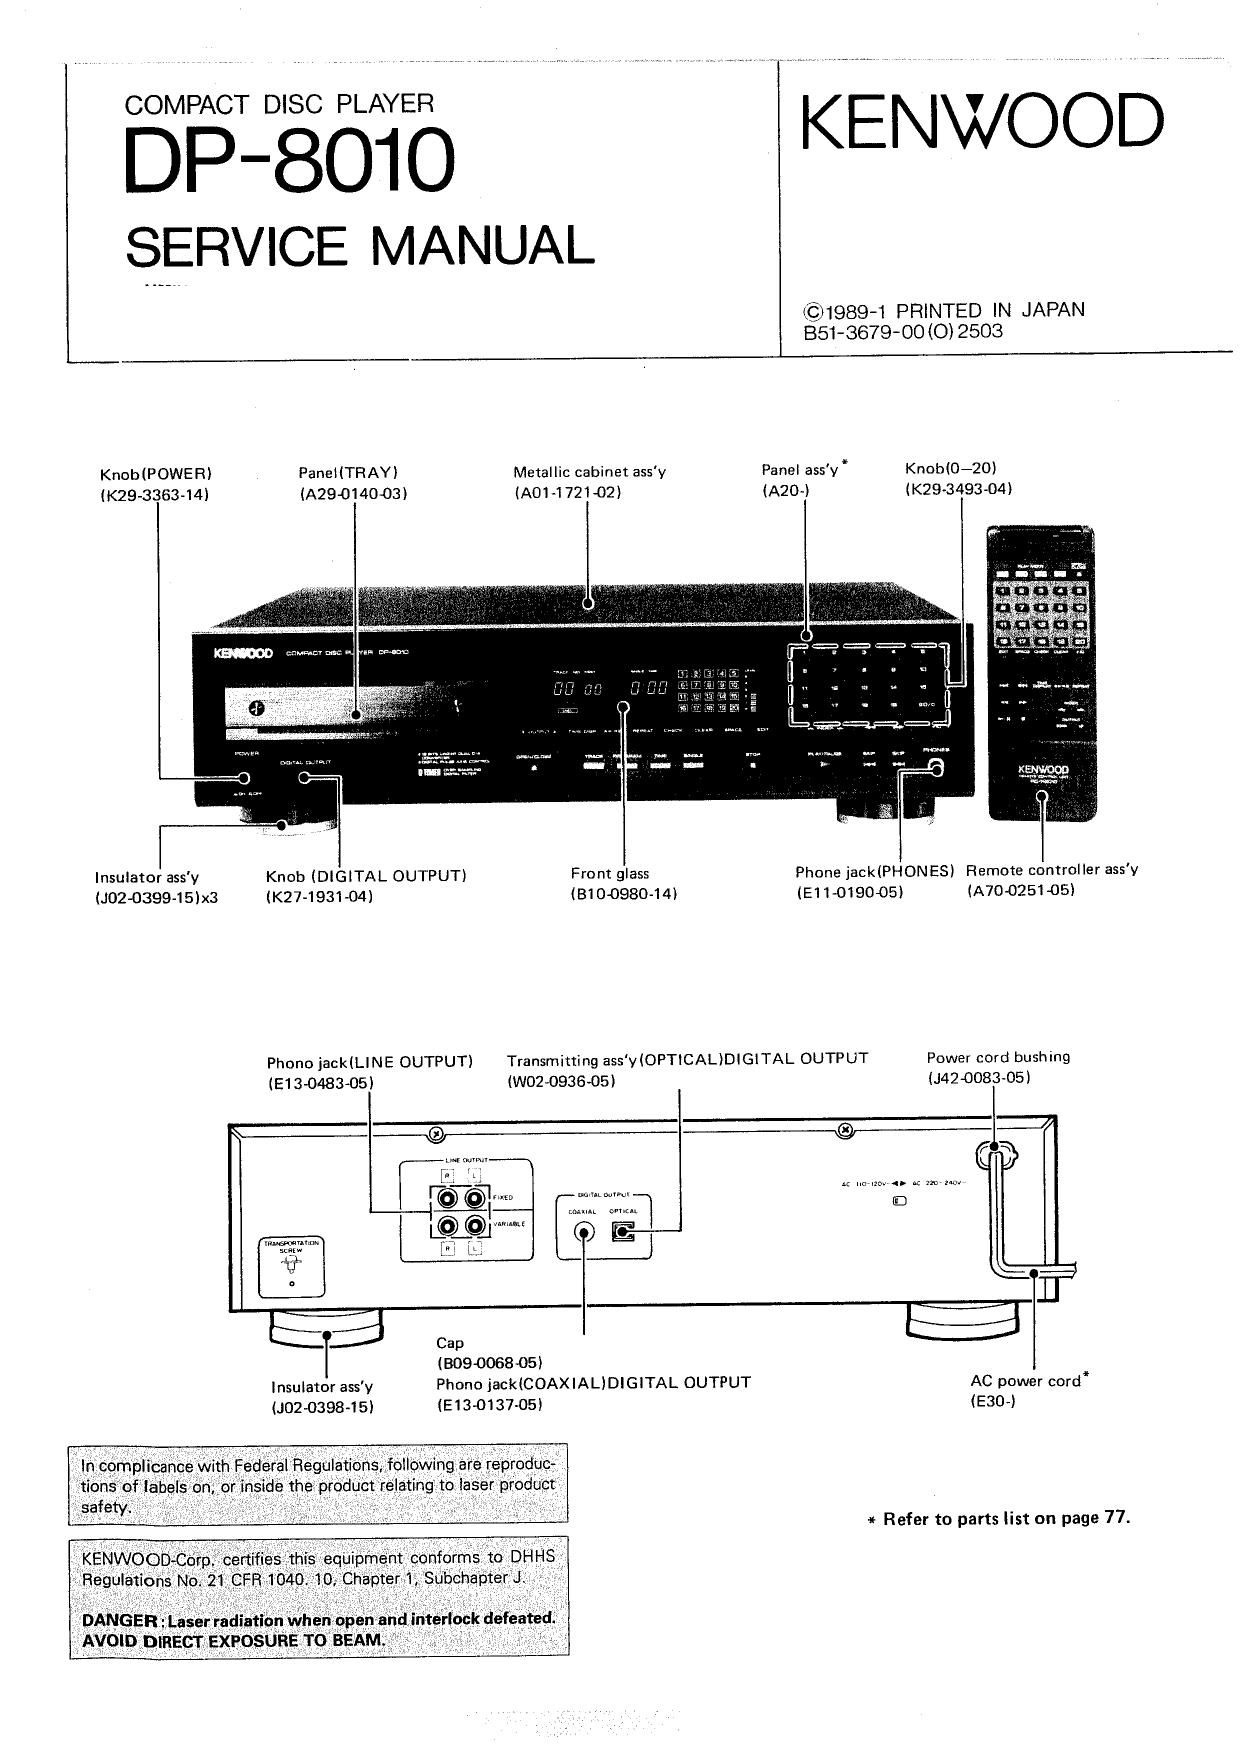
Kenwood DP 8010 Service Manual

This is the 78 pages manual for Kenwood DP 8010 Service Manual.
Read or download the pdf for free. If you want to contribute, please mail your pdfs to info@audioservicemanuals.com.

Page: 1 / 78
left right
Kenwood DP 8010 Service Manual

Extracted text from Kenwood DP 8010 Service Manual (Ocr-read)


Page 1

COMPACT DISC PLAYER

SERVICE MANUAL

©1989-1 PRINTED IN JAPAN
851-3679-00 (o) 2503

KnoblPOWER) PaneHTRAY)

Meallic cabinet assy Panel ass'v * Knob(O-20)
(K294336344) (A29014003)

(A01A1721-02) (A20~) (K294349304)


Insulator ass'y Knob (DIGITAL OUTPUT) Front glass Phone jacktPHONEsy Remme controller assy

(J02-0399-15)x3 (K274931011) (B1 00980-14} 1E1 1-019005) (A700251-05)

Phono iack(L|NE OUTPUT) Transmitting assy(0PTtCAL)DlGlTAL OUTPUT Power cord bushing
(E1 30483435) (WO2JDB36-OS) (.142008305)


«2: Q


» "0129-4 o x mm-

rag?

pwf
' Ezfi

(509006805)
Insulator ass'y Phone jack(COAXIAL)DIGITAL OUTPUT AC power cord
02-03984 5! (EU-0137435) (ESOv)

* Refer to parts list on page 77.

Page 2

DP-8010

CONTENTS/BEFORE OPERATION

Contents

BEFORE OPERATION .................
CONTROLS AND INDICATORS ..
SYSTEM CONNECTIONS .....
DISASSEMBLY FOR REPAIR
. Removing the mechanism .....
. Removing the front panel ..
. Replacement procedure of laser pickup .
. Replacement procedure of yoke ass'y ....... 1
. Removing the sub chassis and

the insulators .....................
. Replacing the disc motor .
. Removal and replacement procedure

of tray ass'y
BLOCK DIAGRAM
CIRCUIT DESCRIPTION
. Description of components .......
. CD player unit (X32-1250-XX)
. Set mode flowchart ...................
. Test mode .................................................... 21
. Microprocessor uP075212ACW-051

(X32-1250-XX : IC104) ................................. 26
. RF AMP. CXA1081S (X29-1960-00 : ICI) 28


#WN


015de

\IQ

(SI-bIhJNd

0:

Before Operation

0 Transportation screw

Before operation, remove the red~headed screw attached
to the bottom of the unit used during transportation from
the factory Remove the screw using a coin or screwdriver.
etc.
. After removing. retain the screw together with the
Warranty card and other documents.
- When the unit is to be transported again, be sure to
replace the screw to its original position.

1. Turn ON the power switch when no disc is loaded.

2. Wait a few seconds until the dISC OUT indicator comes
"ON". Then turn "OFF the powert

rm

3. Firmly tighten the transportation screw.

7. Servo control CXA1244$

(X32-1250-XX : IC103) ................................. 30
8. Signal processor CXD112502
(X32-1250-XX : IC11) ................................... 33

9. 18-bit serial input D/A converter PCM58P
(X32-1250-XX : (66,7) . .......... 36

10. 8x over-sampling digital filter SM5813AP
(X32-1250-XX : ICS) ..................................... 38

11. D.P.A.c Ic TC17GOO8AF-8060

(X32-1250-XX : |C15) ............................
MECHANISM OPERATION DESCRIPTION
1. Tray OPEN operation ...........................
ADJUSTMENT
REGLAGE
ABGLEICH
PC BOARD (COMPONENT SIDE VIEW) .....
PC BOARD (FOIL SIDE VIEW) ..
SCHEMATIC DIAGRAM ............
EXPLODED VIEW (MECHANISM) . . 75
EXPLODED VIEW (UNIT) .. . 76
PARTS LIST ........................ 77
SPECIFICATIONS ................................ BACK COVER

44
. 48
49
53
. 54
55
59
. 63
. 67

Unit securing hoie
(or transportation

Transportation screw
access hole

Page 6

DP-80IO

DISASSEMBLY FOR REPAIR

1. Removing the mechanism

1i Remove the six screws (0) at the both sides of the
case and the two screws (9) at the rear, and take
out the case in the direction of arrow ( o ) while
holding slightly open the both deep sides of the case
in the directions of arrows (e ).

2. When the gear which is moved through the worm
from the clamp DC motor (Mi ) is slowly rotated in the
direction of arrow (9), the clamp mechanism rises,
Next, push the left rear portion of the tray in the
direction (arrow (0)) of the front panel, and the tray
will come out forwards
Unless the tray comes out forwards even by pushing,
it can be assumed that the clamp mechanism is not
undone sufficiently. Therefore, rotate the said gear
once again in the direction of arrow ( 9 ) as shown
on the right.

3. Detach the panel by slowly pushing it up in the
direction of arrow ( G ) from below.

Then, push back the tray slowly to its original position
in the direction of arrow ( 0 ).

4. Remove the four screws (6) fixing the mechanism
and remove the one GND screw (6 l.
5. Disconnect the five connectors running out of the
mechanism (a ).
On PC board X324 250 (N4) :
CN4 (GRN) - 4P
CNS (WHT) - 4P

CN7 - HP
CNlO -- 9P

On PC board X32-1250 (8/4) :
CN12 - 2P