Kenwood DDX 6034 HU Service Manual

This is the 106 pages manual for Kenwood DDX 6034 HU Service Manual.
Read or download the pdf for free. If you want to contribute, please mail your pdfs to info@audioservicemanuals.com.

Page: 1 / 106
left right
Kenwood DDX 6034 HU Service Manual

Extracted text from Kenwood DDX 6034 HU Service Manual (Ocr-read)


Page 1

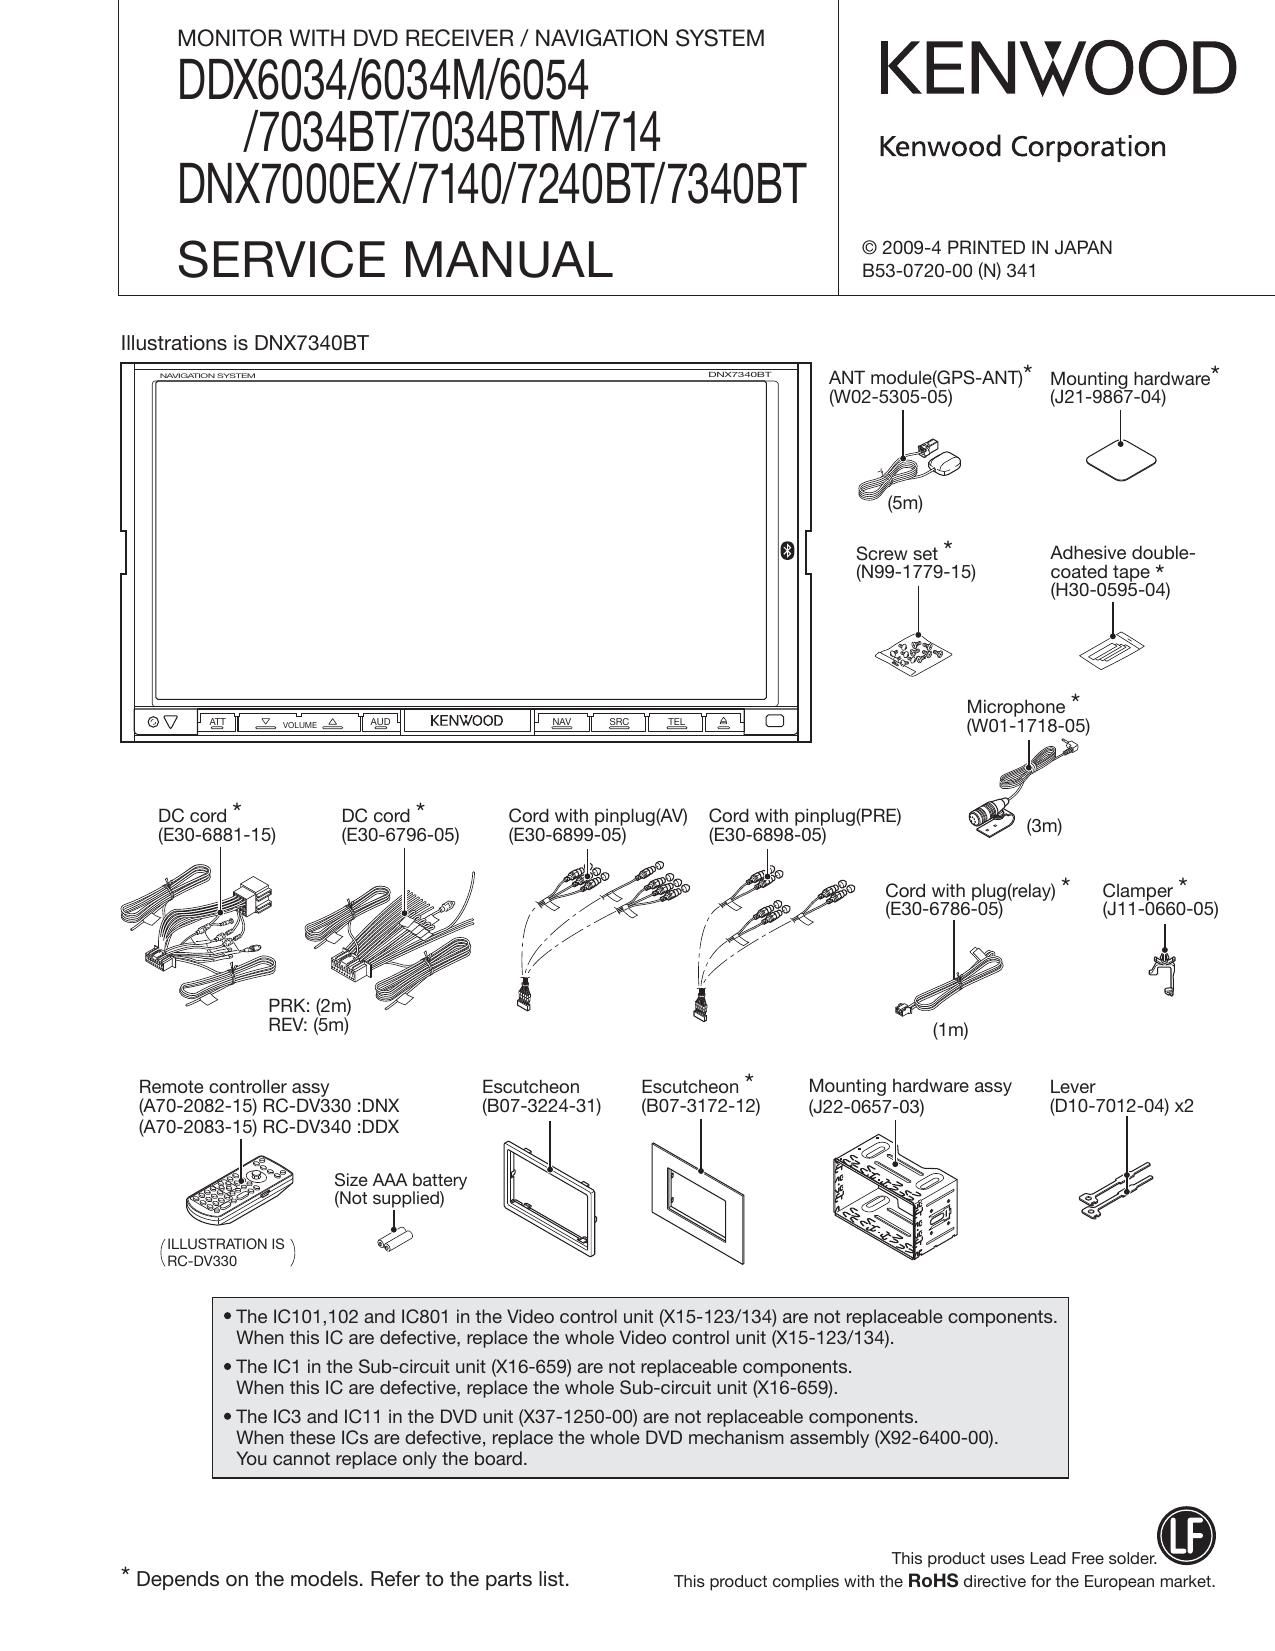
MONITOR WITH DVD RECEIVER / NAVIGATION SYSTEM

DDX6034/6034M/6054 KENWOOD
/7034BT/7034BTM/714 Kenwood Corporation
DNX7000EX/7140/724OBT/734OBT

SERVICE MANUAL -529gigt22'?NIEZINWN

Illustrations is DNX734OBT

WWWW WM ANT modu|e(GPS-ANT)* Mounting hardware*
(W02-5305-05) (J21-9867-04)

%

(5m)
9 Screw set * Adhesive double-
(N99-1779-15) coated tape *
l (H30-0595-04)

@@

Microphone*
«W W7 LIME: AMI KENWOOD Im E g a C1 (W01-1718-05)
4

DC cord * DC cord * Cord with pinplug(AV) Cord with pinplug(PRE)
(E30-6881-15) (E30-6796-05) (E30-6899-05) (E30-6898-05)


i y 9
@ Cord with plug(relay) * Clamper *
" // ,// / (E30-6786-05) (J11-0660-05)
i ; ,// / // I

I /.
g/ Ir/ fi
(1m)
Remote controller assy Escutcheon Escutcheon * Mounting hardware assy Lever
(A70-2082-15) RC-DV33O :DNX (807-3224-31) (BO7-3172-12) (J22-0657-03) (D10-7012-04) x2
(A70-2083-15) RC-DV34O :DDX
Size AAA battery
(Not supplied) @g/
(ILLUSTRATION Is \ @
achvsao /

' The |C101,102 and |0801 in the Video control unit (X15-123/134) are not replaceable components.
When this IC are defective, replace the whole Video control unit (X15-123/134).

I The |C1 in the Sub-circuit unit (X16-659) are not replaceable components.
When this IC are defective, replace the whole Sub-circuit unit (X16-659).

0 The ICS and |C11 in the DVD unit (X37-1250-00) are not replaceable components.
When these le are defective, replace the whole DVD mechanism assembly (X92-6400-00).

You cannot replace only the board.
This product uses Lead Free solder.

* Depends on the models. Refer to the parts list. This product complies with the ROHS directive for the European market.

Page 19

DDX6034/6034M/6054/7034BT/7034BTMN 14
DNX7000EX/7 1 40/ 7240 BT/ 7340 BT

TEST MODE

Up/Down (Green)
: Green Offset key. (This key is displayed only
when the Green Offset mode is turned ON)
Up/Down (Blue)
: Blue Offset key. (This key is displayed only

2.3.11. LCD Adjustment screen

This screen is used to perform adjustment of LCD.

The displayed contents of the LCD Adjustment screen is
displayed in Figure 2.3.11.

LCD Auto Adjust

LCD Auto Adjust

when the Blue Offset mode is turned ON)

Up/Down (Yellow)

Yellow Offset key. (This key is displayed only
when the Yellow Offset mode is turned ON)

Direct Adjustment bar

: Right and Left Adjustment.

DW/ UP : Right and Left Adjustment. (for Fine Adjust-
ment)
Return : Transfer to Test Mode Main screen.

Ammo
Ace/mo l:>


Write OK/NG

VCOM Auto HPOSI Auto

Make a space l
(rhe production process mainly uses
the abovementioned two keys.)

Figure 2.3.11 LCD Adjustment screen

Key Specification

* Select black for the background color until Write OK/NG"
is displayed.
Modify the background color to blue at the same time as
Write OK" is displayed.
Modify the background color to red at the same time as
Write NC" is displayed.

2.3.10. iPod Authentication Chip Confirmation screen
Check communication for iPod authentication.
The iPod Authentication Chip Confirmation screen is dis-

All Auto : Start Auto Adjustment. (The following four
Auto adjustments are executed continu»
ously)

W.B. Auto : Start the W.B. Auto adjustment.

AGC Auto : Start the AGC Auto adjustment.

VCOM Auto : Start the VCOM Auto adjustment.

HPOSI Auto : Start the HPOSI Auto adjustment.

Flicker : Transfer to the Flicker Adjustment screen.

Cancel : Transfer to Test Mode Main screen.

Return : Transfer to Test Mode Main screen.

played in Figure 2.3.10.

iPod Check

iPod Check

|:> lPod OK/NG

Figure 2.3.10 iPod Authentication Chip Confirmation screen

Key Specification
iPod Check : Start checking communication for iPod au-

Cancel
Return

thentication.
: Transfer to Test Mode Main screen.

* Select black for the background color until Write OK/NG
is displayed.
Modify the background color to blue at the same time as
Write OK" is displayed.
Modify the background color to red at the same time as
Write NC is displayed.

2.3.12. Flicker Adjustment screen

This screen is used to perform adjustment of the Flicker.
Transfer to this screen also when TenkeyO on the remote
controller is pressed.

The displayed contents of the Flicker Adjustment screen are
displayed in Figure 2.3.12.

* Select black for the background color until iPod OK/NG"
is displayed.
Modify the background color to blue at the same time as
iPod OK" is displayed.
Modify the background color to red at the same time as
iPod NC" is displayed.

Flicker Adjust

Write OK/NG

Figure 2.3.12 Flicker Adjustment screen

19

Page 20

DDX6034/6034M/6054fl 034BT/7034BTMN 14
DNX7000EX/7140/724OBT/734OBT

TEST MODE

Key Specification

Q) : Flicker Adjustment. (The topmost part is MIN
and the lowermost part is MAX.)
Touching an arbitrary part sets a preset value
according to the places.

(2) : Transfer to the LCD Adjustment screen. (Cancel)

(3) : Start the Writing-in operation in the nonvolatile
memory. (Next)

Return : Transfer to the LCD Adjustment screen.

* Select black for the background color until Write OK/NG"
is displayed.
Modify the background color to blue at the same time as
Write OK" is displayed.
Modify the background color to red at the same time as
Write NG" is displayed.

2.3.13. X35 Power Frequency Check screen

This screen is used to perform switching of the inverter and
the DC/DC frequency.

Power Frequency Check screen is displayed in Figure 2.3.13.

X35 Power Frequency Check

mvener

DC/DC

Figure 2.3.13 Power Frequency Check screen

Key Specification
Inverter Low : Set the Inverter Frequency to a Low level.

Inverter High : Set the Inverter Frequency to a High level.
DC/DC Low : Set the DC/DC Frequency to a Low level.
DC/DC High : Set the DC/DC Frequency to a High level.
Return : Transfer to Test Mode Main screen.

20

2.3.14. Tilt Mecha Adjustment screen

This screen is used to perform adjustment of the Panel
Mechanism.

The Tilt Mecha Adjustment screen is displayed in Figure
2.3.14.

Ti" Mecha Adlust Tilt Mecha Adjust
Mecha Adjust E> Write OK/NG
__Cancel __Retum

Figure 2.3.14 Tilt Mecha Adjustment screen

Key Specification
Mecha Adjust :Start adjustment of the Panel Mecha-

nism.
Cancel : Transfer to Test Mode Main screen.
Return : Transfer to Test Mode Main screen.

* Select black for the background color until Write OK/NG"
is displayed.
Modify the background color to blue at the same time as
Write OK is displayed.
Modify the background color to red at the same time as
Write NG is displayed.

The NG is displayed when the status is in any one of the
following conditions: (When the NC is displayed, no data
is written in the nonvolatile memory.)
Failure in writing data in nonvolatile memory
When the voltage acquired is 0.268V or higher in the
Open condition
When the voltage acquired is lower than 4.160V or it is
higher than 4.376V in the Close condition

Note: In case of NG, check if the mechanism position ad-
justment jig is properly installed or not, and then transfer to
the Test mode again to start over the adjustment.

Page 48

ROMULATOR

: , » Z ,
a k
n _ [ as; R .l.
- R c 7 _ M ona _
E? is _ u 33%
_ 7 _ 7%
n _
_ m , 311.1% 2%
o EBA u 31 _ s 31
_ a, i: 4 i: _
_ as a a; _ 31
Am 21 ,, 21
_ $1 _ m E:
N a :IH 21 _
_ m :J _ g 21
_ A 21 m 9:
m g? 5 «<1 7 21
_ m E? :2 a a;
_ m 2 m m w @115le 8
m w A A a S
_ m A A A 0, TT
0 ~11»
m in , gfiaxaa
m \
a was
_ , o m w. flag;
_ m 0 E S» 9
3%le
0 mix :5 m 7 «.33 _
_ My T |@ :5 n.
L A 3H» 5 _
_ x m 4 n
F®|®J E1 o.l 3 a
_ _ 28 m
D 1 Dzun .0
_ lw LN
_ E m m m 3.3» L,
3 6 «.30 v 8 u. L? >5
_ m mm m u #0 m u 15 W 2 E
R R R 55 7 Ba x 3
3% 1 2 m mmw n a @ E
_ § 1 w wzwfiz c CE 3 Aw?
w s; i 4 m 2 c c a b 2;
_ 2 L 5 4 a 2 1w 2% I02:
m w m 1&5 c @ uzoa
. in M
_ w s :5 mi I®§s
s F e n.
M M IE >5 9 4 W\® >8
_ o VSB m 1 m n ® c2
_ m Q nzun
w w 5% 3 Eu 0%
_ k gr: 0%;
, a .|¢|V@ Emma
_ é Se 5 6,8
EJmlv
,Illl© «<2
_ a E $2
311?
_ w «in» @ 9.5m
e @S
v 21
_ 9 SE @ 0E2,
v|®|+
4 w 1 8E ®§E
4. _ w 1m i, @ 5%
. ,|,¢l+
/ _ m m Ejlvé Ea
M % m 5 9%
T P s @255
m u M 6 as .|@ 5%
w m s o
3T R 2 Q o @933
m8 « 1 \@ SS
3
Wm
B \ o
4070 i ii as: a
m. 2:; @ED
3 as
W m 3:! @38
44 A an
52 K D 5
0 7 a Q 28
6/ x g an
/0 _ L 5
MM A m @33
47 _ M A an
M/ M u 3 m w w as:
6 _ m m m a 1 «N E
P MU _ m a m n m o it ,3
3% m a n
0
mm _ w 9? ,
L m m w p ..
DN _ m c z 4 m w m
DD w v
_ A K m K m s a g,
_ w m M m ow M :2

to DVD MECHA 1x37-1250-ua; CN2
X1 5-1 23X/1 34X-XX (4/1 0)

48