Jvc BR SAR200 E Service Manual Part 2

This is the 50 pages manual for Jvc BR SAR200 E Service Manual Part 2.
Read or download the pdf for free. If you want to contribute, please mail your pdfs to info@audioservicemanuals.com.

Page: 1 / 50
left right
Jvc BR SAR200 E Service Manual Part 2

Extracted text from Jvc BR SAR200 E Service Manual Part 2 (Ocr-read)


Page 1

2.7 ADJUSTMENT OF TAPE TRANSPORT SYSTEM

Note: The tape transport system has been precisely adjusted at the factory before shipment. Check and adjustment are
required only after the parts of the tape transport system are replaced.


No. Item Adjustment and Check
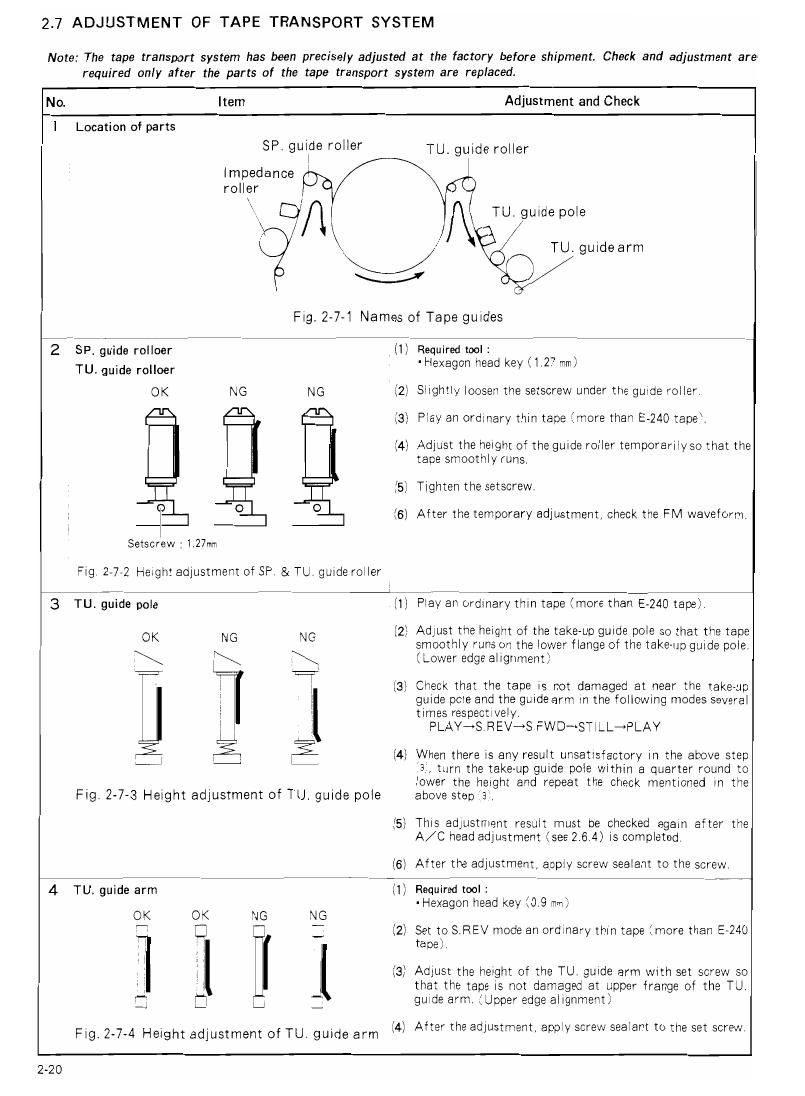
1 Location of parts
SP. guide roller 'i'U. guide roller
1 i
Impedance
roller
\ i
\\ DA TU. guide pole
\ TU. guide arm
/
V
Fig. 2-7-1 Names of Tape gUides
2 SPiguide rolloer (1) Required tool:
TU. guide rolloer -Hexagon head key (l.27 mm)
OK N6 N6 (2) Slightly loosen the setscrew under the guide roller.
(3) Play an ordinary thin tape (more than E-240 tape).
{4) Adjust the height of the guide roller temporarily sothat the
tape smoothly runs.
(5] Tighten the setscrew.
; 0 O O i J After the temporary adjustment, check the FM waveform.
Setscrew : 1.27m
Fig. 2772 Height adjustment of SP. & TU. guide roller
3 TU, guide pole {1} Play an ordinary thin tape (more than E-24O tape),
OK N6 N6 [2)- Adjust the height of the take-up guide pole so that the tape
smoothly runs on the lower flange of the take-up guide pole.
\ \ \ (Lower edge alignment}
T i l [3} Check that the tape is not damaged at near the take-Lip
i j guide pole and the guide arm in the following modes several
l i times respectively
i i PLAYHS REV-~3FWD-48TlLL-rPLAY
ii I; [4i When there is any result unsatisfactory in the above step
.3 turn the take-up guide pole Within a quarter round to
. , . _ lower the height and repeat the check mentioned in the
Fig. 2-7-3 Height adjustment of TU. gUIde pole above step (3:.
(5)- This adjustment result must be checked again after the
A/C head adjustment (see 2.6.4) is completed.
(6) After the adjustment, apply screw sealant to the screw.
4 TU. guide arm (1) Required tool:
-Hexagon head Key (0.9 mm)
OK OK NG NG
Ti [3 : (2) Set to SREV mode an ordinary thin tape (more than E-240
1 i tape)
4 . l
i i i (3) Adjust the height of the TU. guide arm with set screw so
i i l j that the tape is not damaged at upper frange of the TU.
i: l:l : guide arm. (Upper edge alignment)
Fig, 2_7_4 Height adjustment of TU. guide arm \4) After the adjustment, apply screw sealant to the set screw

2-20

Page 2

2.8 TABLE OF SCREWS AND SLIT WASHERS USED IN THIS SET

Note: The numbers of screws and slit washers shown below respectively accord with numbers of them appearing in this

section.

(gold) ;® (gold) @ (silver) <4) (black) (5) (gold)
(9 TBmm E G) 5mm @ (Sm @ 8mm @ 18mm
PDM4165A (-Ma) SDSP26052 SPSPZOOSZ P0435878 (M26) P044621 (-VM2.6)
(6) (gold) ® (gold) (8) (gold) ® (gold) ® (goid)

T .\
@T @T 16m @%}m @?M (as? 1%
sospzewzz SDSP26062 DPSPZOOSZi sosrzeosz SDSPZOO4Z
a) (gold) ® (gold) ///
T /
G) 4% 15m
SDSPZGOAZ SDsrzoosz
\
® (I75 ® $5 © ¢5
\
(0.5 1 ms «1.35
1
¢3.1 am $11
POM30017-24(red) POM30017-26(red) 1 POM30017-2 (black)
i \

2»21