Grundig Transonette 75 WE Service Manual

This is the 4 pages manual for Grundig Transonette 75 WE Service Manual.
Read or download the pdf for free. If you want to contribute, please mail your pdfs to info@audioservicemanuals.com.

Page: 1 / 4
left right
Grundig Transonette 75 WE Service Manual

Extracted text from Grundig Transonette 75 WE Service Manual (Ocr-read)


Page 1

GRUI'IDICI

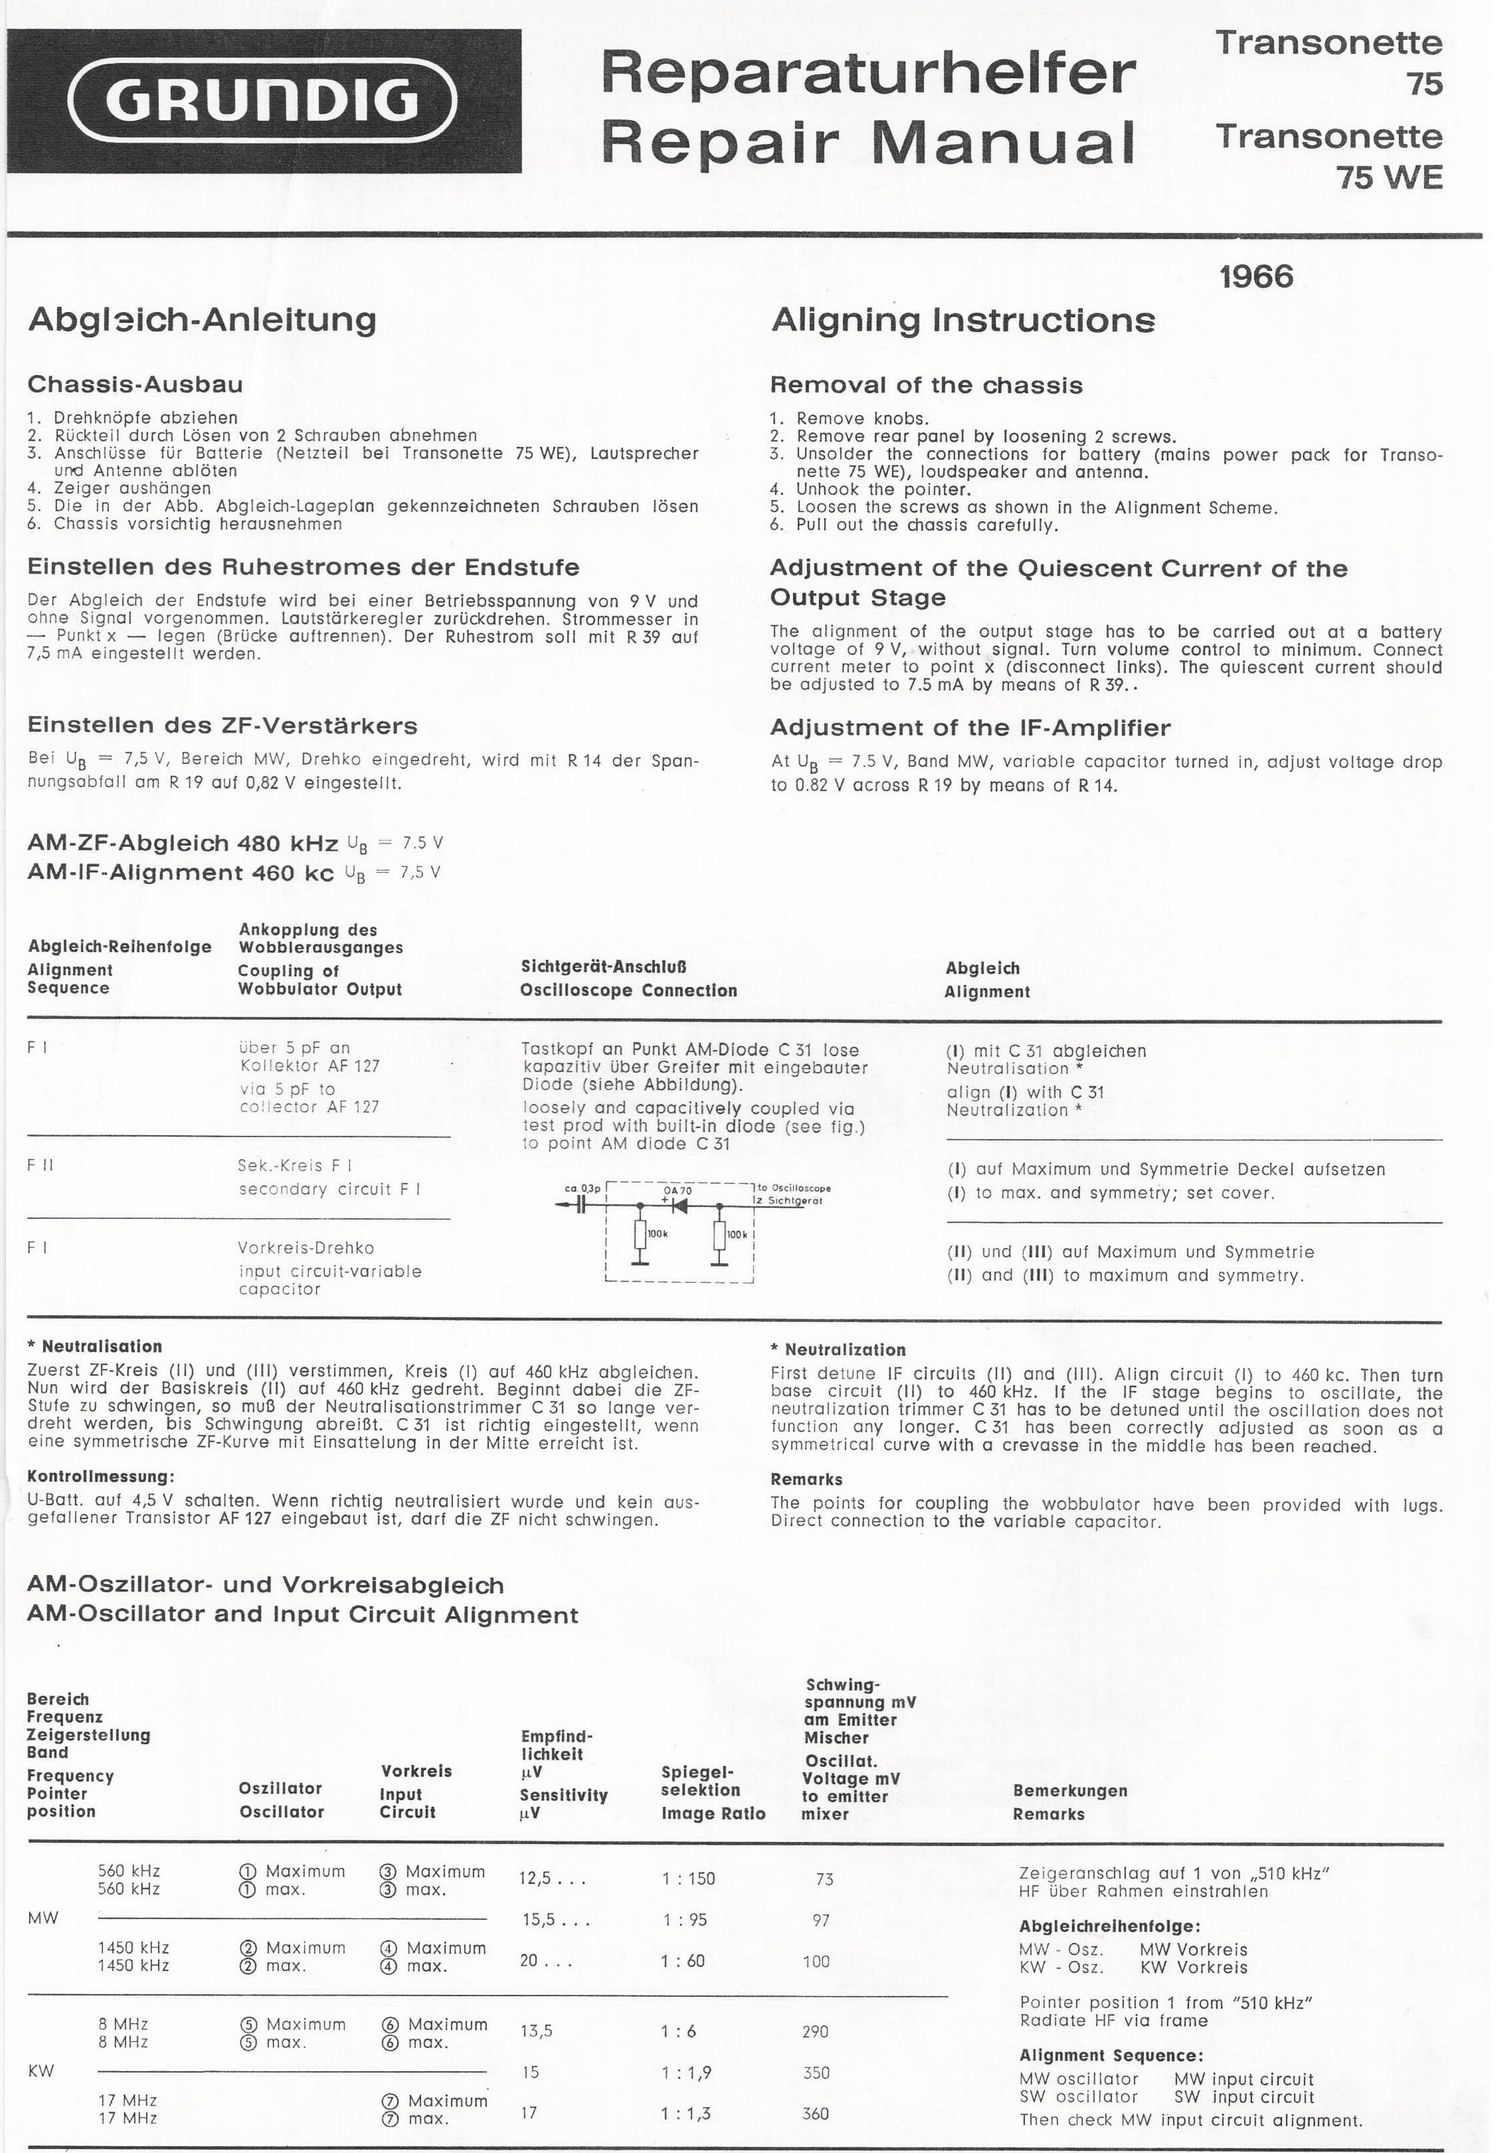
Abgleich-Anleitung

Fteparaturhelfer
Repair Manual

Transonette
75

Transonette
75 WE

1966
Aligning instructions

Chassis-Ausbau Removal of the chassrs

1. Drehkno'pfe abziehen . 1. Remove knobs.

2. RUckteil durch Losen von 2 Schrauben abnehmen 2. Remove rear panel by loosening 2 screws.

3. Anschliisse tUr Batterie (Netzteil bei Transonette 75 WE), Lautsprecher 5. Unsolder the connections for battery (mains power pack for Transo-
und Antenne ablaten nette 75 WE), loudspeaker and antenna.

4. Zeiger aushangen 4. Unhook the pointer.

5. Die in der Abb. Abgleich-Lageplan gekennzeichneten Schrauben losen 5. Loosen the screws as shown in the Alignment Scheme.

6. Chassis vorsichtig herausnehmen 6. Pull out the chassis carefully.

Einstellen des Ftuhestromes der Endstufe

Der Abgleich der Endstufe wird bei einer Betriebsspannung von 9V und
ohne Signal vorgenommen. Lautstdrkeregler zuriickdrehen. Strommesser in
-- Punktx - legen (BrUcke auttrennen). Der Ruhestrom soil mit R39 aut
7,5 mA eingestellt werden.

Einstellen des ZF-Verstarkers

Bei UB = 7,5 V, Bereich MW, Drehko eingedreht, wird mit R14 der Span-
nungsabfall am R 19 out 0,82 V eingestellt.

AM-ZF-Abgleich 480 kHz U3 -' 7.5 V
AM-lF-Alignment 460 kc UB = 7.5 v

Ankopplung des

Abgleich-Reihenlolge Wobblerausganges

Adjustment of the Quiescent Current of the
Output Stage

The alignment of the output stage has to be carried out at a battery
voltage of 9V, without signal. Turn volume control to minimum. Connect
current meter to point x (disconnect links). The quiescent current should
be adjusted to 7.5 mA by means of R39..

Adjustment of the lF-Amplifier

At UB z 7.5 V, Band MW, variable capacitor turned in, adjust voltage drop
to 0.82 V across R 19 by means of R 14.

Alignment Coupling of Slchtgeriit-Anschlult Abgleich
Sequence Wobbulator Output Oscilloscope Connection Alignment
F l older 5 pF an Tastkopf an Punkt AM-Diode C 31 lose (I) mit C 51 abgleichen
Kollektor AF 127 kapazitiv Uber Greiier mit eingebauter Neutrolisation *
Va 5 P F .0 Diode (srehe Abbridung). align (l) with C 31
c: ector AF 127 loosely and capacitively coupled via Neutralization *
test prod with built-in diode (see fig.)
to point AM diode C51
F ii Eek-Kreis F l (I) out Maximum und Symmetrie Deckel aufsetzen
secondary circuit F l 2'?£-_-_EE-__-]:°Sf::t'::fgfe (l) to max. and symmetry; set cover.
i
i 100k riOOk:
F l Vorkreis-Drehko . i (ll) und (Ill) auf Maximum und Symmetrie
input circuit-variable L __________ _} (ii) and (III) to maximum and symmetry.
capacnor

E

* Neutralisation

Zuerst ZF-Kreis (ll) und (lll) verstimmen, Kreis (I) out 460 kHz abgleichen.
Nun wird der Basiskreis (ll) auf 460 kHz gedreht. Beginnt dabei die ZF-
Stute zu sdwwingen, so muB der Neutralisationstrimmer C31 so lange ver-
dreht werden, bis Schwingung abreiBt. C31 ist richtig eingestellt, wenn
eine symmetrische ZF-Kurve mit Einsattelung in der Mitte erreicht ist.

Kontrollmessung:

U-Batt. auf 4,5V schalten. Wenn richtig neutralisiert wurde und kein aus-
geiallener Transistor AF 127 eingebaut ist, darf die ZF nicht schwingen.

* Neutralization

First detune lF circuits (ll) and (ill). Align circuit (l) to 460 kc. Then turn
base circuit (II) to 460 kHz. If the lF stage begins to oscillate, the
neutralization trimmer C 31 has to be detuned until the oscillation does not
function any longer. C31 has been correctly adjusted as soon as a
symmetrical curve with a crevasse in the middle has been reached.

Remarks

The points for coupling the wobbulator have been provided with lugs.
Direct connection to the variable capacitor.

AM-Oszillator- und Vorkreisabgleich
AM-Oscillator and input Circuit Alignment

Schwing-
Bereich spannung mV
Frequenz am Emitter
Zeigerstellung Empiind- Mischer
Band lichkeit Oscillat.
Frequency , Vorkreis V 5111999" Voltage mV
Pointer 05111101" input Sensitivity selektion to emitter Bemerkungen
position Oscillator Circuit pV Image Ratio mixer Remarks
560 kHz Q) Maximum (3) Maximum 12 5 1 .150 73 Zeigeranschlag out 1 von ,,510 kHz
560 kHz CD max. @ max. ' ' ' HF Uber Rahmen einstrahlen
MW 15:5 - ' - 1 3 95 97 Abgleichrelhentolge:
1450 kHz ® Maximum @ Maximum . MW - 052. MW Vorkreis
1450 kHz ® max. G) max. 20 ~ - - 1 -60 100 KW - Osz. KW Vorkreis
Pointer position 1 from 510 kHz
gm? g Maximum % mgiimum 13,5 1 :6 290 Radiate HF VlCl frame
Z max. Alignment Sequence:
KW 15 1 31:9 350 MW oscillator MW input circuit
17 MHz ® Maximum . 4 SW oscillator SW input circuit
17 MHz ® max. 17 1 ~13 360 Then check MW input circuit alignment.

Page 2

Abglelch-Lageplan
Alignment Scheme


06301.11 oc 305/2

Drehkondensator
VARIABLE CAPACITOR

VOLUME CONTROL
Lautstirke =

031

Druckschaltungsplatte, auf die Letseite gesehen
Printed Circuit Board, Solder Side Vlew

9234-059 ~- -257 9234-179
T T

......

" me Mr.

9232 30!. t """

OC 305/2


pRahmen -

........ J . Antenna
AC 175
AF 117 .m-a» Basis '
* ' AF 126

L5 {

Schnurlaufffihrung

Seillénge ca. 800 mm

Drive Cord Assy

length approx. 800 mm

20262 Printed in Germany 20666St