Fisher WEBSTER 356 1 Service Manual

This is the 11 pages manual for Fisher WEBSTER 356 1 Service Manual.
Read or download the pdf for free. If you want to contribute, please mail your pdfs to info@audioservicemanuals.com.

Page: 1 / 11
left right
Fisher WEBSTER 356 1 Service Manual

Extracted text from Fisher WEBSTER 356 1 Service Manual (Ocr-read)


Page 1

W§B§T§B RCD.CH. 2695 21-23

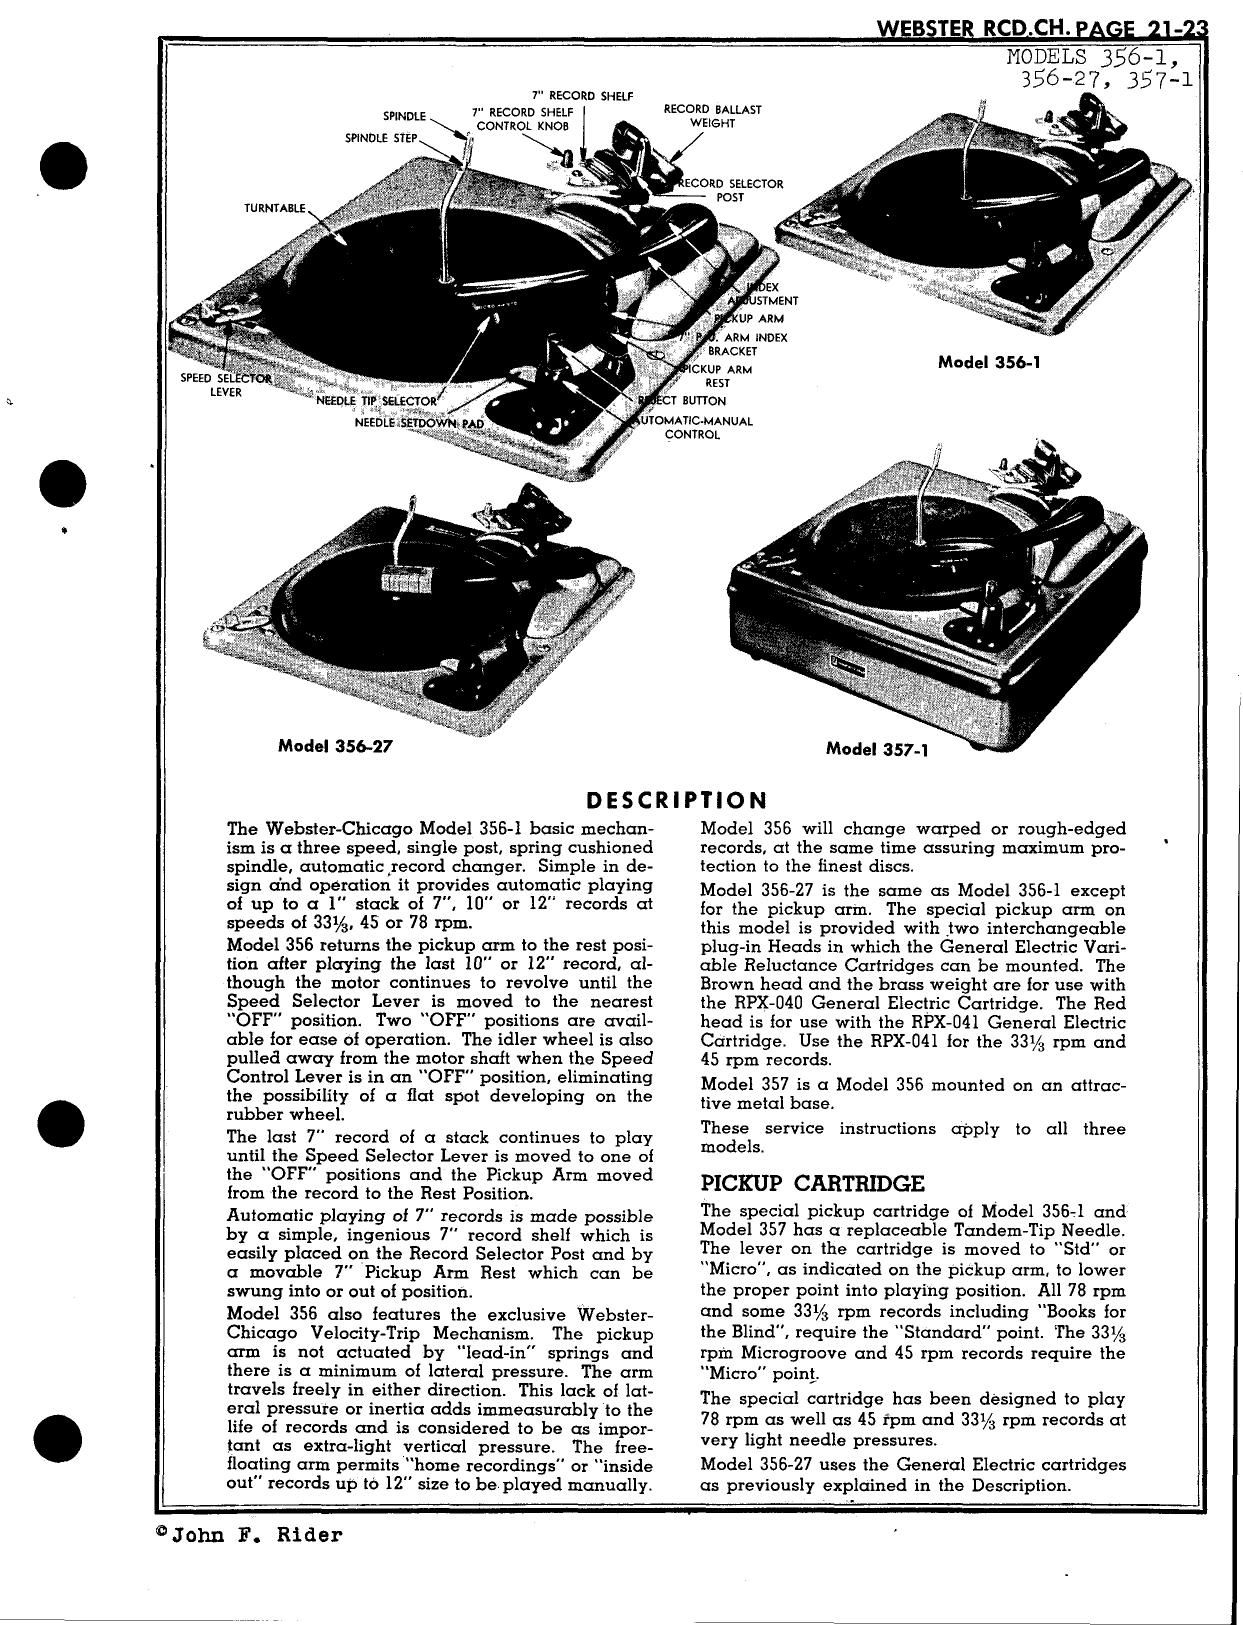
7" RECORD SHELF

39mm; 1" recon) SHELF
CONTROL KNOB
SPINDLE STEP "

Model 356-27

DESCRIPTION

The Webster-Chicago Model 356-! basic mechan
ism is a three speed, single past, spring cushioned
spindle. automatic Irecord changer. Simple in de-
sign a'nd operation it provides automatic playing
of up to a 1" stack of 7", 10" or 12" records at
speeds of 33%. 45 or 78 rpm.

Model 356 returns the pickup arm to the rest posi-
tion after playing the last 10" or 12" record. al-
though the motor continues to revolve until the
Speed Selector Lever is moved to the nearest
"OFF" position. Two "OFF" positions are avail-
able for ease at operation. The idler wheel is also
pulled away from the motor shaft when the Speed
Control Lever is in an OFF" position, eliminating
the possibility of a flat spot developing on the
rubber wheel.

The last 7" record of a stack continues to play
until the Speed Selector Lever is moved to one of
the "OFF positions and the Pickup Arm moved
from the record to the Rest Position.

Automatic playing of 7" records is made possible
by a simple, ingenious 7" record shell which is
easily placed on the Record Selector Post and by
a movable 7" Pickup Arm Rest which can be
swung into or out at position.

Model 356 also ieatures the exclusive Webster-
Chicago Velocity-Trip Mechanisml The pickup
arm is not actuated by "lead-in" springs and
there is a minimum of lateral pressure. The arm
travels treely in either direction. This lack of lat-
eral pressure or inertia adds immeasurably to the
life of records and is considered to be as impor-
tant as extra-light vertical pressure. The tree-
tloating arm permits home recordings" or inside
out" records up to 12" size to be played manually

RECORD BALLAST R l A
c ,

OMATICMANUAL
CONTROL

MODELS 356-1,
356-27, 357-1

Model 356-]

Model 357-1

Model 356 will change warped or rough-edged
records, at the same time assuring maximum pro-
tection to the finest discs

Model 356-27 is the same as Model 356-] except
for the pickup arm. The special pickup arm on
this model is provided with ,two interchangeable
plug-in Heads in which the General Electric Vari-
able Reluctance Cartridges can be mounted. The
Brown head and the brass weight are {or use with
the RPX-MU General Electric Cartridge. The Red
head is for use with the RPX-04l General Electric
Cartridge. Use the RPX-04l tor the 331/3 rpm and
45 rpm records.

Model 357 is a Model 356 mounted on an attrac-
tive metal base.

These service instructions apply to all three
models.

PICKUP CARTRIDGE

The special pickup cartridge oi Model 356-1 and
Model 357 has a replaceable Tandem-Tip Needle.
The lever on the cartridge is moved to Std" or
Micro", as indicated on the pickup arm. to lower
the proper point into playing position. All 78 rpm
and some 331/3 rpm records including Books tor
the Blind", require the "Standard" point. The 331/3
rpm Microgroove and 45 rpm records require the
"Micro" point.

The special cartridge has been designed to play
78 rpm as well as 45 rpm and 33% rpm records at
very light needle pressures.

Model 356-27 uses the General Electric cartridges
as previously explained in the Description.

0 John F. Rider

Page 2

RCD.CH.
MODELS 356-1 ,
56-27, 357-1

ll

/ OPERATION

MOTOR

Connect the motor cord to a source oi 105-120 volt
GD-cycle current only. If it is desired to operate
the changer on 50-cycle current, a special motor
shaft sleeve must be used in order to drive the
turntable at the required speed.

Do not under any circumstances connect the
motor to a source oi direct current (DC) or alter-
nating current at any other frequencies. The
motor switch is part of the Speed Control Lever.
The power is oii when the lever is in an "OFF"
position.

FOR AUTOMATIC RECORD CHANGE

l. Move the Tandem Tip Needle Selector to Std"
or "Micro" or plug-in the correct Head as ex-
plained in the description oi the pickup car-
tridge above.

2. Turn the Record Selector Post to "10" or "12"
for the ten- or twelve-inch records. The Record
Selector Post is pivoted and turns in a counter»
clockwise direction to the 10" posittion as in-
dicated by the arrows. Do not use the Ballast
Weight (see Illustration, Page 1) as a handle
to turn the post. Turn by grasping the head oi
Record Selector Post with the thumb and tore-
iingers. For 7" records. turn the Record Selec-
tor Post to 10". Move the pickup arm toward
the center oi the record until it touches the
spindle. Move the 7" pickup arm rest into posi-
tion and return the pickup arm to the 7" rest
position. Place the 7" record shell on the record
selector post, as illustrated. with the control
knob oi the record sheli turned to "45" or 33"
as required.

3. Turn the Manual-Automatic Switch (sleeve oi
Reject button) to AUTOMATIC.

4. With the Record Ballast Weight turned back.
place up to a 1" stack at records on the spindle
so that the bottom record rests on the step of
the spindle and the sheli- oi the Record Selector
Post or 7" Record Shell.

5. Turn the Record Ballast Weight forward to rest
on the top record or the 7" adapter.

6. Move the Speed Selector Lever to 331/3". "45"
or 78", as required by the record being play-
ed, This also turns the power on.

7. Press the Reject button: to start the changer.

To reject any record while playing in the AU-
TOMATIC position, press the Reject button.
NOTE: Aiter the last record has been played.
the Pickup Arm should not be touched until it
has come to rest on the "Rest" button or has
dropped to a normal playing position on the
record.

8. Aiter the last record has been played. the en-
tire stack may be removed irozn the turntable
at one time. The simplest procedure is as
lollows:

a. Turn the Record Ballast Weight back out oi
position. .

b. Place the fingers at both hands under oppo~
site edges oi the bottom record.

c. Do not apply pressure to the top record.
(Keep your thumbs tree.)

d. Liit the stack oi records straight up, iollow-
ing the contours oi the spindle. This permits
the stack oi records to iollow the curve at
the spindle without binding and greatly'ia-
cilitates the removal oi the stack.

FOR MANUAL" RECORD CHANGE

l. TUm the Record Selector Post to the "12" posi-
tion. (This is not essential but permits more
clearance in loading and unloading records.)

2. Turn the Selector Switch (sleeve oi Reject But-
ton) to MANUAL.

3. Place a record on the turntable. It may facili-
tate this operation it 10" and 12" records are
placed over the spindle at an angle, with one
edge oi the records held below the level oi the
Record Selector Post Shell. Records may be
removed in the same manner.

4. Move the Speed Selector Lever to the proper
position as required by the record being
played.

5. Move the Tandem-Tip Selector to "Std" or
"Micro as explained in the description oi the
pickup cartridge.

6. Place the needle gently on the edge of the rec-
ord. Do not lift the pickup arm too high as this
will cause it to catch in the Automatic Stop
Lock position.

7. To stop the mechanism at any time. turn the
Speed Selector Lever to an OFF position.

_-_-_---_-

©John F. Rider