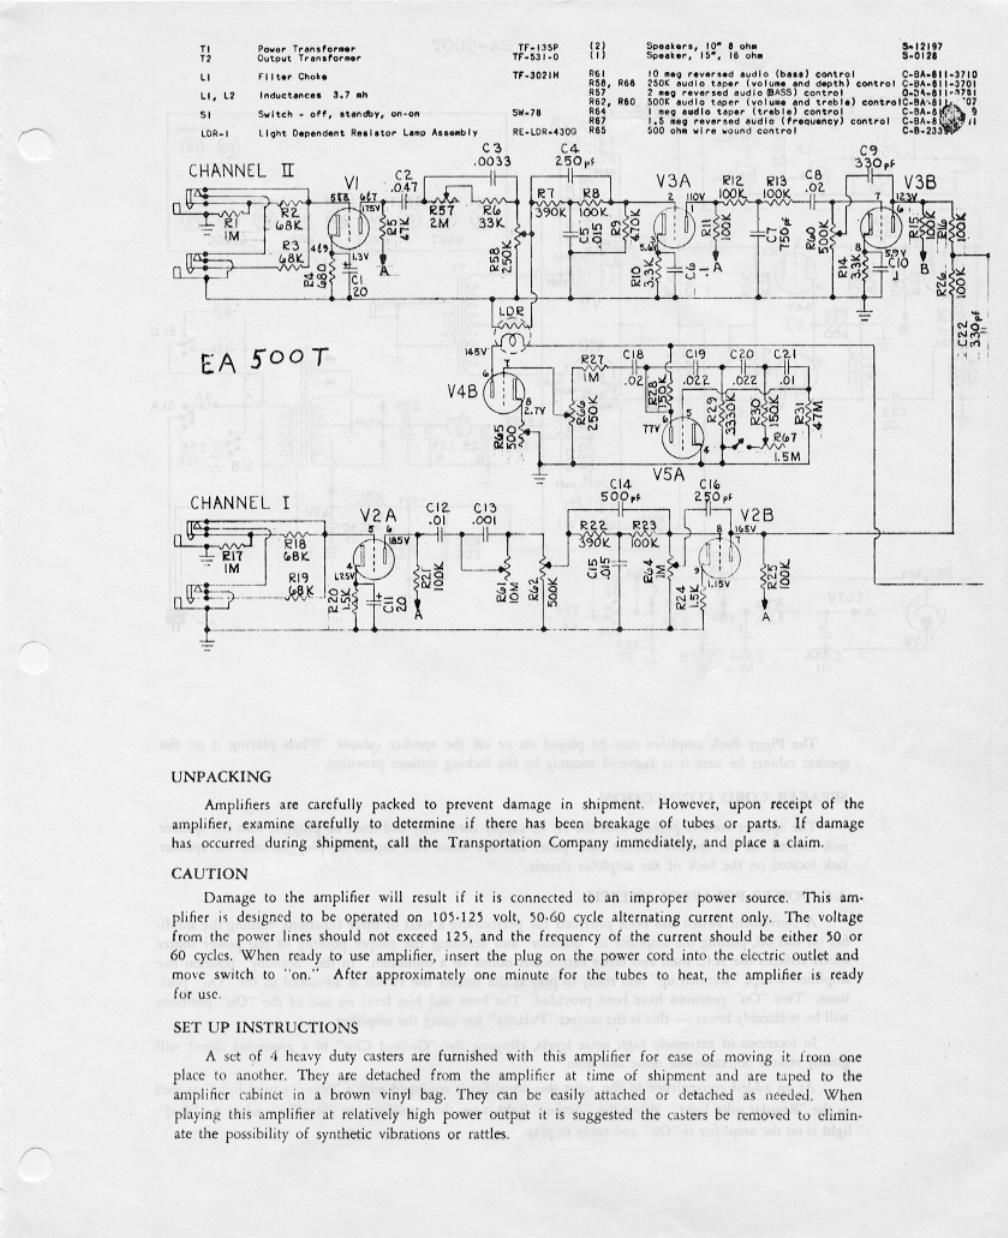
Epiphone ea 500t schematic

This is the 2 pages manual for epiphone ea 500t schematic.
Read or download the pdf for free. If you want to contribute, please mail your pdfs to info@audioservicemanuals.com.

Page: 1 / 2
left right
epiphone ea 500t schematic

Extracted text from epiphone ea 500t schematic (Ocr-read)


Page 1

v r thus! I! Sputu- m- I aim um
ii amt $333335, vr-um nl amt-n'is- It oh- mm
1 . m MI 0.. rover-ea a are (but) «Mr c-IA-IH-Hlo
u Hot cm. ' so! :3. an gent :udlo 5" Sludge rm dip! n mum c. u n
_ n no unu- an o more»
LI, L! IMMHM" 7 - 2. III) 500! evule "our (volu- and treble) untrue-IA I
Si sum. . on, «may, oil-0n sat-1c a; o .
Lea-i lch Dependent Bum-n Luv hugely lawn-4300 m
C3 C4
.0033 250p!

CHANNEL II

CIZ
.Ol

C13
.OOI

UN PACKING

Amplifiers are carefully packed to prevent damage in shipment However. upon receipt of the
amplifier, examine carefully to determine if there has been breakage of tubes or parts. If damage
has occurred during shipment, call the Transportation Company immediately. and place a claim,

CAUTION

Damage to the amplifier will result i! it is connected to an improper power source This am-
plifier is designed to be operated on 105-125 volt. 50-60 cycle alternating current only. The voltage
from the power lines should not exceed I25, and the frequency of the eurrent should be either 50 or
60 cycles. When ready to use amplifier, insert the plug on the power cord into the elutric outlet and
mme swutch to "on." After approximately one minute {or the tubes to heat. the amplifier is ready
for use.

SET UP INSTRUCTIONS

A set of 4 heavy duty casters are furnished with this amplifier for case of moving it Iron) one
place to another. They are detached from the amplifier at time of shipment and are taped to the
amplifier cabinet in a brown vinyl bag. They can be easily attached or detached as needed. When
playing this amplifier at relatively high power output it is suggested the tasters be removed to elimin-
ate the possibility of synthetic vibrations or rattle-s,

Page 2

EA-SOOI

laLbGC

OLLGC

I2 AU! llEUl 0%! 'uLéGC
in

<
m
<

RAVI 0A2 bLaGC


C29


Aélt l9
czaL "
A _

L
:7. B
7,! f. . 50V
E26 cz'ifj
: . -4 v

252 ,
P 22K t can

7' "(alas clia
20 lo |O

The Piggy Back amplifier may be played on or off the speaker cabinet. When playing it on the
speaker rabinet be sure it is fastened securely by the locking fixtures provided.

SPEAKER CORD CONNECTION

The speaker (onl is packed with the A C. supply curd, One end must be plugged into the speaker
jack located on the speaker cabinet back panel and the other end should be plugged into the speaker
jack located on the back of the amplifier chassis.

A.C. POWER-POLAR! SWITCH

A convenient switch has been provided for pctforming a total of three functions, turning the ampli~
her on and off, putting the amplifier in "Standby" and selecting the proper polarity of the power source
which reduces the AC. hum and other extraneous noises to a minimum. In the "Standby" position the
amplifier is kept "warmed up" and rady to play at the instant the switch is advanced to the "On" posi-
tions. Two "On" positions have been provided. The hum and hiss level on one of the On" positions
will be noticeably lower ~ this is the mum "Polarity" for using the amplifier.

In locations of extremely high noise levels, clipping the "Ground Clip" to a grounded object will
greltly reduce obiettionablc noise and hum.

As an added mnvcnicnte to the artist this amplifier is equipped with .l "Standby pilot light" as well
u the "Regultr pilot light". When the "Amber" light is on, the amplifier is in "Standby"; when the "Red"
light is nu the amplifier is "On" and ready to play.