Dual CS 728 Q Service Manual

This is the 19 pages manual for Dual CS 728 Q Service Manual.
Read or download the pdf for free. If you want to contribute, please mail your pdfs to info@audioservicemanuals.com.

Page: 1 / 19
left right
Dual CS 728 Q Service Manual

Extracted text from Dual CS 728 Q Service Manual (Ocr-read)


Page 1

Service -An|eitung

Service Manual
Instructions de Service

Dual

87280

We Mai 1981

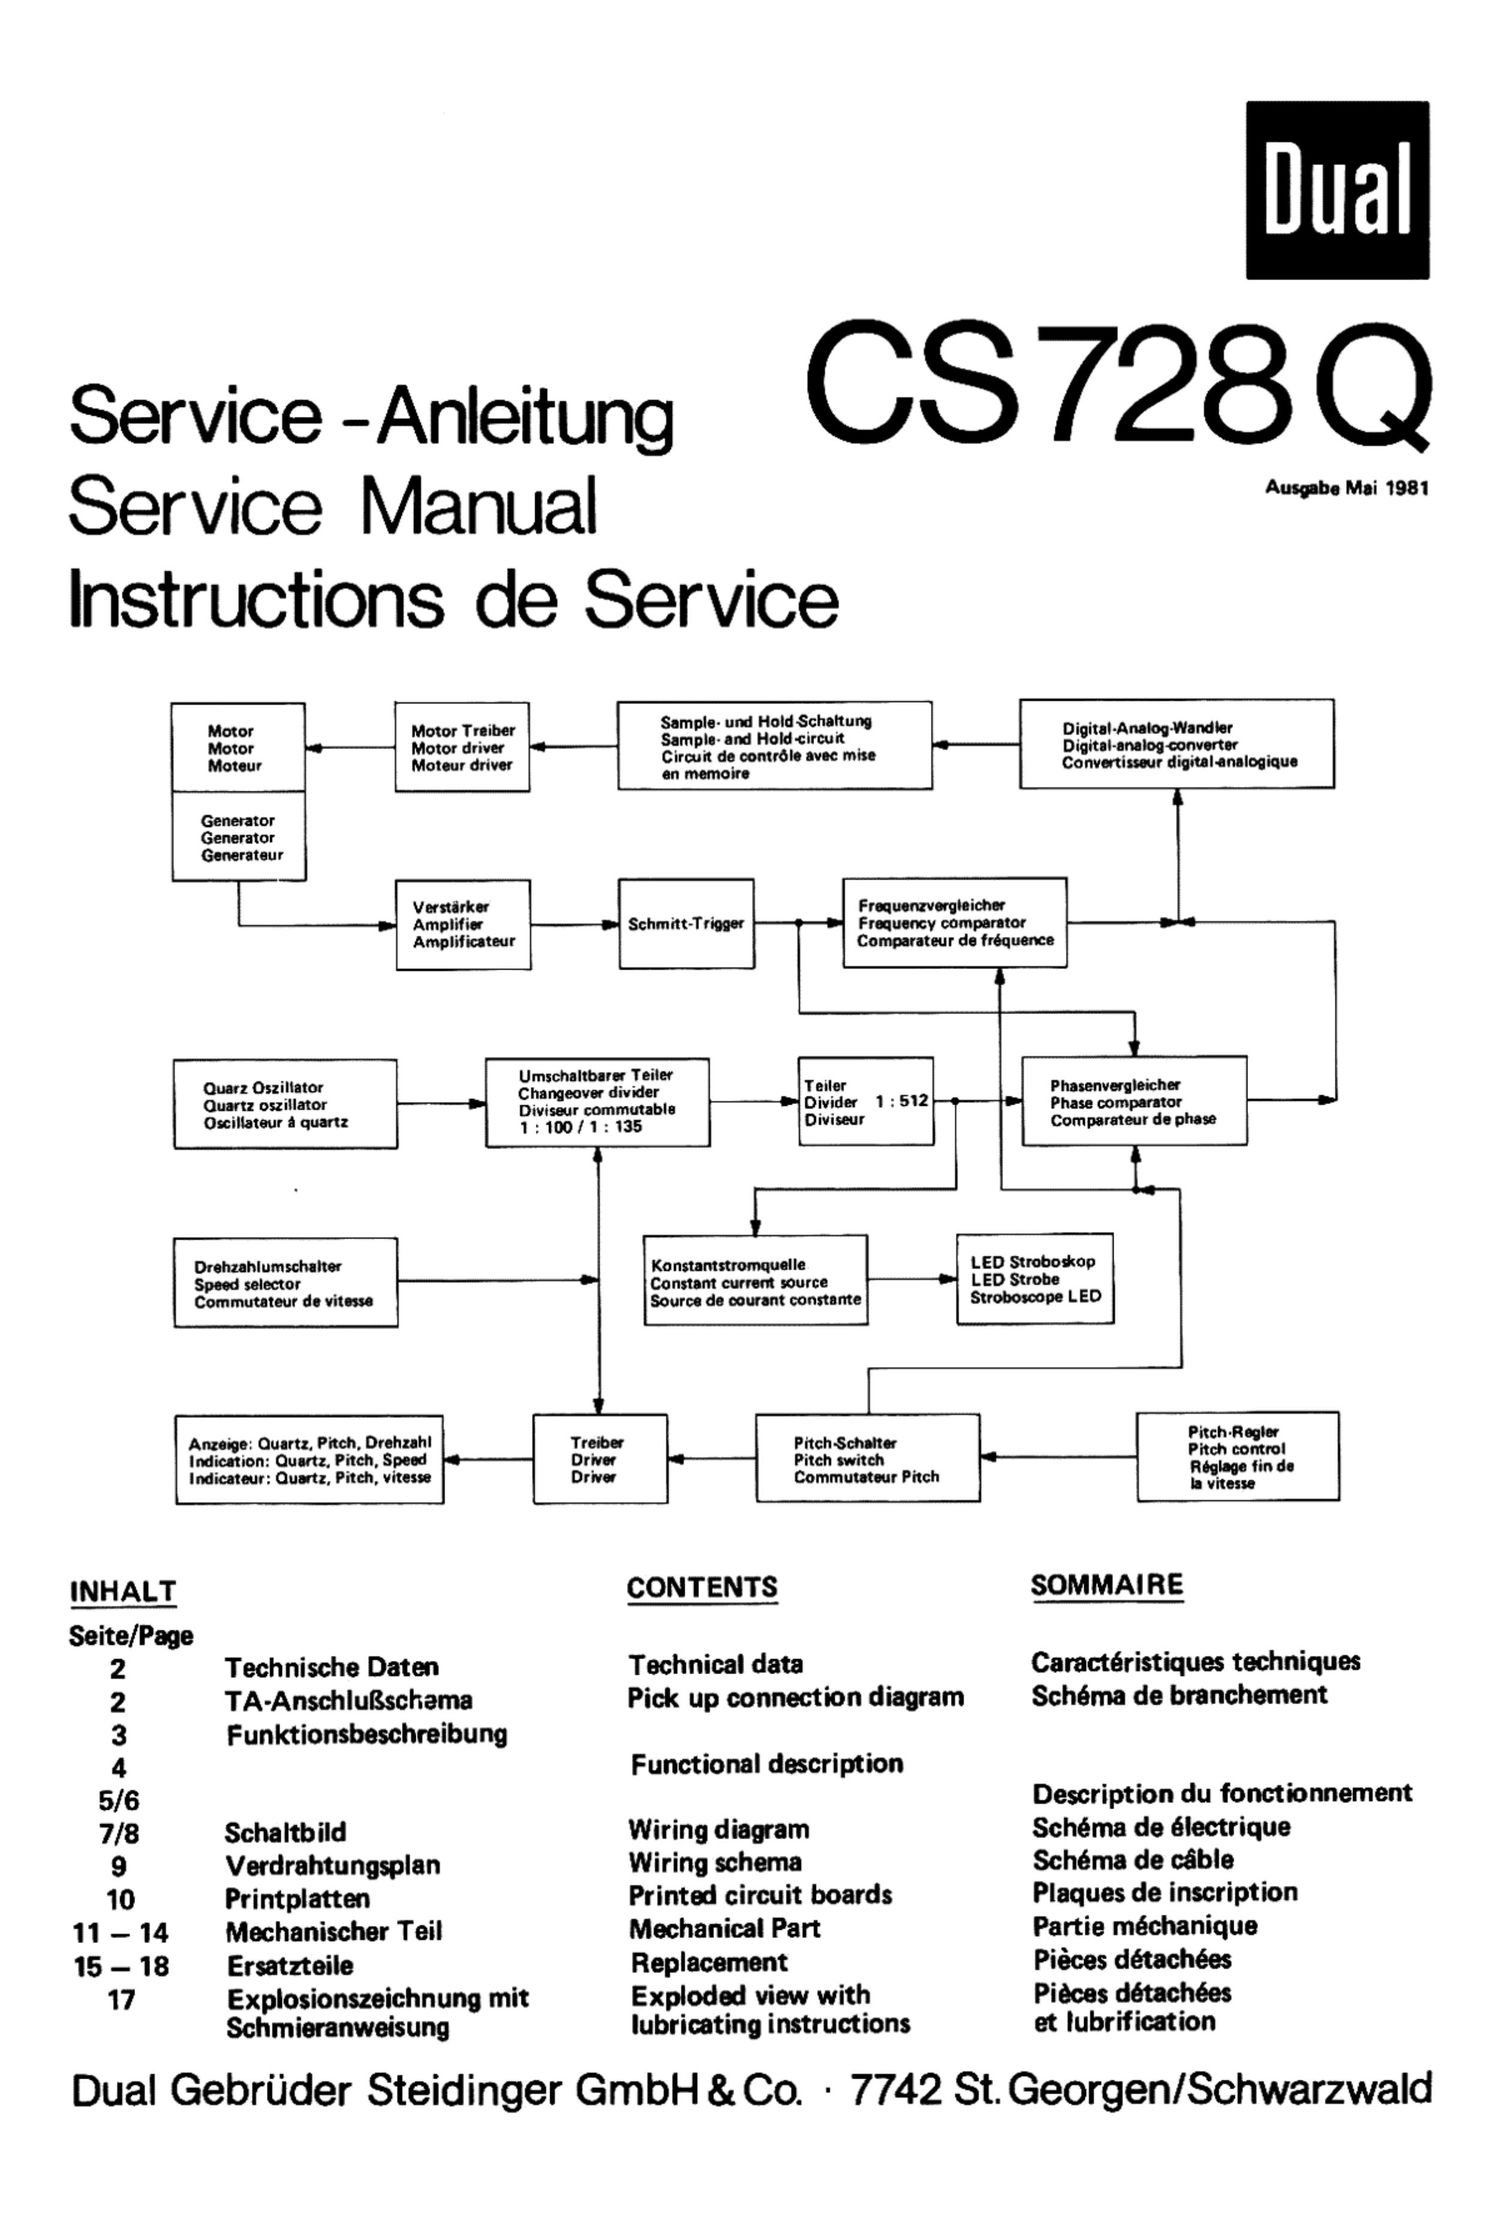
Motor Motor Treiber 2m: ":3 0:: 69.?" DigitIi-AMM'WIndier
Motor ~- Motor driver ¢--- c.:".n";° wmfiofimc mm 20- Digital-analogconverter
Moteur Motcur driver or: amok. Convmiueur digitalenelogiquc
Generator
Generator
Generateur
Vented! Frocucmorgieicher
-D- Amplifier -.- Schmitt-Trigger -9-.r Frequency comparator
Amplnicuteur Comparataur dc fréquence

K

Ouarz Oszillator
Quartz oszillator
Oscillateur I quartz

Umschaltbarcr Tailor

Cha cover divider 7?",9' Phasenvergleicher
Divinsgur commutable ." OFF! 1 i 52 #' Phase comparator
1 : 100/ 1 : 135 Dmseur Comparateur do phase

l

l

I.

Drehuhlumschaiter Konstantstromquelle LED Stmbodtop
SM selector -'-. Constant current scurce --.' LED Strobe
Commutateur do vitm Source do ocurant consume Stroboacope LED
L
22222222222222.2222: +- 22: 2.- 22:22:: 2- 222-222.
lndicateur: Quartz: Pitch: vitesse Driver Commumour Pitch Esmsf" "
INHALT CONTENTS SOMMAI RE
Seite/Page
2 Technische Daten Technicai data Caractéristiques techniques
2 TA-AnschluBschama Pick up connection diagram Schema de branchement
3 Funktionsbeschreibung
4 Functional description
5/6 Description du fonctionnement
7/8 Schaltbild Wiring diagram Schema de électrique
9 Verdrahtungsplan Wiring schema Schema de céble
10 Printplatten Printed circuit boards Plaques de inscription
11 - 14 Mechanischer Teil Mechanical Part Partie mechanique
15 - 18 Ersatzteile Replacement Pieces détachéec
17 Explosionszeichnung mit Exploded view with Pieces detachées
Schmieranweisung lubricating instructions at lubrificetion

Dual Gebriider Steidinger GmbH & Co. - 7742 St. Georgen/Schwarzwald

Page 2

siehe separates Datenblatt
Tonabnehmersysterne mit 1.12 inch
Schraubbefestigung kennen mit dem
rm Fachhandel erhaitlichen Sonder-
zubehor eingebaut werden

, see separate data sheet

Cartridges with 1/2 inch screwtype
attachment. These can be fitted with
the Special accessories which can be
obtained from trade dealers

I - 4*
Technische Daten Technical data Caractéristiques techniques I
MeBwerte = typische Werte Measured values = typical values ' Valeurs mesurées = valeurs typiques
Rumpel- und Gleichlaufwerte mit Rumble and wow and flutter values Ronflement et Syncronisme determine
Lackfo lie ermittelt obtained with lacquer foil avec une feuille vernie
Stromrt Current type Courant
Wechselstrom Alternating current Courant alternatif 50 - 60 Hz
Netnpennungan Maine voltagu Tensions secteur l 10 - 125 Volt
i , _, 220 - 240 Volt
Antrieb Drive Entra lnernent
quarzstabilisiertes elektronisch quartz stabilized electronic direct- Systéme dentrainement direct a com-
geregeltes Direkt-Antriebasystem driversystem Qandeélectmnique, stabilisee parquartz E05 501
Leietungeaufnahme Power consumption Consommation ca. 4,5 Watt
_Motor be: Sprelbetrieb motor during playing - Moteur pendant la lecture <50 mw
Stronteufnehme Power consumption Consornmation da courant
an 230 V 50 Hz: bet Anlaut _ on 230 V 50 Hz: at start en 230 V 50 Hz: au démarrage 60 mA
be: Spielbetrieb at play en tonctionnernent ca. 30 mA
an 115 V 60 Hz; bei Anlaut . on 115 V 60 Hz: at start an 115 V 60 Hz. au demarrage 120 mA
be: Spielbetrieb ._ at play - 4 en fonctionnement ca. 60 mA
{Aniautait Starting time fl Tempe do chauffage
(bis zum Erreichen der Nenndrehzahll (until the rated speed is attained] (pour atteindre la vitesse nominalel
Del 33 1/3 U/mrn at 33 rpm A a 33 trirnn _ ' 2 - 2,5 5 __q
Plattanteller Platter Plateau
nichtmagletisch, abnehmbar ' non~magnetic, removable _ antimagnetique, amovible _ 1,45 59' 304 mm ti) _
Plattentdlar-Drehuhlen elektronisch Platter speeds switched Over electroni- Vitesses du dateeu cemmutationélec I
umschaltbar. quarzstabilisiert cally. quartz stabilized Monique stabilisée par quartz I33 1/3: 45 U/min _
Tonhohen-Abetimmmg Pitdt control Raglage de la hauteur du son
mit DrehWiderstand einstellbar, . adjustable with variable resistor réglage avec resistance rotative
Flegelbereich _ Range of regulation Plagerde réglage 1I % _
Drahzanlltontrolle Speed control Conn-Ole de la vitaae
qmit Leuchtstroboskop fijr Platten with illuminated stroboscope for platter avec stroboscope lumineux incorporé l
teller-Drehzahlen 33 1/3 und 45 U/mm, speeds 33 1/3 and 45 rpm, 50 and au bord du plateau pour les vitesses
50 und 60 Hz, im Plattentellerrand 60 Hz de plateau 33 1/3 at 45 tr/mn
'integriert _ 50 ou 60 Hz
Emptindlichkeit des Leuchtstroboa- Sensitivity of the illuminated atrobos- Sensibilite du stroboacope lumineux
kope fiir 0,1 % Drehzahlebweichung cope for 0.1 96 speed deviation pour 0,1 96 d'ecart de vitesse
Striche pro Minute Divisi_0n markings per minute _ Divisions par minute ¥_ 4
Geeerntdeidtlauflehler DIN Wow end flutter DIN l Tolerance do vitesse totele DIN t 0.045 96
. WRMS 7 WRMS _ WRMS i0,025% g
Stdnpanntetgsebetand Signal-to-noise ratio Rapport signal/bruit
(nach DIN 45 500i lin accordance with DIN 45 500i (suit/ant DIN 45 500)
Rumpel-Fremd5pannungsabstand Rumble unweighted signal-tonoise ratio Signal/tensmnextér eure de ronflement 52 dB
Rumpel-GerauschSpannungsabstand Rumble weighted signal ~to-noise rat l0 Signal/tension perturbatrice de ronflement 78 dB
Tanarm Tonearr'n Brae de lecture
verwindungssteifer, uberlanger Distortion-free "ultra-low-mass. alu- Bras de superlong en tube dalu-
Alu-Rohrtonarm in kardanischer minum tubular tonearm in gimbal minium, antitorsion, avec Suspension i
Vierpunkt-Spitzenlagerung 4 point tip bearing cardanique a quatre pointes _
Wirkaarne Tonarrnlen, Effective tonearm length _ _ Longueur efficace du bras 221 mm _
Krdptglgawinkel V Offset 299" w Angle do coude .. 24_° _'30
Tamtialer Spurtehlwinkel Tangential tracking error JAPV° detreurflde piste tangential __ 0,150/cm
Tonarm-Lagerraihung Tonearrn bearing friction Frotternent de la suspension du bras
lbezogen auf die Abtastspitzel (referred to stylus tipl , lrappor}_é a la pointe de lecture) <9,07 mN (0,907 pl
Auflegeltraft Stylus pressure Force dappui
van 0 - 20 mN l0 - 2 pl stufenlos Infinitely variable from 0 to 20 mN Réglage continu deO a 20 mN
regeer mit 1 mN {0,1 pl Kali- i0 - 2 gl, wrth 1 mN l0.l gl calibra- IO - 2 g), graduations del rnN
brierung rm Bereich von 2 - 15 mN tion in the range from 2 to 15 mN (0,] g) dans la gamme de 2 - 15 mN
(0.2 - 1.5 D) (0.2 - 1.5 gl (0.2 - 1.5 gl
betriebsicher ab operable from fonctionnemem sur a partir de . 215 mN lQ,25_pl a
Tonabnehntersyetern Cartridge Cellule

voir fiche technique séparée

Cellules avec fixation 3' ms de 1/2"
peuvent étre montees ou nOyées. Des
accessoires Spéciaux sont en vente
dans Ie copimerce Spécralisé

I
Art-Nr. 266048

Einstellbarer Uberhang . Adjustable Overhang Ported-tam réglable {5 mm
TA-Anschlufsschema / Pick up connection diagram / Schema de branchement
Konfllflfllt Stummschelter S 11
Contact Plate Mating switch .
ue do contact: . . Cinch-Stacker DIN-Stacker 5 pol.
plat: I91"93E°2'?E'-- 1 Cinch Plug DlN-Plug 5 pin
gnaw... r I n fiche cinch , . fiche cm 5 poles
- reenter Kanel ' l i
right channel I l : l
canal droit I I l j
- griin [green lvcrt I : J O l t'
I I l
sch bl I l
- inter: l aclt [Jnorr 4 3 :
I I i
bleu [blue Ibiau | I 'L
- linker Kane! : i I
left channel . L :
--Jr m" m '
waiB [white lbianc i t I
-_ L... _ _ - ..... J '

Page 3

Funktionsbeschreibung

Motormuno

Zur Motorregelung liefert der Generator 6 eine drehzahlpro-
portionale Frequenz. die durch C 9011 von storenden Ober-
wellen befreit wird und iiber C 9012 am Transistor T 9005 an-
Iiegt, der die Spennung ca. 180-fach verstErkt. Der als OP arbei-
tende DC 9005 erhelt seinen Arbeitspunkt durch den Spannungs-
teiler R 9019 und C 9013. Die Mitkooplung durch R 9020 be-
schleunigt den im Takte der Generatorfrequenz ablaufenden Urn-
schaltprozeB des OP. wodurch an Pin 7 steilflankige Impulse an-
stehen. die iiber T 9002 die Phasenvergleichsschaltung IC 9003m-
steuern. Weiterhin steuern die durch C 9014, R 9021 und R 9022
differenzierten Impulse T 9006 kurzzeitig an, wodurch fiber
R 9026 der zeitbestimmende Kondensator C 901Sentladen wird.

Je nach gewahlter Drehzahl wird fiber R 9024, R 9025, R 9027
und R 9028 der Kondensator C 9015 in Richtung Masse aufge-
laden. Dabei ist bei Drehzahl 33 nur R 9027 und R 9028 wirk~
sam. Bei Drehzahl 45 wird T 9007 leitend, so dai! dieWidersta nde
R 9024 und R 9025 dazugeschaltet werden. Beirn Drehzahlab
gleich ist also immer zuerst "33" und dann 45" einzustellen.

An Pin 2 des IC 9005 11th diese sagezehnformige Spannung an
und wird mit der aus R 9029 und R 9040 gebildeten Mitten-
spannung verglichen. Beim Unterschreiten der Mittenspannung
entsteht an Pin 1 (166 IC 9005 ein positiver Ausgangsimpuls. der
fiber die Differenzierschaltung R 9031. C 9017 und R 9032 den
T 9008 ansteuert. wodurch C 9018 auf die durch den Spannungs-
teiler R 9034, R 9035 vorgegebene Spannung von 07 Volt ent-
iaden wird. Mit D 9007, D 9008 und R 9033, R 9036 wird an-
schliefsend C 9018 ie nach lmpulsdauer mehr oder weniger weit
aufgeladen, was fiber die Siebschaltung R 9037, C 9019 die als
Darlington geschaltete Endstufe T 9009, T 9010 und damit den
Motorstrom regelt.

Der Spannungsabfall an R 9039 ist proportional zum Motorstrom
und steuert iiber R 9040 die Mittenspannung an Pin 3 des IC 9005
etwas nach, wodurch ein drehmomentabhéngiger Drehzahlabfall
kompensiert wird. Wird 2.8. beim Anlaufen des Motors der Tran-
sistor T 9010 stark durchgeschaltet (Uc < 5,3 Vi, wird dieser
Effekt durch D 9009 und R 9041 wieder aufgehoben.

Quanta"

Der Quarzoszillator, bestehend aus T 9001, R 9001. R 9002.
C 9001 - C 9003 and dem Grundwelienquarz mit 4.608 MHz
steuert iiber Pin 9 den programmierberen Teiler IC 9001 an. Stem
der Drehzahlumschalter S 7 auf Stellung 33", so heben die Eingengs-
daten der Eing'ange P1 bis P8 fblgendes Bitmuster: H L H L H L H H.
Dies entspricht einer Dezirnalzahl von 135. wobei die Wertigkeit
von P1 - P8 den Zahlen1, 2. 4, 8, 10, 20, 40,80 entsprechen.
Auf Stellung 45 wird durch das Bitmuster (P1 - P3) L L L L
L H L H die Dezimalzahl 100 dargestellt, Dadurch entstehen am
Ausgang Pin 15 des IC 9001 (O 8) die Frequenzen 34,13 kHz bzw.
46,08 kHz. Diese Frequenzen werden mit IC 9002 durch 512129)
geteilt, wodurch sich die Arbeitsfrequenzen von 66 2/3 Hz oder
90 Hz ergeben (Pin 12). Der Ausgang steuert die Phasenverv
gleicherschaltung an, die aus den zwei D-Flip~Flops IC 9003.
R 9010 und D 9001 gebildet wird. Die der Ist-Drehzahl entspre-
chende Referenz-Frequenz wird von 1C 9005/Pin 7 geliefert,dem
ein Inverter mit T 9002. R 9005, R 9006 und R 9007 nachge-
schaltet ist. Die beiden Ausgénge der Phasenvergleicherschaltung
beinhalten die Information dos Phasenwinkels von --360° bis
+360o in Form unterschiedlicher lmpulsbreiten. Diese Signals
werden mit den Dioden D 9002 and D 9003 entkoppelt und mit
den Widerstanden R 9011, R 9012 so an die Regelelektronik en-
gepaflt, dais sich ein Synchronhaltebereich von :3 96 ergibt. Die
Synchmnisierung wird dadurch erreicht. dais bei voreilendem
Phasenwinkel ein positiver Strom fiber R 9011 auf den drehzehl-
bestimmenden Kondensator C 9015 fliei3t. Dadurch wird die
Ségezahnspannung geringfiigig verkleinert (von + 12 V aus ge-
messen). was dann einen Riickgeng des Motorstromes zur Folge
hat. Bei nacheilendem Phasenwinkel flieBt ein negativer Strom
iiber R 9012 auf den Kondensator C 9015,wodurch eine Erhohung
des Motorstromes erreicht wird. Dies fiihrt dann ieweils dazu,
dais die vorgegebene Drehzahl erhalten bleibt.

Pitch

Zur Pitch-Regelung wird mit dem Potentiometer R 9042 iiber
R 9030 dieMittenspannung an Pin 3des IC 9005 etwas nach + oder
- verschoben, wodurch sich die Drehzahl um i 5 96 ver§ndern
IaBt.

Dieee Verstimmung ist nur bei Stelluno "Pitch" méglich und
wird bei Ouarzbetrieb durch den Querz/Pitch-Schalter S 2 aufge-
hoben.

Stroboekop

Die Frequenz des Teilers 1C 9002 wird mit R 9009.C 9008 und
R 9013 differenziert und fiber die Diode D 9W4 auf die Basis
des T 9003 gegeben. Dieser geht dabei kurzzeitig in den gesperrten
Zustand fiber. wodurch sich an der Basis des T 9004 eine Span-
nung einstellt. die ihn soweit durchsteuert, dafs an R 9016 eine
um 0,7 V niedrigere Spannung als an der Basis anliegt. Die kon-
stante Basisspannung sichert auch einen konstanten impulsfbr-
migen Strom fiber clie Leuchtdioden D 9005 und D 9006, deren
Leuchtdauer hauptsachlich von C 9008 und R 9013 abhéngt.
Die Blitzfrequenz betrégt bei 33 U/min 66 2/3 Hz und bei
45 U/min 90 Hz und ist jeweils quarzgenau.

Dispiey
Des Display dient der optlschen Anzeige folgender Betriebszusténde:

Drehzahlanzeige 33 und 45, Quarz- oder Pitchbetrieb. Die beiden LED's
fiir die Drehzahlanzeige 33 und 45 leuchten abwechselnd je nach Schal-
terstellung. lhr Anodenpotentiel wird bei iibermaBiger Drehmoment-
belastung am Teller und in der Anlaufphase durch T 9102 an Masse
gelegt, wodurch sie erléschen.

Die beiden LED's fiir Quarz~ oder Pitch-Anzeige leuchten ebenfalls ab-
wechselnd je nach Schalterstellung von S 2.

Verteiierplatte

Die Printplatte beinhaltet die Gleichrichtung D 9451 - D 9454, die HF-
Siebung C 9451 und C 9452 und die 100 Hz-Siebung mit C 9453. Sie
hat zudem die Funktion der zentralen Geréteverschaltung. Frontbedie-
nung, Solenoids und Ger'a'temicroschalter sind hier verkabelt.

Start-Funkfion

Wird die Start-Taste S 4 gedriickt. zieht der Start-Magnet M 1 an. Sein
Selbsthaltekontakt S 12 hfilt den Magnet fiber 0 9456 und T 9451 in
Arbeitsstellung. Uber D 9455 wird die Motorelektronik nach 0 V 9e-
scnaltet. Léuft des Kurvenrad anschlieflend durch, schaltet der Lauf-
werkschalter S 8 ein. Jetzt Iiegt die Motorelektronik ganz an Masse.
Kurz bevor das Kurvenrad in seine Nullstellung Iéutt. wird von ihm der
Anker des Start-Magneten M 1 zurflckgedréngt. der Magnet ram ab.

Steht am Anfang der Startphase der Nocken des Motorritzels so ungiin-
stig. dais der Anker des Start-Magneten den Absteller nicht ganz vor-
schieben kann, so konnte der Start-Vorgang nicht eingeleitet werden,
da der Anker seinen Haltekontakt S 12 nicht erreicht. Um diesem Zu~
stand vorzubeugen, bekommt die Motorelektronik in diesem Falle iiber
D 9461 Strom. Der Motor dreht sich, nun lfiuft der Start-Vorgang plan-
méflig ab.

Daumiel-Funktion

Die Dauerspieltaste S 3 hat verriegelnde Funktion. Sie kann dureh
nochmaliges Driicken oder durch Betétigen der Stop-Taste S 5 wieder
entriegelt werden. Die Dauerspieltaste verbindet den Start-Magneten
M 1 derart mit dem Kurvenradschalter ., Dauerspiel" S 9. dais nach dem
Abspielen der Platte nicht der Stop- sondern wieder ein Start-Vorgang
augelést wird.

StopFunktion

Fiir die Stop-Funktion darf der Start-Magnet M 1 nur kurze Zeit (nach-
stens 1/4 Kurvenradumdrehung) in Arbeitsstellung bleiben. Bleibt er
linger in Funktion, wird das Umlenksegment des Kurvenrades beta'tigt.
Dies entspricht dann der Start-Funktion.

Page 12

Mechanical Part

General

The following item numbers refer to the spare part lists and exploded
drawmgs.

The cover can simply be removed by the hinged clips.

The base 57 is secured by four cheesehead self-tapping screws {base set
55) and with two screws 20 on the spring cluster.

Front screen

The front screen 53 is secured to the casing 95 by two hexagonal nuts
120.

Removing the chassis complete

It is recommended to follow the following instructions when dismantling
the chassis complete:

1) Remove caver 95 and turntable 92. Remove the base 57.

2) Loosen the three cheesehead screws 93. Lift Cover 94 and turn so
that it can be removed over the tonearm bearing and tonearm.

3) Swing in tonearm 135 and solder connecting leads. Hold chassis.

4) Remove the four cheesehead screws 19 of the spring cluster 17 and
remove chassis from the casing 95.

Motor and drive

Special tools and measming equipment are necessary when repairing
Dual EDS 501. Therefore repairs to motor and motor circuitry should
be carried out by an authorized Dual service agency.

Changing the motor circuitry
1) Disconnect the connections to the motor circuitry 44.

2) Remove the two cheesehead screws 97.
3) Change the motor circuitry 44.

Changing the motor mechanism

ll Unscrew the two setscrews 51 and remove the cone50 and washer 52.

2) Disconnect the motor and generator power connection from the
motor cirCuitry 44.

3) Remove the three cheesehead screws 49. Replace the motor me-
chanism 53.

Adjusting the rated Speed (33. 45 rpm)
Adjustment shOuld be carried out in the following order:

1i Set the crystal/pitch switch in the crystal position.

2i Set Speed control switch0ver in position 33.

3) Connect point 143 of the motor circuitry to earth.

4i Adjust the rated Speed 33 rpm with the aid of the built-in strobos-
cope on control R 9028.

5) Set the speed control switch to position 45.

6) Adjust the rated speed 45 rpm with the built-in stroboscope on
control R 9024.

Pitch control variation

Each rated speed can be varied within a range of 1 5.5 96 with the
"pitch" control.

When the crystal/pitch switch is in the crystal position the turntable
speed corresoonds exactly to the adjusted rated speed. This is carried
cut independently of the position of the control.

Tonearm and tonearm bearings

Dismanting tonearm complete with tonearm bearing
It is recommended to follow the followung order:

it Set the control knob 129 in the zero position. Lock the tonearm
135. Loosen the tensioning screw 132 and remove the weight 166.

2) Remove the cheesehead screw 84, the hex nut 83 and cover plate 82.
Unsolder the tonearm leads at the shortcut 77.

3) Remove the machine screw 181. the micro switch and the switch
support 176.

Al Remove lock washer 155. Lift off main lever 154 and bearing sup-
port 153.

5) Remove the hex not 110 and the sunk screw 113 and counter bearing
112.

6) Hold tonearm. Remove the machine screw 73 and lift Tonearm cpl.

ReverSe this procedure when reassebling. Please bear in mind the threshold
pins is correctly positioned in the ball bearings.

Removing the tonearm from the bearing case

1) Remove weight 166. Screw out tensiOning screw 132 and set the
control knob 129 in the zero position.

2) Remove cheesehead screw 84 and cover plate 82. Unsolder the tone-
arm leads at the shortout 77.

3) Loosen the countersunk screw 130. Remove control knob 129
washer 128 and pointer 127.

4) Loosen lock nut 98 and remove Setscrew 99.

5) Remove tonearm 135.

Assembly should be carried Out in the reverse order.

Changing the Spring wsing

Remove the tonearm 135 from its bearings 126 following the instructions
described above. Remove the spring case 133.

Special attention must be paid to ensure that the coil Spring fits in the
recess of the bearing 134. Reassemble the tonearm. Adjust the bearing
play as desoribed below.

Adjustment of tonearm hearing

The tonearm must be exactly balanced. Both bearings should have very
little or no play, The horizontal tonearm bearing is correctly adjusted
when the tonearm can freely slide in and out with the antiskating adjust-
ment set to "0.5" The vertical tonearm bearing is correctly adjusted
when the tonearm freely swmgs back into position after being tapped.
The play in the horizontal tonearm bearing can be adjusted with the
setscrew 99 and the counter nut 98. The play in the vertical tonearm
bearing can be adjusted with the setscrew 118 and the counter nut 119.

Shortcut

Adjustment point

When the Curve wheel is in the zero position the contact distance
between the contact spring F and shortout contact L Should be 0.5 mm.
if necessary, bend shortout contact slightly and clean the contact spring
with a suitable cleaning agent.

Tonearm lift

Adjustment point

The tonearm lift height can be adjusted by means of the adjustment
screw and should be between ca. 5 mm.

Changing the lift board

1) Lock tonearm 135 in position. Remove the screw 181, the micro-
switch 34 and the switch Support 175. Remove the lock washer 155.
Lift off main lever 154 wrth bearing support 153.

2) Remove the lock washer 180 and the cam wheel 179. Loosen the
machine screw 108. Remove the slide bush 171. lift the adjusting
bar 170 and rem0ve the lift board 105.

Assembly is carried out in the reverse order.

Adjustment points

Set down point

The set down point of the tonearm can be altered with the ecentric bolt
E [Adjusting plate 71). The setting is effective not only for 17 cm but
also for 30 cm rec0rds.

Shut-off point
The shut-off point can be varied within the shutoff range [record dia.

116 to 122 mml.
Remove platter 92. Usmg a screwdriver adjust shutoff rail 150 through

the hole in cam wheel 30.

F058!

After removmg the turntable 92 the cover of the que switch 27 can be
removed allowing access to the fuse 28.