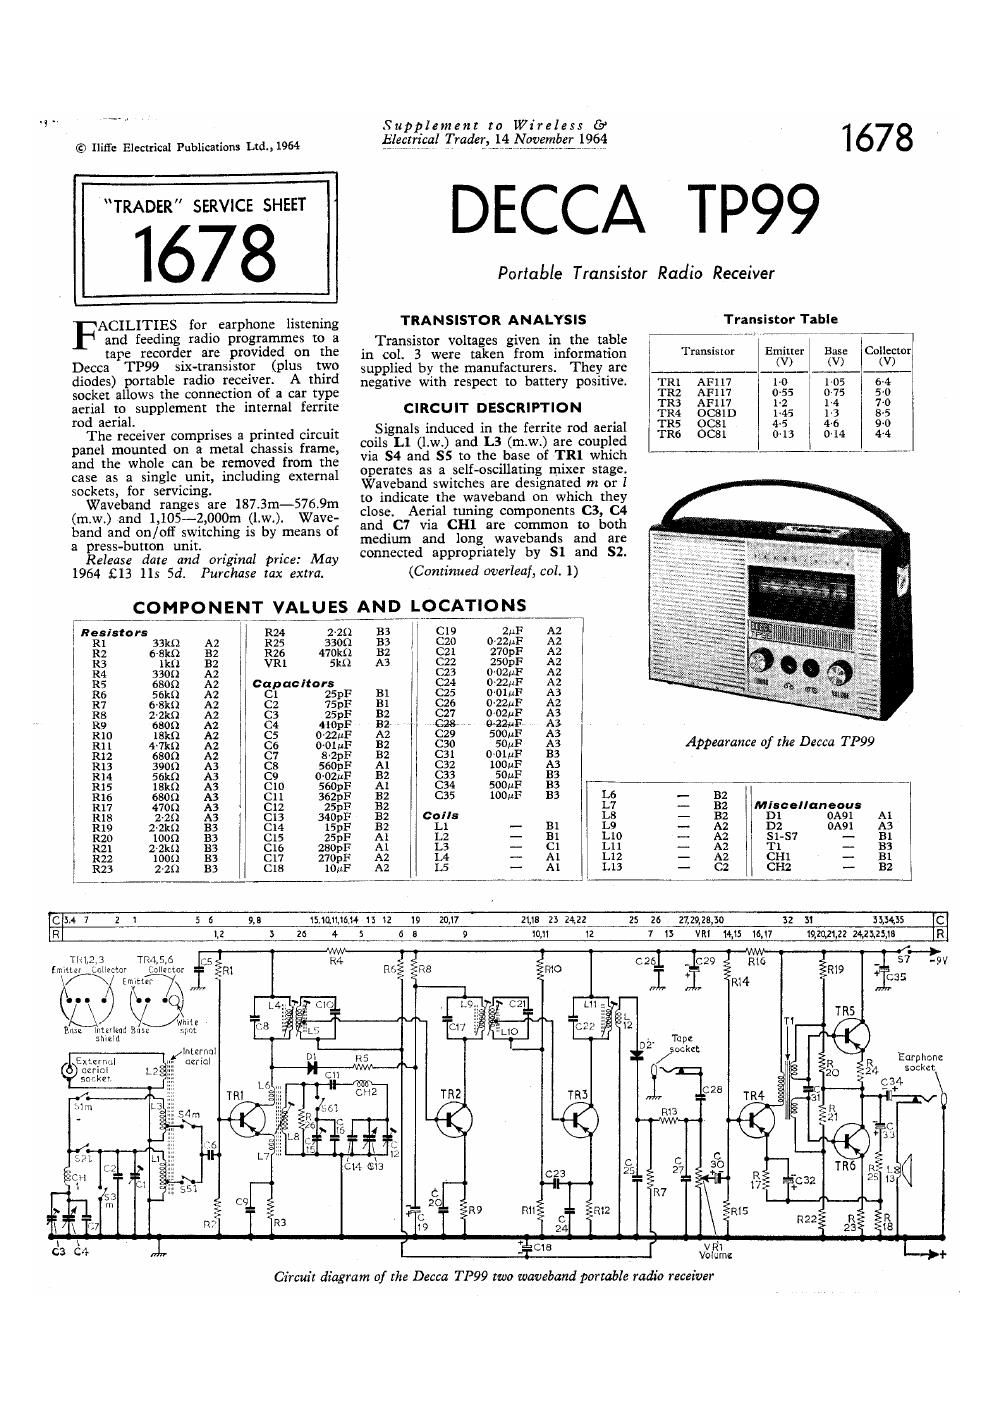
Decca tp 99 service manual

This is the 2 pages manual for decca tp 99 service manual.
Read or download the pdf for free. If you want to contribute, please mail your pdfs to info@audioservicemanuals.com.

Page: 1 / 2
left right
decca tp 99 service manual

Extracted text from decca tp 99 service manual (Ocr-read)


Page 1

© lIifl'e Electrical Publications Ltd.,l.964

TRADER SERVICE SHEET

1678

ACILITIES for earphone listening
and feeding radio programmes to a
tape recorder are provided on the

Decca Tl99 six-transistor (plus two
diodes) portable radio receiver. A third
socket allows the connection of a car type
aerial to supplement the internal ferrite
rod aerial.

The receiver comprises a printed circuit
panel mounted on a metal chassis frame,
and the whole can be removed from the
case as a single unit, including external
sockets, for servicing.

Waveband ranges are 187.3m-57619m
(m.w.) and 1,105-2,000rn (l.w.). Wave-
band and on/ofi switching is by means of
a press-button unit.

Release date and original price: May
1964 £13 115 501. Purchase lax extrar

COMPONENT VALUES AND LOCATIONS

Supplement to Wireless Ctr
glectn'eal Traderi,ril4fil\rlggenizlie:71264 1 678

DECCA TP99

Portable Transistor Radio Receiver

TRANSISTOR ANALYSIS Transistor Table
Transistor voltages given in the table _
in col. 3 were taken from information Transistor Emitter Base
supplied by the manufacturers. They are _ _ _£V_)_ #3,;
negative with respect to battery positive. TRl AF117 I 10 1-05
a; 1:11;
- 1,4
CIRCUIT DESCRIPTION $5; 832i 5 3,3
. . . . . 4.5 -a
Signals induced in the ferrite rod aerial TM 0C31 I 0.13 0.1 4

ooils Ll (l.w.) and L3 (m.w.) are coupled
via S4 and SS to the base of TRl which "¥W-_-*-
operates as a self-oscillating mixer stage.
Waveband switches are designated m or I
to indicate the waveband on which they
close. Aerial tuning components C3, C4
and C7 via CH1 are common to both
medium and long wavebands and are
connected appropriately by SI and 82.

(Continued overleaf, col. 1)

I Resistors I R24 2211 133 I C19 2.1F A2 I
R 33m A2 R25 3300 133 I C20 O-ZZAF A2
R2 mm 112 I R26 470m 132 C21 270m: A2 I
R3 1km 132 mu 5m A3 C22 250pF A2 I
R4 33011 A2 C23 040214? A2
R5 6800 A2 capuclrors 024 0-22AF A2
R6 sekn A2 Ci 5pF 131 C25 0-0121? A3
R7 o-sm A2 c2 75pF 131 I I C26 0222111: A2
R8 222m A2 C3 25pF 32 I 1 (727 0-02MF A3
R9 neon A2 C4 410131: 82 042.21? A3
R10 iskn A2 I C5 0 2214: A2 C29 500111: A3 I
R11 Hm A2 C6 0 11qu 112 C30 50141: A3 Appearance of the Decca TP99
R12 6800 A2 C7 s 2131 82 C3 crown 133
R13 3901: A3 C3 550m A1 C32 10021: A3
R14 56m A3 c9 0 02212 132 C33 50m: B3
R15 1am A3 C10 560 1: A1 C34 50021? 133
R16 asoo A3 I C11 362pF B2 C35 10mm 133 L6 ._ 52
R17 470!) A3 C12 25pF 32 L7 _ 132 Miscellaneous
R18 2-20 A3 I C13 340pF 132 Calla LB _ 132 D1 0591 A1
R19 mm 133 014 151:11 132 L1 - 131 I L9 ._ A2 132 0A.» A3
R20 10011 113 I C15 251,1: A1 L2 - 131 1 L10 - A2 51.57 _ m
I R21 2-2k5l 133 C16 250pi= A1 L3 - C1 L11 - A2 I T1 _ 133
I R22 10011 133 C17 270m: A2 L4 - A1 L12 - A2 cm - 131
1 R23 22:1 133 C18 101117 A2 L5 - A1 L13 - C2 CH2 - 132
CIM 7 2 I s 5 9.8 11111111611 13 12 19 20,17 21,11; 25 24,22 25 25 27,223,311 32 31 3554,15 c
RI 1,2 3 26 4 s a e 9 10,11 12 1 13 VRI 14,15 16,17 19,2w1,2224,2i25,13 R
T1212: T124456 I '
[miner InIIIctDr ColItctnrféR] 025]. :1? > R16 éRW i517 -.°V
Emvtter ' C35
1 n]; ,1 R14
.0. C O. I

. while
Mr: Interluad Base spot
5mm

Exzqmu
mm L
socket

Internal
/ aerial


'Eurphone
520 2R4 Socket
9.1

H13
C
c
55 27 3
- =
R7

4-1015 V [ 'vR1 ' '
, Volume {-

Circuit diagram of the Decca TI99 two waveband portable radio receiver

Page 2

DECCA
TP99

167
.1.__._.@_._,_+._._.._.__._+__.©_._._4

LVL MW. 0th;
i i l

mall '77
° [-I

I'm m mam Ctl
[fl

We

l_"- on]:
1 ca
Tl Qto)6 I159 -

law.
1.3

TAPE EARPHONE
SOCKET

9% r/ e? 08:34
- ci
mo - E... o
m" BEE] l '
0 END it w 35 R TRANSISTURTYPES
. H C30 CE] 24 61:3 } Arm's
I cszfi 1R6 ! TR4-OCBID
I VOLUME mé i R22 R23 mmmo I TRSvTfléOCE j


ext AERIAL
50cm "

Supplement to Wireless 6?
gleim'eal Trader, 14 November 1964


View of the receiver from the rear showing component location:

Circuit Description-contihued

L.w. coil L1 is short-circuited on m.w.
by the action of S3. Signals from the
external aerial socket are coupled to the
ferrite rod via L2.

Forward base bias for TRl is arranged
by the choice of suitable values for R1
and R2 to which the base isconnected
at their junction, in conjunction With the
emitter stabilizing resistor R3. Local
heterodyne signals are developed by posi-
tive feedback from TRl collector to emit-
ter via [.6 and L7 through L8, the latter
forming part of the oscillator tuned Cir-
cuit. L8 is tuned by C11, C12? C13 and
C14, with C15 and C16 added in parallel
on l.w. Oscillator damping is prov1ded
by R26. .

LE. signals present in TRl collector are
selected and coupled via the double-tuned
transformer IA/LS to the first if. ampli-
fier TRZ. This is an a.g.c. controlled
stage with do. output from the detector
D2 fed back to the base via R7, the dc.
level being a function of signal strength
0n strong local signals the reduced col-
lector current through TRZ collector feed
resistor R8 due to a.g.c. action has the
effect of removing the reverse bias on
D1, taking the diode into the conducting
region and heavily damping L4. .

Amplified output from the second if.
stage TR3 is applied via L11 /L12 to the
detector diode DZ and rectified audio-
signals are filtered by R13 and C27 and
developed across the load resistor and
volume control VRl. At this point a tape
socket coupled via C28 allows the de-
tector output to be fed to the recording
head of a tape recorder.

Audio signals from the slider of VRl
are capacitively coupled via C30 to the
base of the driver TR4 which feeds the

bases of the push-pull output pair TRS
and TR6 with alternate half-cycles via
the split-secondary transformer T1 con-
nected in its collector circuit. TRS and
TRIS are series connected and biased by
the network R19-R22 for operation in
Class B. The high impedance loud-
speaker L13 forms the output load im-
pedance. A switched earphone socket
automatically disconnects the loudspeaker
when the plug is inserted. A degree of
output developed across R18 is fed to
TR4 emitter as negative feedback.

CIRCUIT ALIGNMENT

Equipment Required-An a.m. signal

generator; an a.c. voltmeter and a 11:9 resis-

tor.

L-Switeh receiver to m.w. and fully close
the tuning gang. Turn the volume con-
trol to maximum output. Set the volt-
meter to read 2.5V a.c. and connect it
across the loudspeaker.

2,-Connect the signal generator across the
mlw. aerial coil L3 and feed in a 472kc/s
modulated signal. Adjust the cores of
L4, L5, L9, L10 and Lu for maximum
output, reducing the signal input as the
menus come into line to prevent a.g.c.
action. Repeat until there is no further
improvement.

3.-Connect the signal generator to the ex-
ternal aerial socket via a 1k resistor. With
the receiver switched to m.w., tune to
590m on the scale. Feed in a 600kc/s
signal, and adjust L8 and L3 for maximum
output.

4l-Tune receiver to 200m. Feed in a
l,500kc/_s signal and adjust C12 and CS
for maximum output.

5.-Repeat operations 3 and 4.

6.-Switch receiver to l.w. and tune to
1,750m on scale. Feed in a l70kc/s sig-
nal and adjust C15 and L1 for maximum
output.

Note: When adjusting C15, a degree of
oscillator pulling may be experienced. Care
should _be taken to adjust L1 and C15
f0". maximum signal at the correct tracking
Dolnt.

7.fiTune receiver to 1,250m. Feed in a
240kc/s signal and adjust CI for maximum
output

8.-Repeat operations 6 and 7.

GENERAL NOTES

Dismantling-To remove the chassis from
its case, first remove the back cover by giv-
ing half-a-lurn to two screw heads at the
top, and withdrawing the bottom edge from
the slot in die base.

Remove the battery.

Pull off the from control knobs.

Note the colour code and pull of! the
leads from the loudspeaker terminals.

Take out two hexagon-head screws from
the bottom corners of the panel and with-
draw thc chassis bottom edge first, clearing
two top chassis flanges from slots in the
switch escutclieon moulding.

Battery. Ever Ready PP9,
VT9 or equivalent.

Vidormax

Scale drive assembly
as seen from the
from, with the gang
at maximum. When
replacing the drive
card it is important
that the tension
spring is located in
the position shown
to prevent the spring
fouling the bottom
pulley when the
gang is rotated to
the opposite end of
its traverse

2 turns round
control spindle


L...._.

Tcnsion
spring

Printed in Great Hn'rmn by Cornwall Press, Ltd, Paris Garden, Stamford Street, London, 53.], and

Davis: Home, Stamford Street. London. SJ? 1

Published by Iii/7e Electrical Publications, Ltd.,