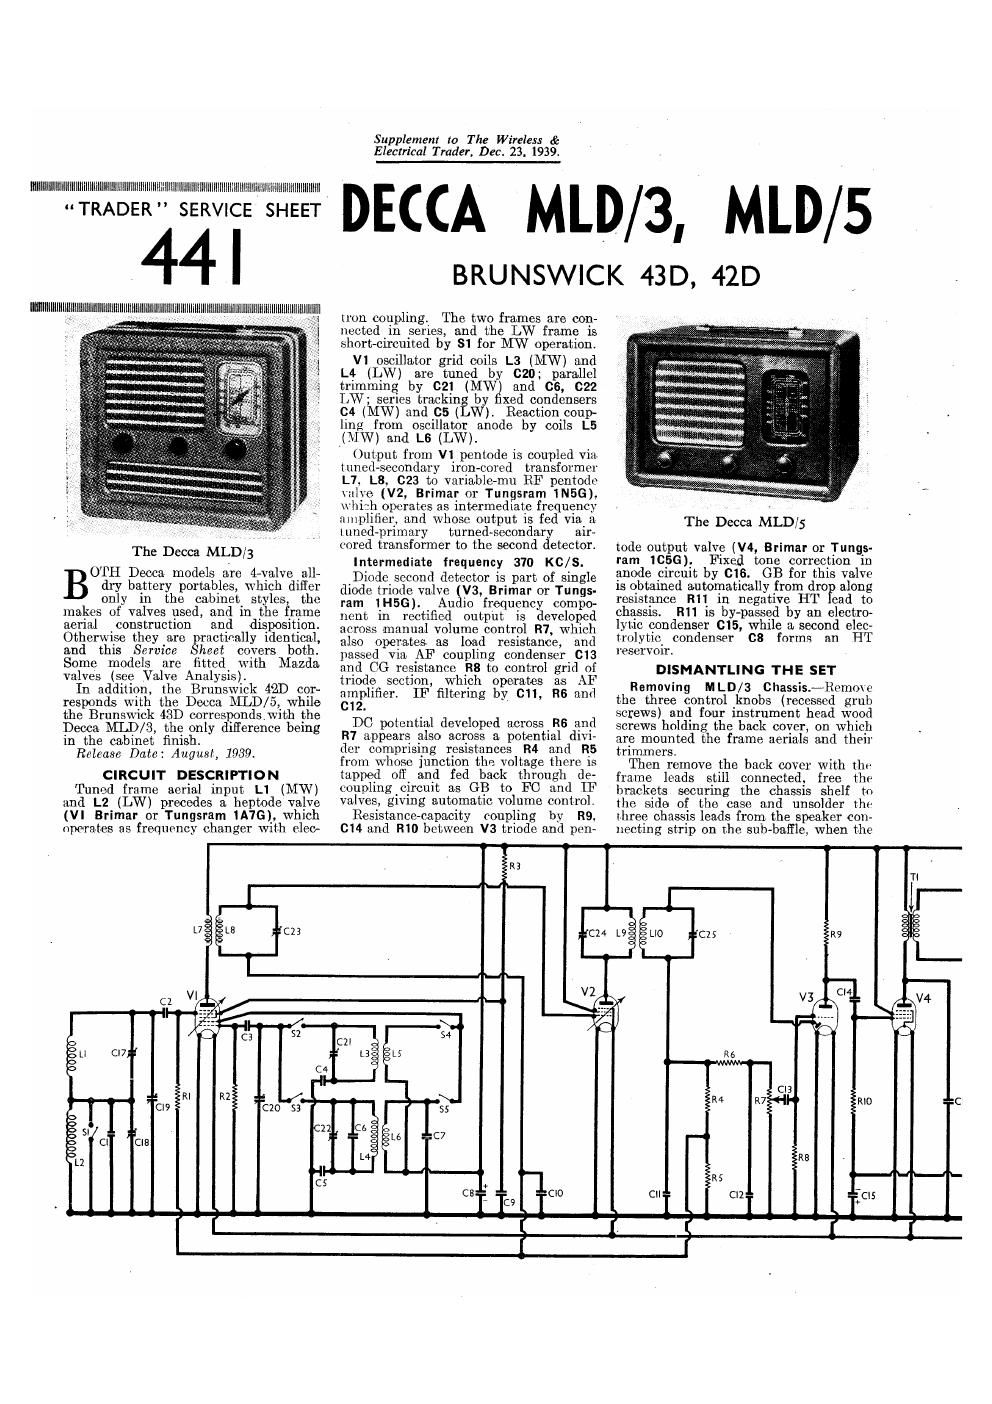
Decca mld 42d 43d service manual

This is the 3 pages manual for decca mld 42d 43d service manual.
Read or download the pdf for free. If you want to contribute, please mail your pdfs to info@audioservicemanuals.com.

Page: 1 / 3
left right
decca mld 42d 43d service manual

Extracted text from decca mld 42d 43d service manual (Ocr-read)


Page 1

II|l1|ll|lll|ll|l|ll|lI||Ii|ll|llllllllllllllllllllllllllllllllllilllIllllll|lll|ll|l|l||l||lllllllllllllllllllllillllllllilllllilllllllllllllllll

TRADER SERVICE SHEET

441

lllllIll|lllllll|ll|llIllIlllllllI|l||l||lll|l||l|l||II|lllllIll|||ll|li|ll||l||il||llIll||l||ll|lll||l||l||ll|ll|lllllllIlllllllllllllllllllllll
. 1

The Decca MLD/ 3

0TH Decca models are 4-valve all-
dry battery portables, which diffei
only 1n the cabinet styles the
makes of valves used, and in the frame
aerial construction and disposition.
Otherwise they are émactically identical,
and this Service heet covers both.
Some models are fitted with Mazda
valves (see Valve Analys1s).

In addition, the Brunswick 42D cor-
responds with the Decca MILD/5, While
the Brunswick 43D corresponds with the
Decca MID/3, the only difierence being
in the cabinet finish.

Release Date: Augusl, 1939.

CIRCUIT DESCRIPTION
Tuned frame aerial input L1 (MW)
and L2 (LW) precedes a heptode valve
(VI Brimar or Tungsram 11176), which
operates as frequency changer with elcc»

Supplement to The Wireless I:
Electrical Trader. Dec. 23, 1939.

DECCA MLD/3, MLD/S

BRUNSWICK 43 D, 42D

non coupling The two frames are con-
nected 1n series, and the LW frame is
shorHircuited by $1 for MW operation.

V1 oscillator grid coils L3 (MW) and
L4 (LW) are tuned by 020; parallel
trimming by 021 (MW) and 06, C22
LW; ser1es trackinU by fixed condensers
C4 (MW) and 05 (iW) Reaction coup-
ling from oscillator anode by coils L5
(MW) and L6 (LW).

()utput fiom V1 pentode is coupled via
tuned- -second:11y iron-cored transformer
L7 L8, 023 to variable- mu BF pentode
\.1l~ (V2, Brimar or Tungsram INSG).
\1l11:: h operates as intermediate frequency
:1111plifier,11.nd whose output is fed via a
tuned-primary turned~secondary air~
cored transformer to the second detector.

Intermediate frequency 370 KC/s.

Diode sccond detector is part of single
diode triode valve (V3, Brimar or Tungs-
ram 1H56). Audio frequency compo
11ent 1n rectified output is developed
across manual volume control R7 which
also operates as load resistance, and
passed v1a AF coupling condenser C13
and CG resistance R8 to control grid of
triode section, which operates as AF
amplifier. IF filtering by 011 R6 and
012.

DC potential developed across R6 and
R7 appears also across a potential divir
(ler compr1si_ng resistances R4 and R5
from whose junction the voltage there is
tapped off and fed back through de-
coupling circuit as GB to F0 and IF
valves, giving automatic volume control.

Resistance capacity coupling by R9
014 and R10 between V3 triodc and pen~

The Decca MLD/ 5

tode output valve (V4, Brimar or Tungs-

ram 1C_5G). Fixed tone correction 1n
anode circuit by 016. GB for this valve
is obtained automatically from dro along
resistance R11 in negative HT ead to
chassis R11 is by passed by an electro-
lytic condenser 015, While a second elec-
trolytic condenser 08 forms an HT
reservmr.

DISMANTLING THE SET

Remnving MLD/3 Chassis. -Rem0\e
the three control knobs (recessed grub
screws) and four instrument head wood
screws holding the back cover, on which
are mounted the frame aerials and their
trimmers.

Then remove the back cover with [lie
frame leads still connected free the
brackets securing the chassis shelf to
the side of the case. and unsolder the
three chassis leads from the speaker con.
necting strip on the sub- baffle, when the

$2

0
811 07:
o
o

écw
E51 -
o 0 08
o
0
L2

EC

no czs
R6 _
c1;
R4 R7 RID
R8

R5

cu CIZ T" C15
9
I .

-U".

Page 2

=C|6

shell. on which the chassis is mounted,
can be withdrawn from the casing with
the frame aerial still connected.

Since the shelf is cut away to give
access to the components beneath the
chassis, it need not be separated from
the chassis.

To free the chassis from the frame
serials, unsoider the three frame leads
from the aerial connecting panel on the
left of the chassis deck.

When replacing, connect these leads
as follows, numbering from left to right:
1, black lead from top left tag of the
frame trimmer panel; 2, block/White
lead from top right tag of trimmer
panel: 3, black lead from bottom left
[3% of trimmer panel.

he chassis leads to the speaker con-
necting strip should be connected as fol-
lows, numbering the lags from left to
right: 1, yellow; 2, black; 3, red. A
felt washer should be fitted to each con-
trol spindle, between the knob and the
cabinet.

Removing MLD/5 Chassis.«Remove
the three control knobs (recessed grub
screws), unsolder the four leads from
the three tags on the aerial connecting
panel at. the oft-hand end of the chassis
deck, and remove the four counter-sunk
head screws (with counter-sunk Washers
and lock washers) holding thc chassis to
the bottom of the case.

Now draw the chassis aside and un-
solder the three leads from the speaker
connecting strip on the sub-baffle, when
the chassis can be withdrawn from the
case.

When replacing, connect the speaker
leads to the connecting strip as follows,
numbering from left to right: 1, yellow;
2, black; 3, red.

Connect the frame aerial leads as fol»
lows, numbering the tags from left to
right: 1, black lead from left-hand frame
irimmer; 2, one black/white lead from
each of the two trimmers: 3, black lead
from right-hand frame trimmer. A felt
washer should be fitted to each control

Cirwit diagram
of the four
models. There
are no diver-
gencies in the
actual chassis,
but the frame
aeriais and bat-
tery connections
are different.
This is fully
explained in
General Notes.

BATTERY PLUG
min/2 a 430

LT new PLUG
Mic/5 a 42::

HT-
Rll

o->S LT-
LT+

Supplement to The Wireless &
Electrical Trader, Dec 23, 1939

DECCA MLD/3. MLD/S
BRUNSWICK 43D, 42D

44|

Under-chassis view. A diagram of the Sl-SS switch unit is in column one overleaf.

spindle, between the knob and
cabinet.

When fittin the chassis fixing bolts, a
metal clip w ioh holds the right-hand
frame lea s in place, should he slipped
on to each of the two rear bolts, between
the chassis and the cabinet.

Removing Speaker (both models).-
Remove the round head wood screw
holding the connectin stri to the to
right~hand corner of t c su baffle, an
the two nuts holding the speaker to the
sub-baffle,

When replacing, the transformer
should point towards the connecting
strip. and do not forget to replace the
earthing wire, with its tags beneath the
wood screw and lower speaker fixmg nut.

COMPONENTS AND VALUES

Values

the

RESISTANCES '

(ohms)
R1 V1 pentnde CG resistance .. 500030
K2 V1 osc, CG resistance 100,011)
R3 ' V1 SG HT feed 75,000
R4 }AVC feed potential divide 8,000.000
R5 resistances ... 3,000,000
Re rr stopper 100,000
R7 Manual volum con 1;
signal diode load 500010
R8 V3 triode Cl} resistance 8,000,000
R9 V3 triode anode load 1.000.000
RIO V4 CG resistance 2,000,000
R11 V4 auto 1313 resistance 350
~ Values
CONDEIV SEES (nF)
Cl Frame aerial LV fixed
trimmer 0000025
C2 V1 pentode CG condenser 0000]
CS V1 030. CG condenser 00002
04 Osc. circuit MW tracker 0000641
05 059. circuit LW tracker 0000445
CG Osc. circuit LW fixed
trimmer 00002
07 Oscillator LW reaction
shunt 0-0002
08 HT reservoir condenser 80
09 V1 SG decoupling 0-1
010 AVG line deoouplin 01
g; I 1F by-pass condensers 3%
013 AF coupling to V3 trioric 0001
CM V3 trlode to V4 AF coupiin 0'000
015 V4 CG decoupling 50-0
C16 Fixed tone corrector .. 0-001
017 Frame aerial MW trimmer -
013 Frame aerial LW trimmer 7
019» Frame aerial tuning ,.
020i Oscillator circuit tuning
CZ! 030. circuit MW trimmer -
022 030. circuit LW trimmer -
-231 lst IF transi sec. tuning -
CZ]; 2nd IF trans. pri. tuning -
W5: 2nd IF trans. sec. tuning -

* Electrolytic i Variable. iPre-set


OTHER COMPONENTS

l Frame aerial coils 333
L3 031:. circuit MW tuning coil 2-0
L4 050. circuit LW tuning coil 84
L5 Oscillator MW reaction 0-5
Lt Oscillator LW reaction 6-5
11:; i let IF trans {m 133
£20 } 2nd IF ms 33
L1! Speaker speech coil 2-5
T1 Speaker input transi i {3 6583
81-55 Wavebend switches -
$6 LT circuit switch -

VALVE ANALYSIS

Voltages and currents given in the
lable below are those measured in our
MLD/5 when it was operating with u
new,100 V HT battery reading 100 V on
load. The gang was turned to minimum,
the volume control was at maximum,
and the receiver was switched to MW,
but the frame aerials were disconnected.

Voltages were measured on the 400 V
scale .of aModel 7 Universal Avometer,
chassis being negative.

If V2 should become unstable when its
screen current is being measured, it can
bc stabilised by a, condenser of about
0,1;4F connected between the grid (top
cap) and chassis

Anode Anode Screen'Smen

Valve Voltage Current Voltage Current
(V) ("IN (V) (mA
4 so 052-
V1 1A7G J, Oscillator l 39 0-0
( 00 L56!
V2 INSG 90 1-2 90 0'20
VS 1H5G 13 0-025 -- -
l V4 106G 86 5-5 90 04

The Values in the following table are
those taken in a model MLD/3 receiver
fitted withMazda; valves, under the
same conditions as those in the table
above, except that the 90 V section of
the battery was reading 95 V on load.

Anode Anode Screen Screen
Valve Voltage Current Voltage Current
(V) (mA) (V) (nut)
. as 0-3)
V1 F0141 -V Oscillator - 35 0'0
1 38 1'7}
V2 SPHI 38 1-2 88 0-0
V3 HNID 15 0-025 ~ -
V4 Penidl 85 6-0 88 1-5