Decca deccalain mk4 service manual

This is the 2 pages manual for decca deccalain mk4 service manual.
Read or download the pdf for free. If you want to contribute, please mail your pdfs to info@audioservicemanuals.com.

Page: 1 / 2
left right
decca deccalain mk4 service manual

Extracted text from decca deccalain mk4 service manual (Ocr-read)


Page 1

Supplement to Wireless 69

© 11m Electrical Publications Ltd 1964. Eleciififlfl TradeMQM May #1914

TRADER " SERVICE SHEET

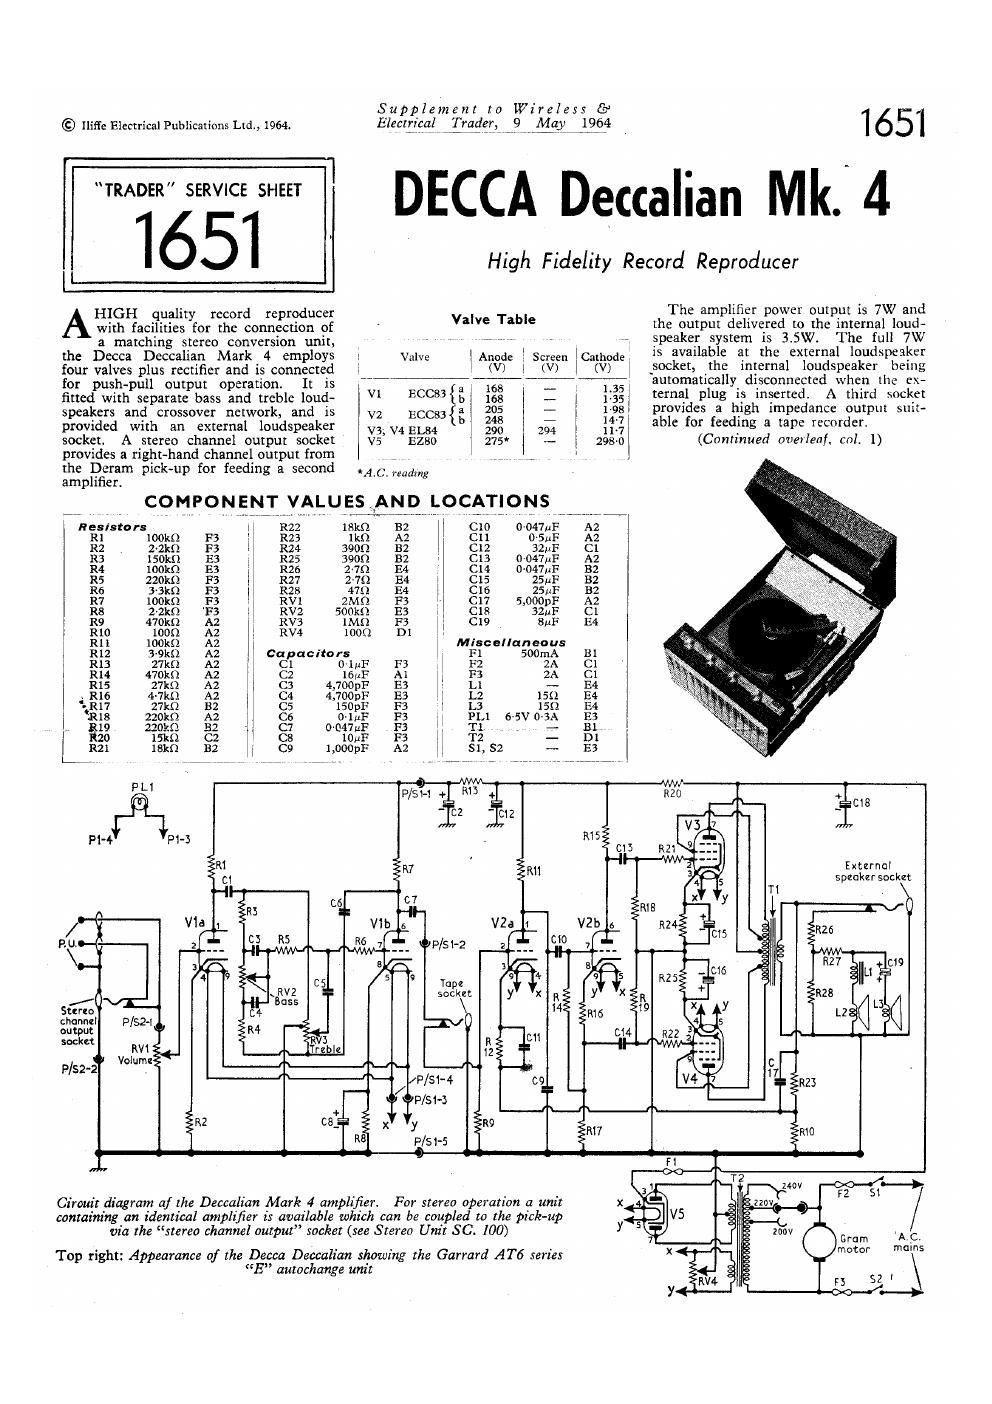
HIGH quality record reproducer
with facilities for the connection of
a matching stereo conversion umt, .

Valve Table

the Decca Deccalian Mark 4 employs 1 Valve Anode 2 Screen iCathode
four valves plus rectifier and is connected . . (V) l (V) l (V)
for push-pull output operation It is -_-".- T
. a 168 -- 1.3:
fitted w1th separate bass and treble loud- I V1 ECCSS{b 168 - l 1~35
speakers and crossover network, and 15 V2 ECC33{ 205 - 1'98
. . 1 b 248 - 14-7
prov1ded With an external loudspeaker [V9;V4 ELM 290 294 .7
socket. A stereo channel output socket v5 EZBO 275* l - 298-0

provides a right-hand channel output from
the Dcram pick-up for feeding a second

ampl1fier.
COMPON ENT VALU ES \AND LOCATIONS
Resistors R22 123m B2 i C10 0-047pF A2
R1 100m F3 R23 1m A2 1 C11 0-511F A2
R2 22119 F3 R24 39011 132 C12 32111: c1
R3 150m E3 R25 390:: 132 (:13 0-047uF A2
R4 10011:) E3 R26 2712 154 C14 n-o47uF 112
R5 220m F3 R27 2-70 E4 1 C15 ZSaF 132
R6 33111 F3 R28 4711 E4 l C16 25M}: 32
R7 10010 F3 RVl 2M!) F} C17 5.000111: A2
R3 2sz F3 Rv2 5001:: E3 1 C13 321m (:1
R9 470m A2 RV3 lMfl F} l 1 C19 SaF 134
R10 1009 A2 RV4 1000 D1
R11 100m A2 Miscellaneous
R12 3-9kn A2 Capacito rs F1 ODmA Bl
R13 27m A2 Cl o-mF F3 . l F2 2A (:1
R14 470m A2 c2 16p]: A1 F3 2A (:1
R15 4,700pF E3 1 L1 - E4
4 Rl6 4,700pF E: l 1.2 159 E4
, :R17 150pF F3 1 L3 150 E4
1 R18 01111F F3 1 PLl 65V 0-3A 133
i 319 o 047w F3 T1 # 31.
R20 1an F3 T2 - D1
l,000pF A2 51, $2 -- E3

1651

DECCA Deccalian Mk. 4

High Fidelity Record Reproducer

The amplifier power output is 7W and
the output delivered to the internal loud~
speaker system is 315W. The full 7W
is available at the external loudspeaker
_socket, the internal loudspeaker being
automatically disconnected when lllc ex-
ternal plug is inserted. A third socket
provides a high impedance output suit-
able for feeding a tape recorder.

(Continued overleaf. col. ])

F1-4

E xtzrnul
speaker socket

Circuit diagram af the Deualian Mark 4 amplifier. For stereo operation a unit
containing an identical amplifier it available which can be coupled to the pick-up
via the stereo channel output socket (see Stereo Unit SC. 100)

Top right: Appearance of the Decca Deccah'an showing the Garrard AT6 series
E autochange unit


mains

Page 2

DECCA
DECCALIAN Mk. 4

Supplement to Wireless [9
Electrical. ygtflL 9 May 1964

@ We

Trchlt Vlltctw Volume

Continued- _
An automatic record changer is in-
corporated, and a full-wave isolated power
unit permits operation from a.c. mains
only, of ZOO-ZSOV 500/5.
Release date and price: September 1963

£35 55 9d. Purchase lax extra. Stereo

conversion unit SC. 100 £21.

AUTOCHANGE RECORD UNIT

The autochange unit fitted is the Gar-
rard ATS Series E with provision for
manual control. The pick-up is a Deram
transcription head, suitable for mono and
stereo recordings; stylus Deram Dia-
mond/ S, coded white.

Stereo Conversion.-In order to con«
vert the Deccalian Mark 4 to stereo
operation, a suitable amplifier and loud-
speaker unit is required with provision
for matching to the Deram pick-up. (The
Decca SC.100 amplifier/loudspeaker is
recommended for this purpose.) If a suit-
able lead and plug is connected from the
second amplifier to the stereo channel
output socket of the Deccalian Mark 4,

the Deram pick-up automatically provide ~ ,.

a right-hand channel signal for the second
amplifier.

STEREO UNIT SC.I00

Stereo unit SC.100 comprises an ampli-
fier, loudspeaker and power unit assembly,
identical to that employed in the Decca-
lian Mark 4. Its input circuit is matched
to the Deram'pick-up making it suit-
able for use as a stereo conversion unit
for the Deccalian Mark 4, requiring
simply a lead and plug connection from
its input socket to the Deccalian Mark
4 stereo channel output socket.

. DISMANTLING

To remove the chassis
cabinet, proceed as follows:

from the


I
R5
(A


c1
C6 -
Rut/6? It?

iCS R6 R7

Upper and lower views of the control panel,
and the loudspeaker crossover network located
on the speaker Imfi'le board

From the autochange compartment re-
move the front and rear sloping panels.

Remove the heat shield from above the
main amplifier by taking out three wood
screws.

In some models it will be possible at
this stage to make a valve replacement.
In models after serial number 2180 the
front sloping panel can only be removed
after removal of the motor board.

Remove four chrome-headed PK screws
securing the motor board and remove the
motor board. Connectors should be re-
moved from the terminal block beneath
the motor board and the mains lead dis-
connected from the mains block.

Pick-up connections are coded as
follows:

Double internal pick-up lead. Signal
lead to tag with red lead; screen lead to
tag with green lead.

Single external pick-up lead. Signal
lead to tag with white lead; screen lead
to tag with black lead.

Remove the 5-pin plug (plug 1) from
the socket on the main amplifier chassis.

Remove the 2-pin plug (plug 2) from

the socket on the control unit panel.

Remove the red and brown leads from
the crossover unit.

Pull off control unit knobs and felt
washers and remove two 4BA control unit
securing bolts from location holes under-
neath the control panel.

To remove the amplifier chassis,
slacken two ZBA nuts and remove two
Shiflips-head wood screws from the case

8C .

Note: When replacing leads to the
loudspeaker network it is important that
the phasing is correct. Ensure that the
red lead is connected to the equivalent red
spot tag on the loudspeaker itself.

GENERAL NOTES

Stylus Replacement-The incidence of
groove jumping and distortion particularly in
the upper frequencies may be symptoms that
life stylus is reaching the end of its playing

e.

To remove the old stylus, run the finger
down the front of the pick-up head to ease
the stylus hair out of its slot. The stylus bar
is then gripped between finger and thumb,
and pushed forward free from its rear locat-
ing hole.

The new stylus should be held between
finger and thumb and the rear peg inserted
into the locating hole in the pick-up. Push
the stylus gently backwards until the protru-
sions on the stylus bar locate gently against
the nose of the stylus slot then touch the
stylus bar into the slot.

If the stylus does not sit squarely with
the diamond shank vertical. do not attempt
to twist the bar into a better position, remove
the stylus and re-set it into position as
described.

Heater Balance Adiustmeut.-If any valve
is replaced, RV4 located on the mains trims-
former TZ should be adiusted for minimum
hum level. This may be done aurally by ad-
justing RV4 under no signal conditions for
minimum audible hum from the loudspeakers
with. volume and bass controls turned to
maximum.

A preferred method is to connect a suit-
able a.c. millivoltmeter across the bass speaker
terminals and adjust RV4 for maximum dip
on the meter.

V2(ECC as)

2'
2WD channel TflPv
k sockz

kg»

9®Cl3
no 7 n25
gamutfi

\
ml; I R22

Plan and underside illustration: of the main amplifier chassis
Printed in Great Emam by Cornwall Press, Ltd,, Pan's Garden, Stamford Street, Landon, S.E.l, and Published by llifie Electrical Publicatiom, Lid

Darrel Home, Stamford Street. London. 5.5.1.