Bsr p 204 owners manual

This is the 1 pages manual for bsr p 204 owners manual.
Read or download the pdf for free. If you want to contribute, please mail your pdfs to info@audioservicemanuals.com.

Page: 1 / 1
left
bsr p 204 owners manual

Extracted text from bsr p 204 owners manual (Ocr-read)


Page 1

P204

This BSFl unit will play automatically or
manually 7". 10" or 12" records
individually at 76. 45 or 33 rpm.

initial Preparation

I. Check that the two transit screws are
lully screwed down to the malnplale and
that the unit floats treely on the m0unting
springs.

2. Fit pickup weight in order to give
correct stylus pressure (see adiustments
1 ).

3. Insert spindle into turntable bearing.
4 Release manual pickup clip.

(The automatic pickup clip is released
when the starting lever is operated),

Automatic Operation

1. Place record on turntable

2. Select speed. record size and stylus
to suit record.

3. Move starting lever to 'AUTO' and
allow it to return gently to ON'. The
pickup arm will automatically set down
on the record. At the end at the record
the pickup arm will return to the rest and
the unit will switch otl automatically,

4. To stop. Alter playing the record the
unit will shut oll automatically. It it
becomes necessary to stop the unit
during play. raise the cueing lever and
move the pickup arm above the pickup
rest. lower the cuelng lever and move the
starting lever to the OFF' position.
NOTE: To interrupt the record raise the
seeing lever to tilt the pickup arm. When
the cueing lever is lowered. the pickup
will descend to the record and resume
playing in the same groove.

Operating Instructions

Manual Operation

1 Place record on turntable.

2. Select speed. record size and stylus
to suit record.

3. Move the starting lever to 'ON' and
raise the cueing lever. Move the pickup
arm ebOve the selected point on the
record and lower to the groove by
returning the cueing lever to the lowered
position. At the end at the record. the
pickup arm will return to the rest and the
unit will switch oll automatically.
alternatively. alter switching the starting
lever to 'ON the pickup arm may be
tilted by the linger tilt and placed in any
desired position on the record.

4 To stop. The procedure lor stopping
a record while playing is as described in
paragraph 4 under 'Automallc Operation.

IMPORTANT

1, Always remember to use the cancel
stylus on the pickup ll the wrong one is
in use it may not be apparent lrom the
music. however. the stylus itsell may
become damaged by continuous playing
an the wrong point.

2. Never lorce the pickup arm. This unit
is robust. but due to the leatherweight
action ol the pickup and the delicate
balance required. any lorca will upset the
adjustment.

3. When playing new records a certain
amount or llull will gather on the stylus
point. This should be carelully removed
lrom time to time.

4 Do not leave records on the unit
when not in use. store as recommended
by the manulacturera

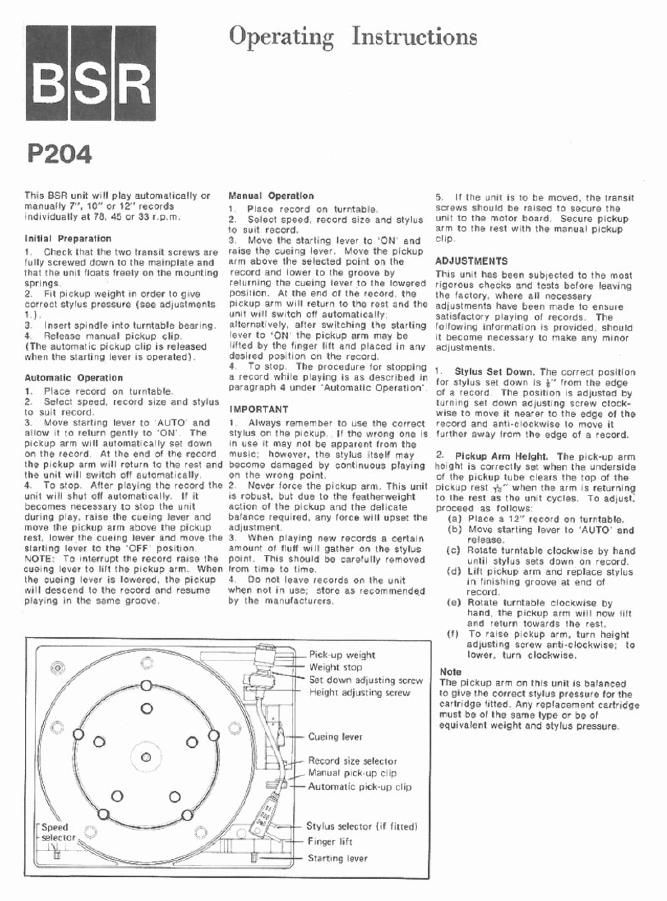
I _ Pick-up weight

' "v- Weight stop

I
NE 59! down adjusting screw
- Height adjusting screw

-- Cueing lever

.. Record size selector
, Mahual pickup clip
~- Automatic pick-up clip

- Stylus selector (it littadi
Finger lift
Starting lever

5. It the unit is to be moved. the transit
screws should be raised to secure the
unit to the motor board. Secure pickup
arm to the rest with the manual pickup
clip

ADJUSTMENTS

This unit has been aubiected to the most
rigorous checks and tests belore leaving
the lactory. where all necessary
adiustments have been made to ensure
satislactory playing or records. The
lollowing information is provided. should
it become necessary to make any minor
adiustments.

1. Stylus Sat Down. The correct position
lor stylus set down is i" lrom the edge
cl a record. The posit-en is adiusted by
turning set down adiusting screw clock-
wise to move it nearer to the edge at the
record and anti-clockwise to move it
lurther away lrom the edge of a record.

2- Pickup Arm Height. The pick-up arm
height is correctly set when the underside
ol the pickup tube clears the top of the
pickup rest 15" when the arm is returning
to the rest as the unit cycles. To adiust.
proceed as lollows;
(a) Place a 12" record on turntable.
(b) Move starting lever to AUTO' and
release.
(c) Rotate turntable clockwise by hand
until stylus sets dawn on record.
(d) Litt pickup arm and replace stylus
in linishing groove at end oi
record.
Rotate turntable clockwise by
hand. the pickup arm will now tilt
and return towards the rest.
To raise pickup arm. turn height
adiusting screw anti-clockwise: to
lower. turn clockwise.

Note

The pickup arm on this unit is balanced

to give the correct stylus pressure lor the
cartridge titted. Any replacement cartridge
must be oi the same type or be at
equivalent weight and stylus pressure

lo)

(0