Aiwa AD M700 Service Manual

This is the 17 pages manual for Aiwa AD M700 Service Manual.
Read or download the pdf for free. If you want to contribute, please mail your pdfs to info@audioservicemanuals.com.

Page: 1 / 17
left right
Aiwa AD M700 Service Manual

Extracted text from Aiwa AD M700 Service Manual (Ocr-read)


Page 1

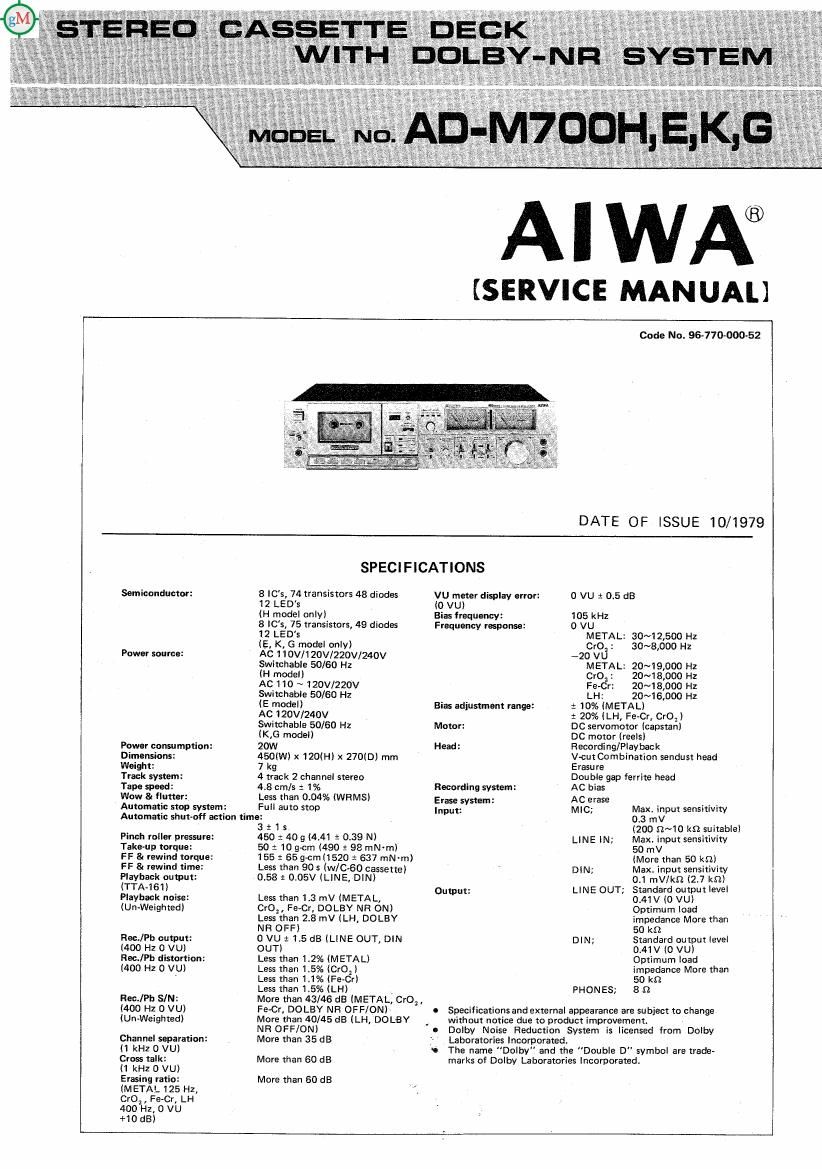
Al WA®

(SERVICE MAN UALI

Code No. 96-770-000-52

DATE OF ISSUE 10/1979

Semiconductor:

Power source:

Power consumption:
Dimensions:

Weiyit:

Track system:

Tape spend:

Wow & flutter:
Automatic stop system:

SPECIFICATIONS

8 lCs, 74 transistors 48 diodes
12 LED's

(H model only)

8 lC's, 75 transistors, 49 diodes
12 LED':

(E, K, G model only)

AC 1 10V/120V/220Vl240V
Switchable 50/60 Hz

(H model]

AC 110 ~ 120V/220V
Switchable 50/60 Hz

(E model)

AC 120V/240V

switchable 50/60 Hz

(.91 model)

20W
4501W) x 120(Hl x 270(D) mm
7 k

4 track 2 channel stereo
4.8 cmls i 1%

Less than 0.04% (WRMSI
Full auto stop

Automatic shut-off action time:

Pinch roller pressure:
Take-up torque:

FF & rewind torque:
FF & rewind time:
Playback output:
(TTA-161I

Playback noise:
(Un-Weightedl

Rom/Pb output:
(400 H2 0 VU)
Rem/Pb distortion:
(400 HZ 0 VU)

Rem/Pb SIN:
(400 Hz 0 VU)
IUn-Weighted)

Channel separation:
11 kHz 0 VU)
Cross talk:

(1 kHz 0 VU)
Erasing ratio:
(METAL 125 Hz,
CrO , Fe-Cr, LH
400112, 0 VU

+10 dB)

3 i 'I s

450 t 409 (4.41 t 0.39 N)

50 t 10 g-cm (490 2 98 rnN-m)
155 s 659cm(1520 1 637 men)
Less than 90 s (w/C-BD cassette)
0.58 i 0.05V (LINE, DIN)

Less than 1.3 mV (METAL,
CrOz, Fe Less than 2.8 mV (LH, DOLBY
NR OFF)

0 VU 1 1.5 dB (LINE CUT, DIN
OUTI

LESS than 1.2% (METAL)

Less than 1.5% (Cr0,l

Less than 1.1% (Fe-Cr)

Less than 1.5% (LH) .
More than 43/46 dB (METAL, CrO2 ,
Fe-Cr, DOLBY NR OFF/0N)
More than 40/45 dB (LH, DOLBY
NR OFF/0N)

More than 35 dB

More than 60 dB
More than 60 dB

VU meter display error: 0 VU t 0.5 dB
(0 VU)
Bias frequency: 105 kHz
Frequency response: 0 VU
METAL: 30~12,500 Hz
0er2 : 30~8.000 HZ
-20 VU
METAL: 20~19,000 HZ
00,: 20~1s,ooo Hz
Fe-Cr: 20~18,000 Hz
LH: 20~16,000 Hz
Bias adjustment range: 2 10% (METAL)
i 20% lLH, Fe-Cr, Cr0,)
Motor: DC servornotor lcapstanl
DC motor (reels!
Head: Recording/Playback
V-cut Combination sendust head
Erasure
Double gap ferrite head
Recording system: AC bias
Erase system: AC erase _ .
Input: MIC; Max. input sensmvlty
0.3 mV
(200 fl~10 kn suitable)
LINE W; Max. input sensitivity
50 mV
(More than 50 km
DIN: Max. input sensitivity
0.1 mV/kfl (2.7 kn)
Output: LINE OUT; Standard output level

0.41 V (0 VU)
Optimum load
impedance More than
50 k9

Standard output level
0.41 V (0 VU)
Optimum load
impedance More than
5!) kn

PHONES; 8 :2

DIN;

0 Specifications andexternal appearance are subject to change
without notice due to product improvement.

0 Dolby Noise Reduction System is licensed from Dolby

Laboratories Incorporated.

5 The name "Dolby" and the "Double D" symbol are trade-

marks of Dolby Laboratories Incorporated.

Page 2

MODEL N0. AD-M70llH,E,K,G

DISASSEMBLY INSTRUCTIONS

1. To Remove Cassette Lid
1) Remove the ca§ette lid in the direction shown by the
arrow (See Figure 1.)

Fig. 1

2. To Remove Blinder and Cassette Plate
1) Remove the two cassette plate screws and pull the blinder
in the direction of the arrow (See Figure 2.)

Fig. 2

3. To Remove Front Panel
1) Remove the eight knobs and six screws (See Figure 3.)

oau-g #?


Vrnfij-s Fig, 3
vtreuw
4. To Remove Main Motor and Sub Motor
1) Bend the wires and solder, etc. into the shape of an
"L" and place the main belt over the belt rest.
2) Once rotated in the direction of the arrow, the main

and sub motors can be removed easily (See Figure 4.)

2

AIWA

5, To Remove Flywheel Support Plate
1) Loosen the screws and then slide the support plate in
the direction of the arrow [See Figure 5.)

Fig. 5
6. To Remove Oil-damped Section
1) Remove the screw holding the power switch.
2) Remove the two logic circuit board screws.
3) Remove the screw. (See Figure 6.)
Fig. 6

Notes: Application of oil-damping oil
Apply silicon K oil (GD-10) evenly to the whole inside
circumference of the holder (oil-damped) and the whole
outside of the gear (oil-damped.) (See Figure 7.)
Rotate the gear (oil-damped) and then insert the holder.
Wipe oif any excess oil.

Fig. 7

htto : / laetMANUAL . com