AB International 410 Series 900 Service Manual

This is the 31 pages manual for AB International 410 Series 900 Service Manual.
Read or download the pdf for free. If you want to contribute, please mail your pdfs to info@audioservicemanuals.com.

Page: 1 / 31
left right
AB International 410 Series 900 Service Manual

Extracted text from AB International 410 Series 900 Service Manual (Ocr-read)


Page 1

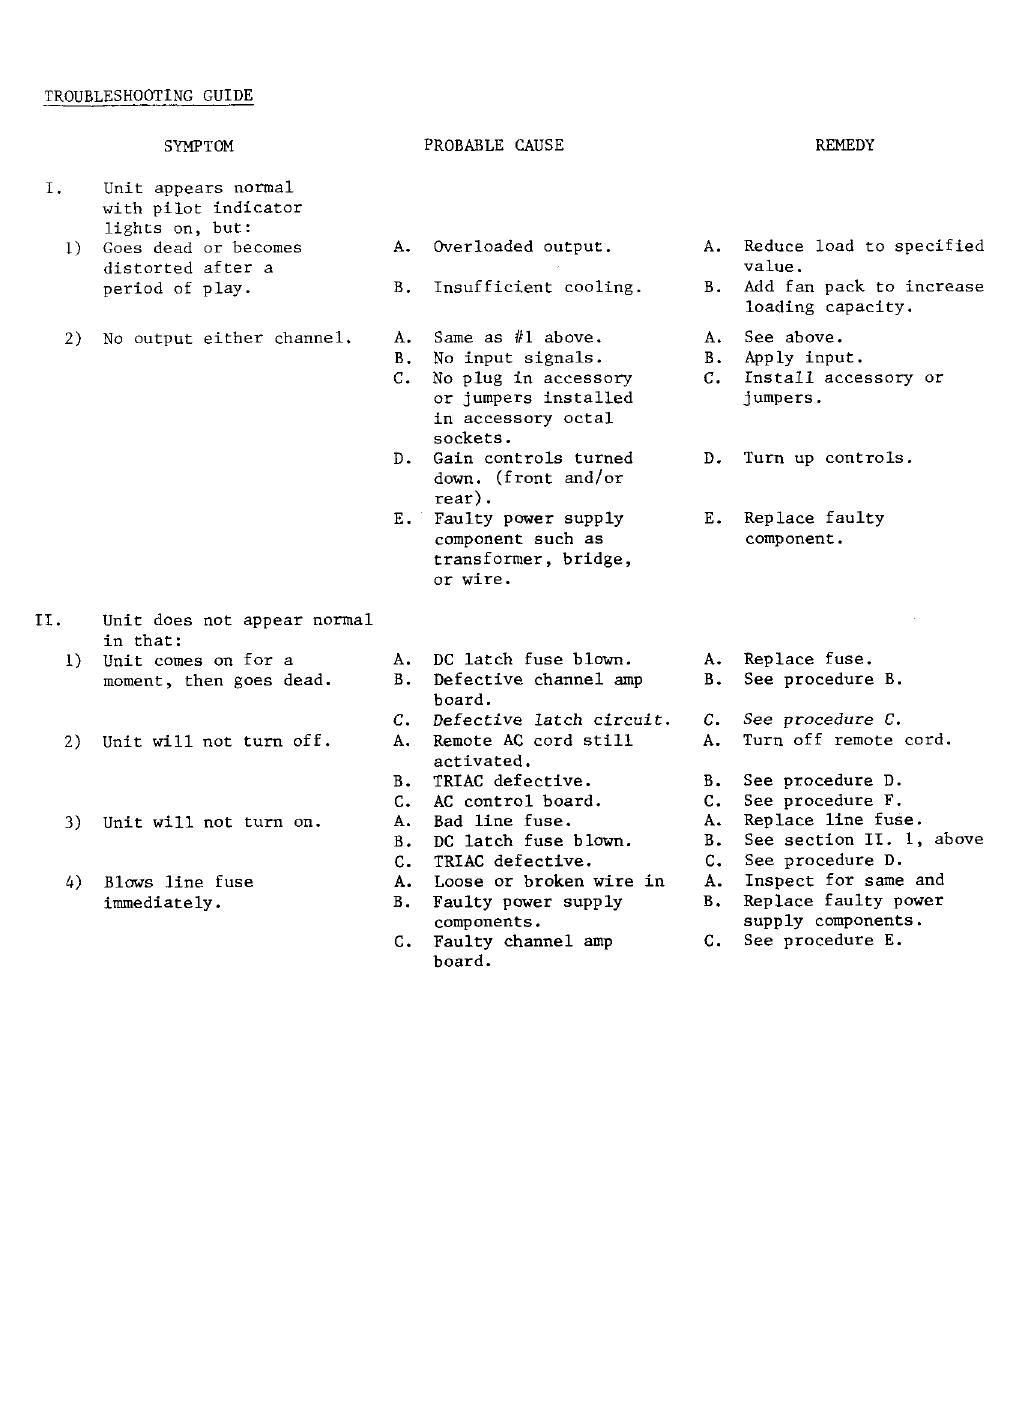
TROUBLESHOOTING GUIDE

1)

2)

II.

1)

2)

3)

A)

SYMPTOM

Unit appears normal
with pilot indicator
lights on, but:

Goes dead or becomes
distorted after a
period of play.

No output either channel.

Unit does not appear normal

in that:
Unit comes on for a
moment, then goes dead.

Unit will not turn off.

Unit will not turn on.

Blows line fuse
immediately.

A.
B.
C.

PROBABLE CAUSE

Overloaded output.

Insufficient cooling.

Same as #1 above.

No input signals.

No plug in accessory
or jumpers installed
in accessory Octal
sockets.

Gain controls turned
down. (front and/or
rear).

Faulty pOwer supply
component such as
transformer, bridge,
or wire.

DC latch fuse blown.
Defective channel amp
board.

Defective latch circuit.

Remote AC cord still
activated.

TRIAC defective.

AC control board.
Bad line fuse.

DC latch fuse blown.
TRIAC defective.
Loose or broken wire in
Faulty power supply
components.

Faulty channel amp
board.

A.
B.
C.

REMEDY

Reduce load to specified
value.

Add fan pack to increase
loading capacity.

See above.

Apply input.

Install accessory or
jumpers.

Turn up controls.

Replace faulty
component.

Replace fuse.
See procedure B.

See procedure C.
Turn off remote cord.

See procedure D.

See procedure F.

Replace line fuse.

See section II. 1, above
See procedure D.

Inspect for same and
Replace faulty power
supply components.

See procedure E.

Page 2

A.

SERVICE TECHNICIAN: Before gaining access to the interior compartment, remove all input

and output connections and ALL AC POWER CONNECTIONS.

ACCESS PROCEDURES: Interior Compartment: Remove 6 cover screws.

Rear Panel: Remove 6 top cover screws.
Remove 2 rearward bottom cover screws.
Remove 3 side screws into rear panel each side, and
move panel back.

Front Panel: Remove 4 hex head screws thru handles.

PROCEDURES

B1.
B2.
B3.

B4.

BS.

86.
CL
C2.

C3.
C4.

C5.

D1.
D2.
D3.
D4.
D5.

D6.

El.
E2.
E3.
E4.

E5.

E6.

E7.

NOTE: When removing or testing any module, note color and location of any
wires disconnected for reconnection purposes.

Remove any output loads and all inputs.

Obtain access to the interior compartment. (SEE ACCESS)

Unplug blue wire pushed on AC control board near front center. This will
disable the DC Latch circuit.

With no wires shorting out, turn unit on and measure the DC output condi-
tion of each channel at the rear terminals. If either channel indicates a
DC condition of greater than +/ 2 volts, replace that channel amp board
to restore operation. (See procedure G)

If both channels indicated a DC condition, verify that both 3+ and B-
(+/- = 70-100V DC) appear on the power chassis capacitors.

If neither channel indicates a DC condition, proceed to "C" below.

Proceed as in B above.

Turn unit off and wait 5 minutes, or drain off supply capacitor charge Via

a resistor load.

Replace blue wire removed in BB above.

Remove orange wire pushed on at right front end of each channel amp board.
This is the Latch signal from that board.

With no wires shorting, turn on unit and carefully replace one orange wire at
a time. The orange wire which causes the Latch circuit to operate indicates
the channel amp board with a faulty Latch detector circuit. Replace the
channel amp module. (See procedure G)

Remove all AC power connections.

Remove screws securing top cover.

Locate TRIAC and AC control board at left side and bottom.
Loosen TRIAC mounting nut's and remove TRIAC from main chassis.
Note lead color coding and install new TRIAC leads accordingly.
(See accompanying diagram).

Mount new TRIAC on main chassis and tighten mounting nuts.

Remove any output loads and all inputs.

Obtain access to the interior compartment. (See ACCESS)

Loosen back panel and move rearward.

Remove the red and green wires pushen on to ONE channel amp module at far
right and left.

With caution and N0 WIRES SHORTED, turn unit AC power on. If fuse remains
intact, remove AC power, drain supply, and replace channel amp module

that was disconnected.

If line fuse blows, remove AC power, drain supply, replace disconnected
wires, and repeat process for the other channel amp board.

If line fuse still blows, disconnect red and green wires from both channel
amp modules and repeat process. If fuse remains intact, replace both
modules. If fuse still blows, fault is in power supply section or in
primary AC circuit.