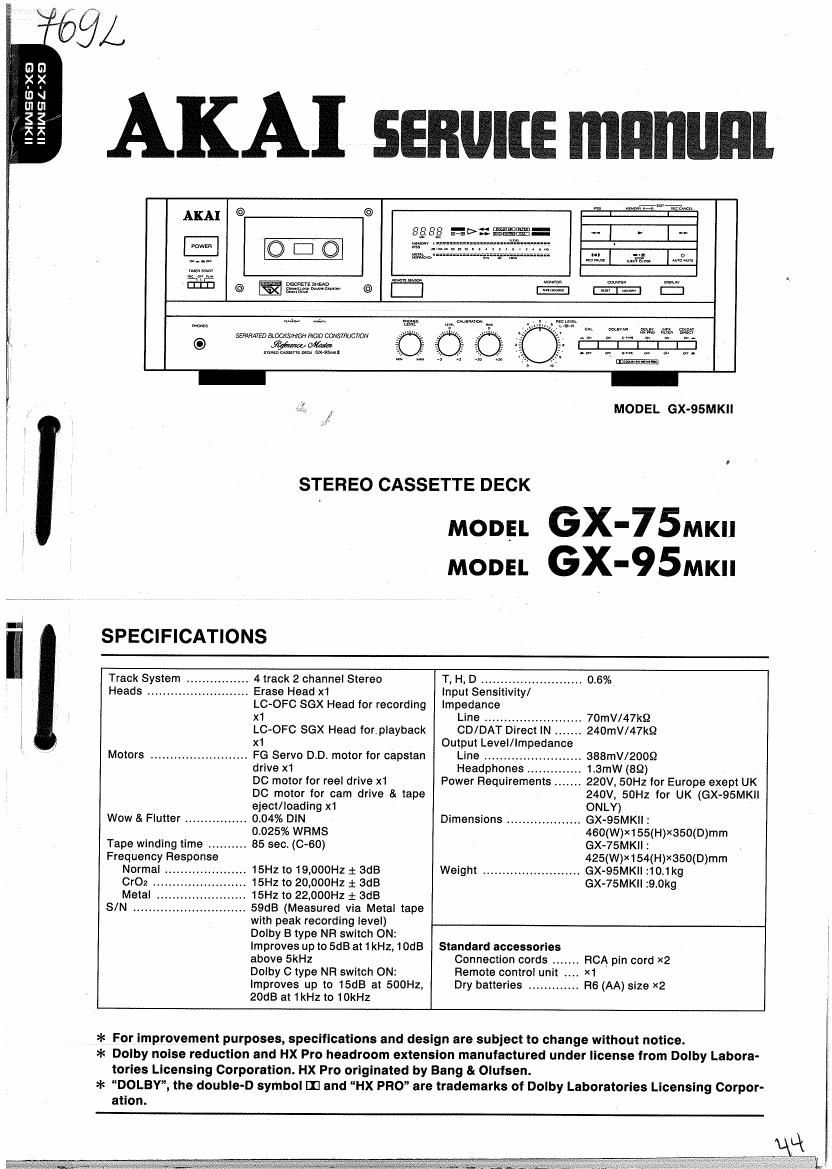
Akai GX 95 Mk2 Service Manual
This is the 22 pages manual for Akai GX 95 Mk2 Service Manual.
Read or download the pdf for free.
If you want to contribute, please mail your pdfs to info@audioservicemanuals.com.

Extracted text from Akai GX 95 Mk2 Service Manual (Ocr-read)
Page 20
egg
. W" ,
3-6. REMOVING THE CAM WHEEL AND POSITION POTENTIAL VOLUME
1) Remove the motor block from the mechanism block.
(See section 3-3, Removing the motor block) Also
remove the motor PCB, the capstan belt and the fly-
wheel.
2) Remove the stopper ring from the capstan holder. Pull
off the cam wheel. (Refer to Fig. 3-12.)
@vsrowen RING
CAM WHEEL
CAPSTAN HOLDER
Fig. 3-12
3) Remove capstan holder securing screws 0, 0, 0 and
0. Remove the capstan holder.(Refer to Fig. 3-18.)
4) Remove the potentio gear. Unscrew the position
potential volume securing nut. (Refer to Fig. 3-14.)
5) To vreassemble, follow the directions in section
3-7,Reassembling the cam wheel and position poten-
tial volume,below.
POTENTIAL VOLUME
CAPSTAN HOLDER
POTENTIAL GEAR
Fig. 3-13
POTENTIAL GEAR I I
-
illIIIIIIIII|llllllllIIIIIIlllllll -
Hz?
POTENTIAL VOLUME CAPSTAN HOLDER
Fig. 3-14
3-7. REASSEMBLING THE CAM WHEEL AND POSITION POTENTIAL VOLUME
1) Attach the position potential volume to the capstan
holder and attach the potention gear. Attach the cap-
stan holder to the motor biock and tighten the secur«
ing screws. Align the mark on the potention gear with
the groove in the motor chassis as shown in Fig. 3-15.
2) Slide the cam wheel onto the capstan holder and po-
sition it so that the eject lever fits into the slot in the
cam wheel and the center of the mark on the cam
wheel aligns with the center of the chassis groove.
POTENTION
GEAR
MARK IA) MARKIB)
Fig. 3-15
SERVICE MANUAL
Take care not to scratch the gear. When replacing
with a new partuapply molybdenum grease to the por-
tion of the capstan holder indicated by the slanted
lines and the cam portion of the cam wheel before as-
sembiing. ,/
3) After confirming that the positions of the marks on the
potention gear and cam wheel are aligned with the
groove in the motor chassis, attach the stopper ring.
KQW MARK
MARK tCl VVVVI o-mssrs \
AL...-
Fig. 3-16
IV. MECHANICAL ADJUSTMENT
: 4-1. POTENTIAL VOLUME PRESET VOLTAGE ADJUSTMENT (Refer to Fig. 4-1, 4-2)
F'OTENTI
HIGH
PRE- SET VOLTAGE
REEL MOTOR
DIGITAL
VOLTMETER
DC
OMETER
CAPSTAN MOTOR
1) LOW VOLTAGE ADJUSTMENT
a. With power OFF, remove the connecting cord of the
CAM MOTOR and turn the OPERATE PULLEY fully
with your fingers in the A direction.
(EJECT DIRECTION)
b. Connect the digital voltmeter as shown in Fig. 4-1.
0. With power ON, adjust VR2so that the voltage
reading on the Digital DC Voitmeter is 1.13V.
2) HIGH VOLTAGE ADJUSTMENT
a. With power OFF, turn the OPERATE PULLEY fully
with your fingers in B direction. (PLAY DIRECTION)
b. With power ON, adjust VR1 so that the voltage
reading on the Digital DC Voltmeter is 9.08V.
_.' M3,). Repeat step t) and 2).
._ 4) With power OFF, connect the connecting cord of the
CAM MOTOR.
SERVICE MANUAL
FLYWHEEL
OPERATE FRONT
2 IPULLEY
27"
Fig. 4-1
BOTTOM
05C PCB
| (9
I
M T A [IllllllllIIIILllIIlIIIlIlI CAM WHEEL
i H
GMARK OMAR CHASSIS
Fig. 4-2
5) Remove the Cassette lid, Front panel and Bottom
cover.
(Refer to l. DISASSEMBLY)
6) a. Turn the power ON
b. Adjust VR1 slightly so that the center of marker 9
coincides with the center of marker 0 in the STOP
mode as shown on Fig. 4-2. (The marker 0 on the
CAM WHEEL can be seen clearly by lighting it from
the back.)
c. Set the IPLS switch to ON.
d. Turn the reel with fingers in STOP mode to check
that the brake works sufficiently. When the brake
acts normally, the take -up reel does not turn clock-
wise and the supply reel does not rotate counter
clock wise.